Filecollection Org Pdf Signing Naturally Download
Dependency management in Gradle
What is dependency management?
Software projects rarely work in isolation. In most cases, a project relies on reusable functionality in the form of libraries or is broken up into individual components to compose a modularized system. Dependency management is a technique for declaring, resolving and using dependencies required by the project in an automated fashion.
| For a general overview on the terms used throughout the user guide, refer to Dependency Management Terminology. |
Dependency management in Gradle
Gradle has built-in support for dependency management and lives up to the task of fulfilling typical scenarios encountered in modern software projects. We'll explore the main concepts with the help of an example project. The illustration below should give you an rough overview on all the moving parts.
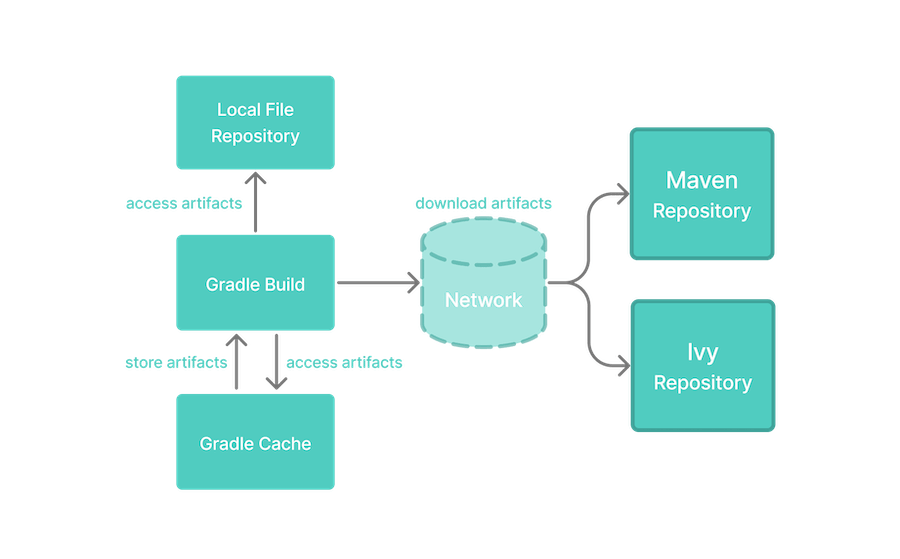
Figure 1. Dependency management big picture
The example project builds Java source code. Some of the Java source files import classes from Google Guava, a open-source library providing a wealth of utility functionality. In addition to Guava, the project needs the JUnit libraries for compiling and executing test code.
Guava and JUnit represent the dependencies of this project. A build script developer can declare dependencies for different scopes e.g. just for compilation of source code or for executing tests. In Gradle, the scope of a dependency is called a configuration. For a full overview, see the reference material on dependency types.
Often times dependencies come in the form of modules. You'll need to tell Gradle where to find those modules so they can be consumed by the build. The location for storing modules is called a repository. By declaring repositories for a build, Gradle will know how to find and retrieve modules. Repositories can come in different forms: as local directory or a remote repository. The reference on repository types provides a broad coverage on this topic.
At runtime, Gradle will locate the declared dependencies if needed for operating a specific task. The dependencies might need to be downloaded from a remote repository, retrieved from a local directory or requires another project to be built in a multi-project setting. This process is called dependency resolution. You can find a detailed discussion in How Gradle downloads dependencies.
Once resolved, the resolution mechanism stores the underlying files of a dependency in a local cache, also referred to as the dependency cache. Future builds reuse the files stored in the cache to avoid unnecessary network calls.
Modules can provide additional metadata. Metadata is the data that describes the module in more detail e.g. the coordinates for finding it in a repository, information about the project, or its authors. As part of the metadata, a module can define that other modules are needed for it to work properly. For example, the JUnit 5 platform module also requires the platform commons module. Gradle automatically resolves those additional modules, so called transitive dependencies. If needed, you can customize the behavior the handling of transitive dependencies to your project's requirements.
Projects with tens or hundreds of declared dependencies can easily suffer from dependency hell. Gradle provides sufficient tooling to visualize, navigate and analyze the dependency graph of a project either with the help of a build scan or built-in tasks. Learn more in Viewing and debugging dependencies.
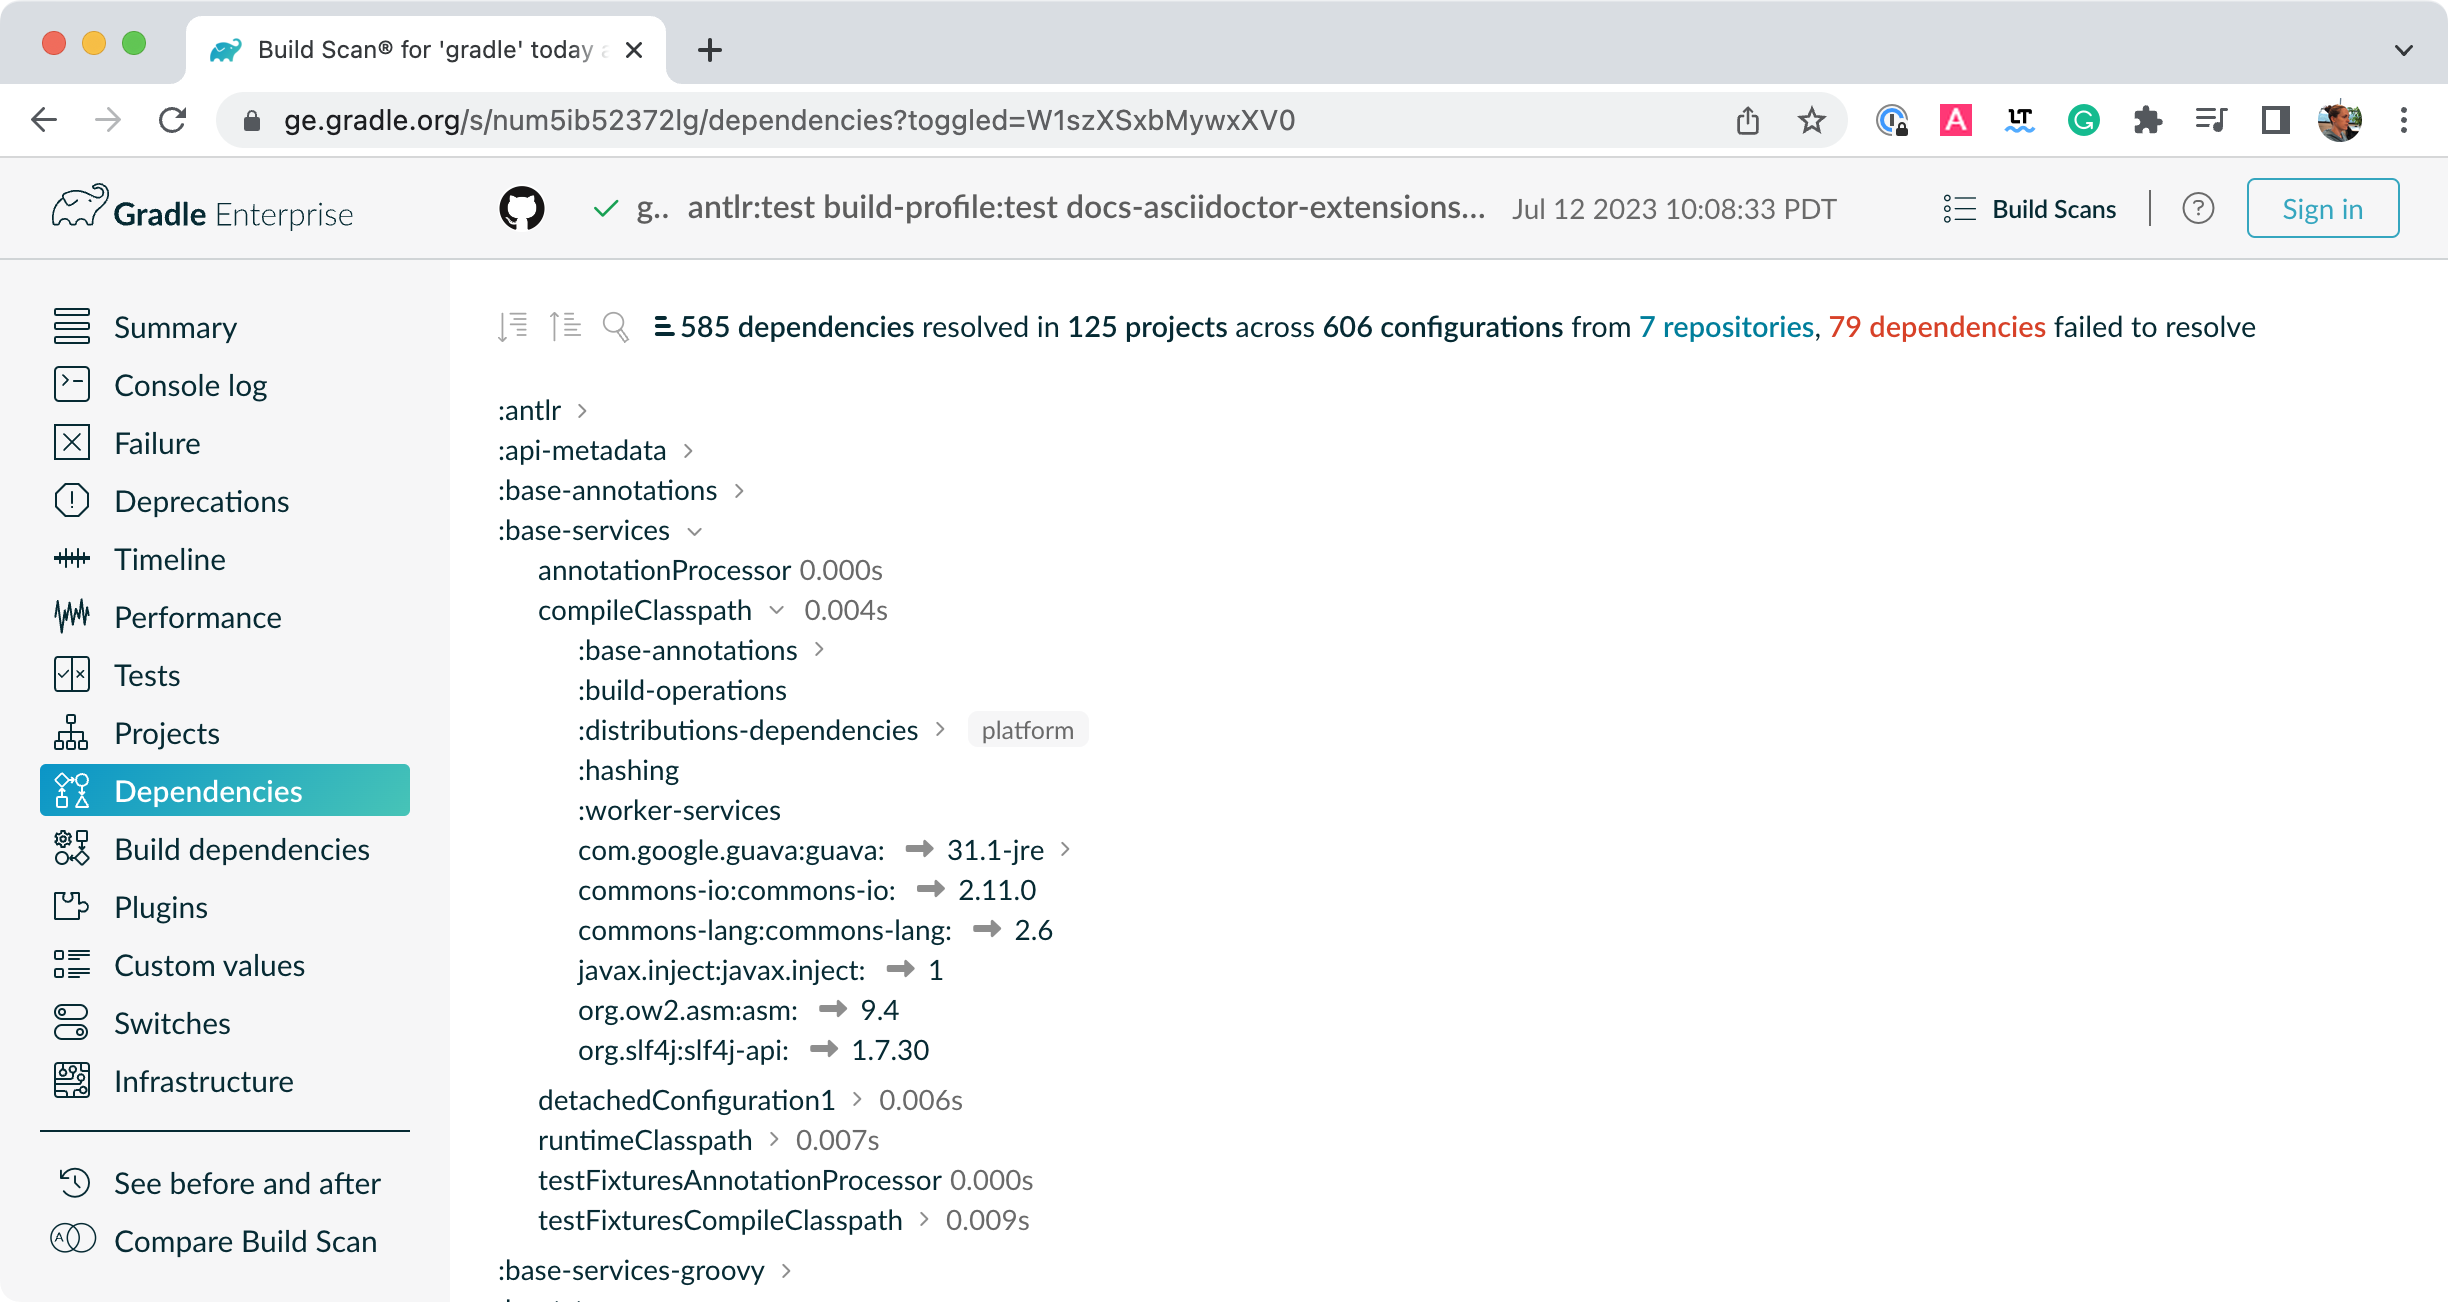
Figure 2. Build scan dependencies report
Declaring repositories
Gradle can resolve dependencies from one or many repositories based on Maven, Ivy or flat directory formats. Check out the full reference on all types of repositories for more information.
Declaring a publicly-available repository
Organizations building software may want to leverage public binary repositories to download and consume open source dependencies. Popular public repositories include Maven Central and the Google Android repository. Gradle provides built-in shorthand notations for these widely-used repositories.
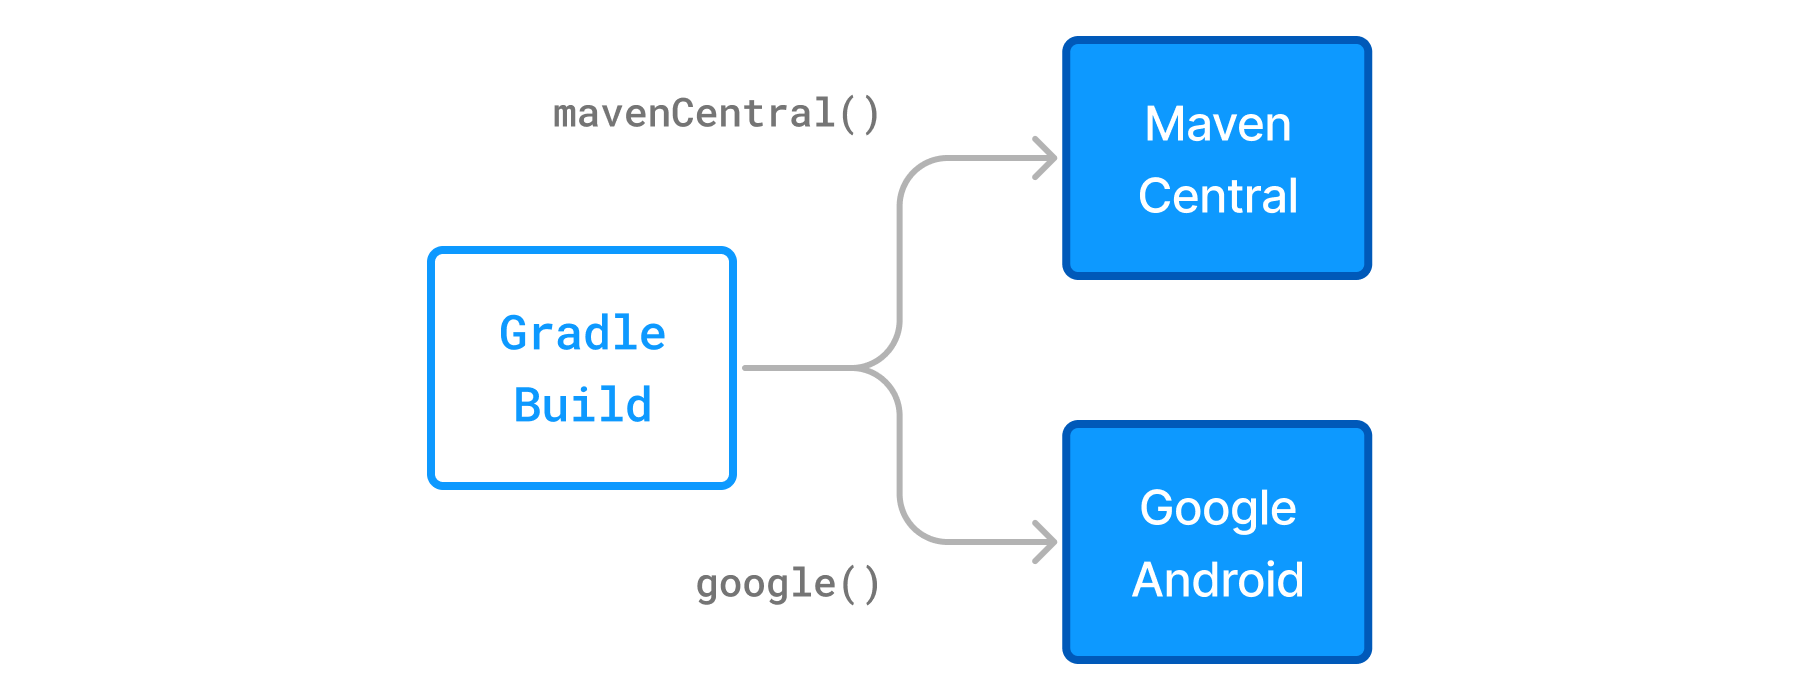
Figure 3. Declaring a repository with the help of shorthand notations
Under the covers Gradle resolves dependencies from the respective URL of the public repository defined by the shorthand notation. All shorthand notations are available via the RepositoryHandler API. Alternatively, you can spell out the URL of the repository for more fine-grained control.
Maven Central repository
Maven Central is a popular repository hosting open source libraries for consumption by Java projects.
Example 1. Adding central Maven repository
build.gradle
repositories { mavenCentral() } build.gradle.kts
repositories { mavenCentral() } Google Maven repository
The Google repository hosts Android-specific artifacts including the Android SDK. For usage examples, see the relevant Android documentation.
Example 2. Adding Google Maven repository
build.gradle
repositories { google() } build.gradle.kts
repositories { google() } Declaring a custom repository by URL
Most enterprise projects set up a binary repository available only within an intranet. In-house repositories enable teams to publish internal binaries, setup user management and security measure and ensure uptime and availability. Specifying a custom URL is also helpful if you want to declare a less popular, but publicly-available repository.
Repositories with custom URLs can be specified as Maven or Ivy repositories by calling the corresponding methods available on the RepositoryHandler API. Gradle supports other protocols than http or https as part of the custom URL e.g. file, sftp or s3. For a full coverage see the section on supported repository types.
You can also define your own repository layout by using ivy { } repositories as they are very flexible in terms of how modules are organised in a repository.
Declaring multiple repositories
You can define more than one repository for resolving dependencies. Declaring multiple repositories is helpful if some dependencies are only available in one repository but not the other. You can mix any type of repository described in the reference section.
This example demonstrates how to declare various named and custom URL repositories for a project:
Example 3. Declaring multiple repositories
build.gradle
repositories { mavenCentral() maven { url "https://repo.spring.io/release" } maven { url "https://maven.restlet.com" } } build.gradle.kts
repositories { mavenCentral() maven { url = uri("https://repo.spring.io/release") } maven { url = uri("https://maven.restlet.com") } } | The order of declaration determines how Gradle will check for dependencies at runtime. If Gradle finds a module descriptor in a particular repository, it will attempt to download all of the artifacts for that module from the same repository. You can learn more about the inner workings of dependency downloads. |
Strict limitation to declared repositories
Maven POM metadata can reference additional repositories. These will be ignored by Gradle, which will only use the repositories declared in the build itself.
| This is a reproducibility safe-guard but also a security protection. Without it, an updated version of a dependency could pull artifacts from anywhere into your build. |
Supported repository types
Gradle supports a wide range of sources for dependencies, both in terms of format and in terms of connectivity. You may resolve dependencies from:
-
Different formats
-
a Maven compatible artifact repository (e.g: Maven Central)
-
an Ivy compatible artifact repository (including custom layouts)
-
local (flat) directories
-
-
with different connectivity
-
authenticated repositories
-
a wide variety of remote protocols such as HTTPS, SFTP, AWS S3 and Google Cloud Storage
-
Flat directory repository
Some projects might prefer to store dependencies on a shared drive or as part of the project source code instead of a binary repository product. If you want to use a (flat) filesystem directory as a repository, simply type:
Example 4. Flat repository resolver
build.gradle
repositories { flatDir { dirs 'lib' } flatDir { dirs 'lib1', 'lib2' } } build.gradle.kts
repositories { flatDir { dirs("lib") } flatDir { dirs("lib1", "lib2") } } This adds repositories which look into one or more directories for finding dependencies.
This type of repository does not support any meta-data formats like Ivy XML or Maven POM files. Instead, Gradle will dynamically generate a module descriptor (without any dependency information) based on the presence of artifacts.
| As Gradle prefers to use modules whose descriptor has been created from real meta-data rather than being generated, flat directory repositories cannot be used to override artifacts with real meta-data from other repositories declared in the build. For example, if Gradle finds only For the use case of overriding remote artifacts with local ones consider using an Ivy or Maven repository instead whose URL points to a local directory. |
If you only work with flat directory repositories you don't need to set all attributes of a dependency.
Local repositories
The following sections describe repositories format, Maven or Ivy. These can be declared as local repositories, using a local filesystem path to access them.
The difference with the flat directory repository is that they do respect a format and contain metadata.
When such a repository is configured, Gradle totally bypasses its dependency cache for it as there can be no guarantee that content may not change between executions. Because of that limitation, they can have a performance impact.
They also make build reproducibility much harder to achieve and their use should be limited to tinkering or prototyping.
Maven repositories
Many organizations host dependencies in an in-house Maven repository only accessible within the company's network. Gradle can declare Maven repositories by URL.
For adding a custom Maven repository you can do:
Example 5. Adding custom Maven repository
build.gradle
repositories { maven { url "http://repo.mycompany.com/maven2" } } build.gradle.kts
repositories { maven { url = uri("http://repo.mycompany.com/maven2") } } Setting up composite Maven repositories
Sometimes a repository will have the POMs published to one location, and the JARs and other artifacts published at another location. To define such a repository, you can do:
Example 6. Adding additional Maven repositories for JAR files
build.gradle
repositories { maven { // Look for POMs and artifacts, such as JARs, here url "http://repo2.mycompany.com/maven2" // Look for artifacts here if not found at the above location artifactUrls "http://repo.mycompany.com/jars" artifactUrls "http://repo.mycompany.com/jars2" } } build.gradle.kts
repositories { maven { // Look for POMs and artifacts, such as JARs, here url = uri("http://repo2.mycompany.com/maven2") // Look for artifacts here if not found at the above location artifactUrls("http://repo.mycompany.com/jars") artifactUrls("http://repo.mycompany.com/jars2") } } Gradle will look at the base url location for the POM and the JAR. If the JAR can't be found there, the extra artifactUrls are used to look for JARs.
Accessing authenticated Maven repositories
You can specify credentials for Maven repositories secured by different type of authentication.
See Supported repository transport protocols for authentication options.
Local Maven repository
Gradle can consume dependencies available in the local Maven repository. Declaring this repository is beneficial for teams that publish to the local Maven repository with one project and consume the artifacts by Gradle in another project.
| Gradle stores resolved dependencies in its own cache. A build does not need to declare the local Maven repository even if you resolve dependencies from a Maven-based, remote repository. |
| Before adding Maven local as a repository, you should make sure this is really required. |
To declare the local Maven cache as a repository add this to your build script:
Example 7. Adding the local Maven cache as a repository
build.gradle
repositories { mavenLocal() } build.gradle.kts
repositories { mavenLocal() } Gradle uses the same logic as Maven to identify the location of your local Maven cache. If a local repository location is defined in a settings.xml, this location will be used. The settings.xml in USER_HOME/.m2 takes precedence over the settings.xml in M2_HOME/conf. If no settings.xml is available, Gradle uses the default location USER_HOME/.m2/repository.
The case for mavenLocal()
As a general advice, you should avoid adding mavenLocal() as a repository. There are different issues with using mavenLocal() that you should be aware of:
-
Maven uses it as a cache, not a repository, meaning it can contain partial modules.
-
For example, if Maven never downloaded the source or javadoc files for a given module, Gradle will not find them either since it searches for files in a single repository once a module has been found.
-
-
As a local repository, Gradle does not trust its content, because:
-
Origin of artifacts cannot be tracked, which is a correctness and security problem
-
Artifacts can be easily overwritten, which is a security, correctness and reproducibility problem
-
-
To mitigate the fact that metadata and/or artifacts can be changed, Gradle does not perform any caching for local repositories
-
As a consequence, your builds are slower
-
Given that order of repositories is important, adding
mavenLocal()first means that all your builds are going to be slower
-
There are a few cases where you might have to use mavenLocal():
-
For interoperability with Maven
-
For example, project A is built with Maven, project B is built with Gradle, and you need to share the artifacts during development
-
It is always preferable to use an internal full featured repository instead
-
In case this is not possible, you should limit this to local builds only
-
-
For interoperability with Gradle itself
-
In a multi-repository world, you want to check that changes to project A work with project B
-
It is preferable to use composite builds for this use case
-
If for some reason neither composite builds nor full featured repository are possible, then
mavenLocal()is a last resort option
-
After all these warnings, if you end up using mavenLocal(), consider combining it with a repository filter. This will make sure it only provides what is expected and nothing else.
Ivy repositories
Organizations might decide to host dependencies in an in-house Ivy repository. Gradle can declare Ivy repositories by URL.
Defining an Ivy repository with a standard layout
To declare an Ivy repository using the standard layout no additional customization is needed. You just declare the URL.
Example 8. Ivy repository
build.gradle
repositories { ivy { url "http://repo.mycompany.com/repo" } } build.gradle.kts
repositories { ivy { url = uri("http://repo.mycompany.com/repo") } } Defining a named layout for an Ivy repository
You can specify that your repository conforms to the Ivy or Maven default layout by using a named layout.
Example 9. Ivy repository with named layout
build.gradle
repositories { ivy { url "http://repo.mycompany.com/repo" layout "maven" } } build.gradle.kts
repositories { ivy { url = uri("http://repo.mycompany.com/repo") layout("maven") } } Defining custom pattern layout for an Ivy repository
To define an Ivy repository with a non-standard layout, you can define a pattern layout for the repository:
Example 10. Ivy repository with pattern layout
build.gradle
repositories { ivy { url "http://repo.mycompany.com/repo" patternLayout { artifact "[module]/[revision]/[type]/[artifact].[ext]" } } } build.gradle.kts
repositories { ivy { url = uri("http://repo.mycompany.com/repo") patternLayout { artifact("[module]/[revision]/[type]/[artifact].[ext]") } } } To define an Ivy repository which fetches Ivy files and artifacts from different locations, you can define separate patterns to use to locate the Ivy files and artifacts:
Each artifact or ivy specified for a repository adds an additional pattern to use. The patterns are used in the order that they are defined.
Example 11. Ivy repository with multiple custom patterns
build.gradle
repositories { ivy { url "http://repo.mycompany.com/repo" patternLayout { artifact "3rd-party-artifacts/[organisation]/[module]/[revision]/[artifact]-[revision].[ext]" artifact "company-artifacts/[organisation]/[module]/[revision]/[artifact]-[revision].[ext]" ivy "ivy-files/[organisation]/[module]/[revision]/ivy.xml" } } } build.gradle.kts
repositories { ivy { url = uri("http://repo.mycompany.com/repo") patternLayout { artifact("3rd-party-artifacts/[organisation]/[module]/[revision]/[artifact]-[revision].[ext]") artifact("company-artifacts/[organisation]/[module]/[revision]/[artifact]-[revision].[ext]") ivy("ivy-files/[organisation]/[module]/[revision]/ivy.xml") } } } Optionally, a repository with pattern layout can have its 'organisation' part laid out in Maven style, with forward slashes replacing dots as separators. For example, the organisation my.company would then be represented as my/company.
Example 12. Ivy repository with Maven compatible layout
build.gradle
repositories { ivy { url "http://repo.mycompany.com/repo" patternLayout { artifact "[organisation]/[module]/[revision]/[artifact]-[revision].[ext]" m2compatible = true } } } build.gradle.kts
repositories { ivy { url = uri("http://repo.mycompany.com/repo") patternLayout { artifact("[organisation]/[module]/[revision]/[artifact]-[revision].[ext]") setM2compatible(true) } } } Accessing authenticated Ivy repositories
You can specify credentials for Ivy repositories secured by basic authentication.
Example 13. Ivy repository with authentication
build.gradle
repositories { ivy { url "http://repo.mycompany.com" credentials { username "user" password "password" } } } build.gradle.kts
repositories { ivy { url = uri("http://repo.mycompany.com") credentials { username = "user" password = "password" } } } See Supported repository transport protocols for authentication options.
Repository content filtering
Gradle exposes an API to declare what a repository may or may not contain. There are different use cases for it:
-
performance, when you know a dependency will never be found in a specific repository
-
security, by avoiding leaking what dependencies are used in a private project
-
reliability, when some repositories contain corrupted metadata or artifacts
It's even more important when considering that the declared order of repositories matter.
Declaring a repository filter
Example 14. Declaring repository contents
build.gradle
repositories { maven { url "https://repo.mycompany.com/maven2" content { // this repository *only* contains artifacts with group "my.company" includeGroup "my.company" } } mavenCentral { content { // this repository contains everything BUT artifacts with group starting with "my.company" excludeGroupByRegex "my\\.company.*" } } } build.gradle.kts
repositories { maven { url = uri("https://repo.mycompany.com/maven2") content { // this repository *only* contains artifacts with group "my.company" includeGroup("my.company") } } mavenCentral { content { // this repository contains everything BUT artifacts with group starting with "my.company" excludeGroupByRegex("my\\.company.*") } } } By default, repositories include everything and exclude nothing:
-
If you declare an include, then it excludes everything but what is included.
-
If you declare an exclude, then it includes everything but what is excluded.
-
If you declare both includes and excludes, then it includes only what is explicitly included and not excluded.
It is possible to filter either by explicit group, module or version, either strictly or using regular expressions. When using a strict version, it is possible to use a version range, using the format supported by Gradle. In addition, there are filtering options by resolution context: configuration name or even configuration attributes. See RepositoryContentDescriptor for details.
Declaring content exclusively found in one repository
Filters declared using the repository-level content filter are not exclusive. This means that declaring that a repository includes an artifact doesn't mean that the other repositories can't have it either: you must declare what every repository contains in extension.
Alternatively, Gradle provides an API which lets you declare that a repository exclusively includes an artifact. If you do so:
-
an artifact declared in a repository can't be found in any other
-
exclusive repository content must be declared in extension (just like for repository-level content)
Example 15. Declaring exclusive repository contents
build.gradle
repositories { // This repository will _not_ be searched for artifacts in my.company // despite being declared first mavenCentral() exclusiveContent { forRepository { maven { url "https://repo.mycompany.com/maven2" } } filter { // this repository *only* contains artifacts with group "my.company" includeGroup "my.company" } } } build.gradle.kts
repositories { // This repository will _not_ be searched for artifacts in my.company // despite being declared first mavenCentral() exclusiveContent { forRepository { maven { url = uri("https://repo.mycompany.com/maven2") } } filter { // this repository *only* contains artifacts with group "my.company" includeGroup("my.company") } } } It is possible to filter either by explicit group, module or version, either strictly or using regular expressions. See InclusiveRepositoryContentDescriptor for details.
| If you leverage exclusive content filtering in the Your options are either to declare all repositories in settings or to use non-exclusive content filtering. |
Maven repository filtering
For Maven repositories, it's often the case that a repository would either contain releases or snapshots. Gradle lets you declare what kind of artifacts are found in a repository using this DSL:
Example 16. Splitting snapshots and releases
build.gradle
repositories { maven { url "https://repo.mycompany.com/releases" mavenContent { releasesOnly() } } maven { url "https://repo.mycompany.com/snapshots" mavenContent { snapshotsOnly() } } } build.gradle.kts
repositories { maven { url = uri("https://repo.mycompany.com/releases") mavenContent { releasesOnly() } } maven { url = uri("https://repo.mycompany.com/snapshots") mavenContent { snapshotsOnly() } } } Supported metadata sources
When searching for a module in a repository, Gradle, by default, checks for supported metadata file formats in that repository. In a Maven repository, Gradle looks for a .pom file, in an ivy repository it looks for an ivy.xml file and in a flat directory repository it looks directly for .jar files as it does not expect any metadata. Starting with 5.0, Gradle also looks for .module (Gradle module metadata) files.
However, if you define a customized repository you might want to configure this behavior. For example, you can define a Maven repository without .pom files but only jars. To do so, you can configure metadata sources for any repository.
Example 17. Maven repository that supports artifacts without metadata
build.gradle
repositories { maven { url "http://repo.mycompany.com/repo" metadataSources { mavenPom() artifact() } } } build.gradle.kts
repositories { maven { url = uri("http://repo.mycompany.com/repo") metadataSources { mavenPom() artifact() } } } You can specify multiple sources to tell Gradle to keep looking if a file was not found. In that case, the order of checking for sources is predefined.
The following metadata sources are supported:
| Metadata source | Description | Order | Maven | Ivy / flat dir |
|---|---|---|---|---|
| | Look for Gradle | 1st | yes | yes |
| | Look for Maven | 2nd | yes | yes |
| | Look for | 2nd | no | yes |
| | Look directly for artifact | 3rd | yes | yes |
| The defaults for Ivy and Maven repositories change with Gradle 6.0. Before 6.0, |
Since Gradle 5.3, when parsing a metadata file, be it Ivy or Maven, Gradle will look for a marker indicating that a matching Gradle Module Metadata files exists. If it is found, it will be used instead of the Ivy or Maven file.
Starting with Gradle 5.6, you can disable this behavior by adding ignoreGradleMetadataRedirection() to the metadataSources declaration.
Example 18. Maven repository that does not use gradle metadata redirection
build.gradle
repositories { maven { url "http://repo.mycompany.com/repo" metadataSources { mavenPom() artifact() ignoreGradleMetadataRedirection() } } } build.gradle.kts
repositories { maven { url = uri("http://repo.mycompany.com/repo") metadataSources { mavenPom() artifact() ignoreGradleMetadataRedirection() } } } Plugin repositories vs. build repositories
Gradle will use repositories at two different phases during your build.
The first phase is when configuring your build and loading the plugins it applied. To do that Gradle will use a special set of repositories.
The second phase is during dependency resolution. At this point Gradle will use the repositories declared in your project, as shown in the previous sections.
Plugin repositories
However, for different reasons, there are plugins available in other, public or not, repositories. When a build requires one of these plugins, additional repositories need to be specified so that Gradle knows where to search.
As the way to declare the repositories and what they are expected to contain depends on the way the plugin is applied, it is best to refer to Custom Plugin Repositories.
Centralizing repositories declaration
Instead of declaring repositories in every subproject of your build or via an allprojects block, Gradle offers a way to declare them in a central place for all project.
| Central declaration of repositories is an incubating feature |
Repositories used by convention by every subproject can be declared in the settings.gradle(.kts) file:
Example 19. Declaring a Maven repository in settings
settings.gradle
dependencyResolutionManagement { repositories { mavenCentral() } } settings.gradle.kts
dependencyResolutionManagement { repositories { mavenCentral() } } The dependencyResolutionManagement repositories block accepts the same notations as in a project, which includes Maven or Ivy repositories, with or without credentials, etc.
By default, repositories declared by a project will override whatever is declared in settings. You can change this behavior to make sure that you always use the settings repositories:
Example 20. Preferring settings repositories
settings.gradle
dependencyResolutionManagement { repositoriesMode.set(RepositoriesMode.PREFER_SETTINGS) } settings.gradle.kts
dependencyResolutionManagement { repositoriesMode.set(RepositoriesMode.PREFER_SETTINGS) } If, for some reason, a project or a plugin declares a repository in a project, Gradle would warn you. You can however make it fail the build if you want to enforce that only settings repositories are used:
Example 21. Enforcing settings repositories
settings.gradle
dependencyResolutionManagement { repositoriesMode.set(RepositoriesMode.FAIL_ON_PROJECT_REPOS) } settings.gradle.kts
dependencyResolutionManagement { repositoriesMode.set(RepositoriesMode.FAIL_ON_PROJECT_REPOS) } Eventually, the default is equivalent to setting PREFER_PROJECT:
Example 22. Preferring project repositories
settings.gradle
dependencyResolutionManagement { repositoriesMode.set(RepositoriesMode.PREFER_PROJECT) } settings.gradle.kts
dependencyResolutionManagement { repositoriesMode.set(RepositoriesMode.PREFER_PROJECT) } Supported repository transport protocols
Maven and Ivy repositories support the use of various transport protocols. At the moment the following protocols are supported:
| Type | Credential types | Link |
|---|---|---|
| | none | |
| | username/password | Documentation |
| | username/password | Documentation |
| | username/password | Documentation |
| | access key/secret key/session token or Environment variables | Documentation |
| | default application credentials sourced from well known files, Environment variables etc. | Documentation |
| Username and password should never be checked in plain text into version control as part of your build file. You can store the credentials in a local |
The transport protocol is part of the URL definition for a repository. The following build script demonstrates how to create HTTP-based Maven and Ivy repositories:
Example 23. Declaring a Maven and Ivy repository
build.gradle
repositories { maven { url "http://repo.mycompany.com/maven2" } ivy { url "http://repo.mycompany.com/repo" } } build.gradle.kts
repositories { maven { url = uri("http://repo.mycompany.com/maven2") } ivy { url = uri("http://repo.mycompany.com/repo") } } The following example shows how to declare SFTP repositories:
Example 24. Using the SFTP protocol for a repository
build.gradle
repositories { maven { url "sftp://repo.mycompany.com:22/maven2" credentials { username "user" password "password" } } ivy { url "sftp://repo.mycompany.com:22/repo" credentials { username "user" password "password" } } } build.gradle.kts
repositories { maven { url = uri("sftp://repo.mycompany.com:22/maven2") credentials { username = "user" password = "password" } } ivy { url = uri("sftp://repo.mycompany.com:22/repo") credentials { username = "user" password = "password" } } } For details on HTTP related authentication, see the section HTTP(S) authentication schemes configuration.
When using an AWS S3 backed repository you need to authenticate using AwsCredentials, providing access-key and a private-key. The following example shows how to declare a S3 backed repository and providing AWS credentials:
Example 25. Declaring an S3 backed Maven and Ivy repository
build.gradle
repositories { maven { url "s3://myCompanyBucket/maven2" credentials(AwsCredentials) { accessKey "someKey" secretKey "someSecret" // optional sessionToken "someSTSToken" } } ivy { url "s3://myCompanyBucket/ivyrepo" credentials(AwsCredentials) { accessKey "someKey" secretKey "someSecret" // optional sessionToken "someSTSToken" } } } build.gradle.kts
repositories { maven { url = uri("s3://myCompanyBucket/maven2") credentials(AwsCredentials::class) { accessKey = "someKey" secretKey = "someSecret" // optional sessionToken = "someSTSToken" } } ivy { url = uri("s3://myCompanyBucket/ivyrepo") credentials(AwsCredentials::class) { accessKey = "someKey" secretKey = "someSecret" // optional sessionToken = "someSTSToken" } } } You can also delegate all credentials to the AWS sdk by using the AwsImAuthentication. The following example shows how:
Example 26. Declaring an S3 backed Maven and Ivy repository using IAM
build.gradle
repositories { maven { url "s3://myCompanyBucket/maven2" authentication { awsIm(AwsImAuthentication) // load from EC2 role or env var } } ivy { url "s3://myCompanyBucket/ivyrepo" authentication { awsIm(AwsImAuthentication) } } } build.gradle.kts
repositories { maven { url = uri("s3://myCompanyBucket/maven2") authentication { create<AwsImAuthentication>("awsIm") // load from EC2 role or env var } } ivy { url = uri("s3://myCompanyBucket/ivyrepo") authentication { create<AwsImAuthentication>("awsIm") } } } For details on AWS S3 related authentication, see the section AWS S3 repositories configuration.
When using a Google Cloud Storage backed repository default application credentials will be used with no further configuration required:
Example 27. Declaring a Google Cloud Storage backed Maven and Ivy repository using default application credentials
build.gradle
repositories { maven { url "gcs://myCompanyBucket/maven2" } ivy { url "gcs://myCompanyBucket/ivyrepo" } } build.gradle.kts
repositories { maven { url = uri("gcs://myCompanyBucket/maven2") } ivy { url = uri("gcs://myCompanyBucket/ivyrepo") } } For details on Google GCS related authentication, see the section Google Cloud Storage repositories configuration.
HTTP(S) authentication schemes configuration
When configuring a repository using HTTP or HTTPS transport protocols, multiple authentication schemes are available. By default, Gradle will attempt to use all schemes that are supported by the Apache HttpClient library, documented here. In some cases, it may be preferable to explicitly specify which authentication schemes should be used when exchanging credentials with a remote server. When explicitly declared, only those schemes are used when authenticating to a remote repository.
You can specify credentials for Maven repositories secured by basic authentication using PasswordCredentials.
Example 28. Accessing password-protected Maven repository
build.gradle
repositories { maven { url "http://repo.mycompany.com/maven2" credentials { username "user" password "password" } } } build.gradle.kts
repositories { maven { url = uri("http://repo.mycompany.com/maven2") credentials { username = "user" password = "password" } } } The following example show how to configure a repository to use only DigestAuthentication:
Example 29. Configure repository to use only digest authentication
build.gradle
repositories { maven { url 'https://repo.mycompany.com/maven2' credentials { username "user" password "password" } authentication { digest(DigestAuthentication) } } } build.gradle.kts
repositories { maven { url = uri("https://repo.mycompany.com/maven2") credentials { username = "user" password = "password" } authentication { create<DigestAuthentication>("digest") } } } Currently supported authentication schemes are:
Using preemptive authentication
Gradle's default behavior is to only submit credentials when a server responds with an authentication challenge in the form of an HTTP 401 response. In some cases, the server will respond with a different code (ex. for repositories hosted on GitHub a 404 is returned) causing dependency resolution to fail. To get around this behavior, credentials may be sent to the server preemptively. To enable preemptive authentication simply configure your repository to explicitly use the BasicAuthentication scheme:
Example 30. Configure repository to use preemptive authentication
build.gradle
repositories { maven { url 'https://repo.mycompany.com/maven2' credentials { username "user" password "password" } authentication { basic(BasicAuthentication) } } } build.gradle.kts
repositories { maven { url = uri("https://repo.mycompany.com/maven2") credentials { username = "user" password = "password" } authentication { create<BasicAuthentication>("basic") } } } You can specify any HTTP header for secured Maven repositories requiring token, OAuth2 or other HTTP header based authentication using HttpHeaderCredentials with HttpHeaderAuthentication.
Example 31. Accessing header-protected Maven repository
build.gradle
repositories { maven { url "http://repo.mycompany.com/maven2" credentials(HttpHeaderCredentials) { name = "Private-Token" value = "TOKEN" } authentication { header(HttpHeaderAuthentication) } } } build.gradle.kts
repositories { maven { url = uri("http://repo.mycompany.com/maven2") credentials(HttpHeaderCredentials::class) { name = "Private-Token" value = "TOKEN" } authentication { create<HttpHeaderAuthentication>("header") } } } AWS S3 repositories configuration
S3 configuration properties
The following system properties can be used to configure the interactions with s3 repositories:
-
org.gradle.s3.endpoint -
Used to override the AWS S3 endpoint when using a non AWS, S3 API compatible, storage service.
-
org.gradle.s3.maxErrorRetry -
Specifies the maximum number of times to retry a request in the event that the S3 server responds with a HTTP 5xx status code. When not specified a default value of 3 is used.
S3 URL formats
S3 URL's are 'virtual-hosted-style' and must be in the following format
s3://<bucketName>[.<regionSpecificEndpoint>]/<s3Key>
e.g. s3://myBucket.s3.eu-central-1.amazonaws.com/maven/release
-
myBucketis the AWS S3 bucket name. -
s3.eu-central-1.amazonaws.comis the optional region specific endpoint. -
/maven/releaseis the AWS S3 key (unique identifier for an object within a bucket)
S3 proxy settings
A proxy for S3 can be configured using the following system properties:
-
https.proxyHost -
https.proxyPort -
https.proxyUser -
https.proxyPassword -
http.nonProxyHosts
If the org.gradle.s3.endpoint property has been specified with a HTTP (not HTTPS) URI the following system proxy settings can be used:
-
http.proxyHost -
http.proxyPort -
http.proxyUser -
http.proxyPassword -
http.nonProxyHosts
AWS S3 V4 Signatures (AWS4-HMAC-SHA256)
Some of the AWS S3 regions (eu-central-1 - Frankfurt) require that all HTTP requests are signed in accordance with AWS's signature version 4. It is recommended to specify S3 URL's containing the region specific endpoint when using buckets that require V4 signatures. e.g.
s3://somebucket.s3.eu-central-1.amazonaws.com/maven/release
| When a region-specific endpoint is not specified for buckets requiring V4 Signatures, Gradle will use the default AWS region (us-east-1) and the following warning will appear on the console:
Failing to specify the region-specific endpoint for buckets requiring V4 signatures means:
|
AWS S3 Cross Account Access
Some organizations may have multiple AWS accounts, e.g. one for each team. The AWS account of the bucket owner is often different from the artifact publisher and consumers. The bucket owner needs to be able to grant the consumers access otherwise the artifacts will only be usable by the publisher's account. This is done by adding the bucket-owner-full-control Canned ACL to the uploaded objects. Gradle will do this in every upload. Make sure the publisher has the required IAM permission, PutObjectAcl (and PutObjectVersionAcl if bucket versioning is enabled), either directly or via an assumed IAM Role (depending on your case). You can read more at AWS S3 Access Permissions.
Google Cloud Storage repositories configuration
GCS configuration properties
The following system properties can be used to configure the interactions with Google Cloud Storage repositories:
-
org.gradle.gcs.endpoint -
Used to override the Google Cloud Storage endpoint when using a non-Google Cloud Platform, Google Cloud Storage API compatible, storage service.
-
org.gradle.gcs.servicePath -
Used to override the Google Cloud Storage root service path which the Google Cloud Storage client builds requests from, defaults to
/.
GCS URL formats
Google Cloud Storage URL's are 'virtual-hosted-style' and must be in the following format gcs://<bucketName>/<objectKey>
e.g. gcs://myBucket/maven/release
-
myBucketis the Google Cloud Storage bucket name. -
/maven/releaseis the Google Cloud Storage key (unique identifier for an object within a bucket)
Handling credentials
Repository credentials should never be part of your build script but rather be kept external. Gradle provides an API in artifact repositories that allows you to declare only the type of required credentials. Credential values are looked up from the Gradle Properties during the build that requires them.
For example, given repository configuration:
Example 32. Externalized repository credentials
build.gradle
repositories { maven { name = 'mySecureRepository' credentials(PasswordCredentials) // url = uri(<<some repository url>>) } } build.gradle.kts
repositories { maven { name = "mySecureRepository" credentials(PasswordCredentials::class) // url = uri(<<some repository url>>) } } The username and password will be looked up from mySecureRepositoryUsername and mySecureRepositoryPassword properties.
Note that the configuration property prefix - the identity - is determined from the repository name. Credentials can then be provided in any of supported ways for Gradle Properties - gradle.properties file, command line arguments, environment variables or a combination of those options.
Also, note that credentials will only be required if the invoked build requires them. If for example a project is configured to publish artifacts to a secured repository, but the build does not invoke publishing task, Gradle will not require publishing credentials to be present. On the other hand, if the build needs to execute a task that requires credentials at some point, Gradle will check for credential presence first thing and will not start running any of the tasks if it knows that the build will fail at a later point because of missing credentials.
Lookup is only supported for credentials listed in the Table 3.
| Type | Argument | Base property name | Required? |
|---|---|---|---|
| | | | required |
| | | required | |
| | | | required |
| | | required | |
| | | optional | |
| | | | required |
| | | required |
Declaring dependencies
Before looking at dependency declarations themselves, the concept of dependency configuration needs to be defined.
What are dependency configurations
Every dependency declared for a Gradle project applies to a specific scope. For example some dependencies should be used for compiling source code whereas others only need to be available at runtime. Gradle represents the scope of a dependency with the help of a Configuration. Every configuration can be identified by a unique name.
Many Gradle plugins add pre-defined configurations to your project. The Java plugin, for example, adds configurations to represent the various classpaths it needs for source code compilation, executing tests and the like. See the Java plugin chapter for an example.
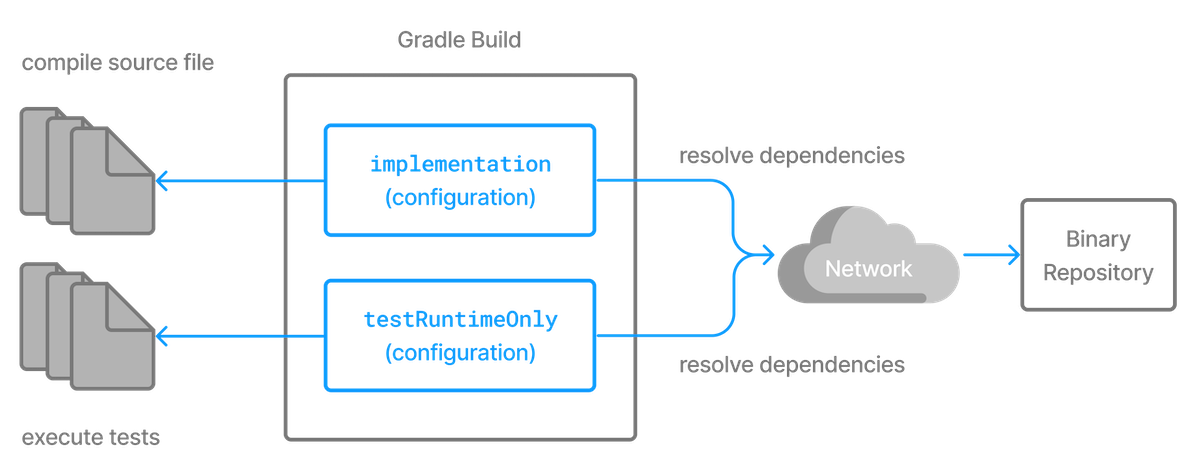
Figure 4. Configurations use declared dependencies for specific purposes
For more examples on the usage of configurations to navigate, inspect and post-process metadata and artifacts of assigned dependencies, have a look at the resolution result APIs.
Configuration inheritance and composition
A configuration can extend other configurations to form an inheritance hierarchy. Child configurations inherit the whole set of dependencies declared for any of its superconfigurations.
Configuration inheritance is heavily used by Gradle core plugins like the Java plugin. For example the testImplementation configuration extends the implementation configuration. The configuration hierarchy has a practical purpose: compiling tests requires the dependencies of the source code under test on top of the dependencies needed write the test class. A Java project that uses JUnit to write and execute test code also needs Guava if its classes are imported in the production source code.
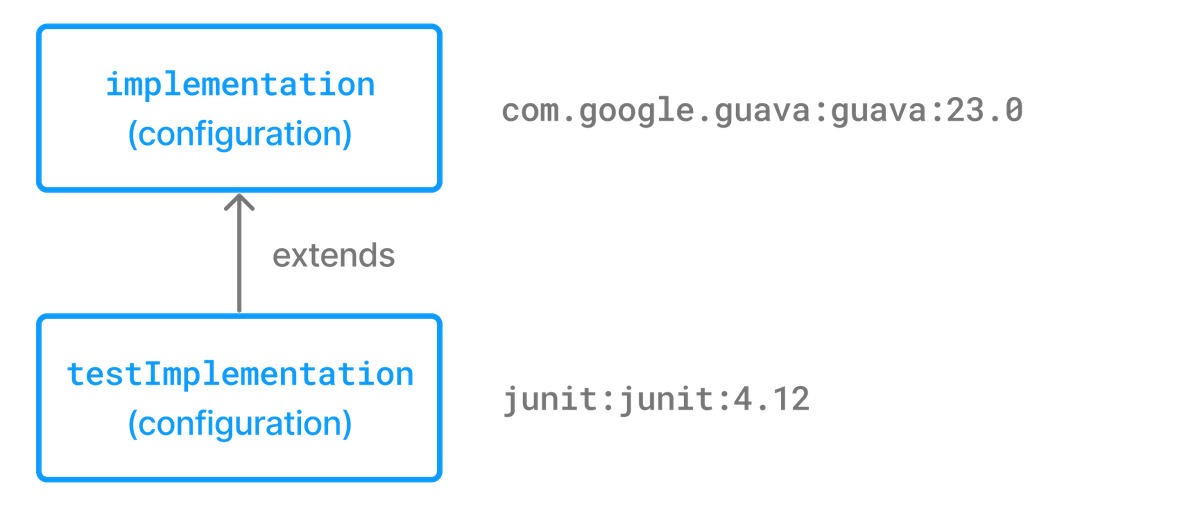
Figure 5. Configuration inheritance provided by the Java plugin
Under the covers the testImplementation and implementation configurations form an inheritance hierarchy by calling the method Configuration.extendsFrom(org.gradle.api.artifacts.Configuration[]). A configuration can extend any other configuration irrespective of its definition in the build script or a plugin.
Let's say you wanted to write a suite of smoke tests. Each smoke test makes a HTTP call to verify a web service endpoint. As the underlying test framework the project already uses JUnit. You can define a new configuration named smokeTest that extends from the testImplementation configuration to reuse the existing test framework dependency.
Example 33. Extending a configuration from another configuration
build.gradle
configurations { smokeTest.extendsFrom testImplementation } dependencies { testImplementation 'junit:junit:4.13' smokeTest 'org.apache.httpcomponents:httpclient:4.5.5' } build.gradle.kts
val smokeTest by configurations.creating { extendsFrom(configurations.testImplementation.get()) } dependencies { testImplementation("junit:junit:4.13") smokeTest("org.apache.httpcomponents:httpclient:4.5.5") } Resolvable and consumable configurations
Configurations are a fundamental part of dependency resolution in Gradle. In the context of dependency resolution, it is useful to distinguish between a consumer and a producer. Along these lines, configurations have at least 3 different roles:
-
to declare dependencies
-
as a consumer, to resolve a set of dependencies to files
-
as a producer, to expose artifacts and their dependencies for consumption by other projects (such consumable configurations usually represent the variants the producer offers to its consumers)
For example, to express that an application app depends on library lib, at least one configuration is required:
Example 34. Configurations are used to declare dependencies
build.gradle
configurations { // declare a "configuration" named "someConfiguration" someConfiguration } dependencies { // add a project dependency to the "someConfiguration" configuration someConfiguration project(":lib") } build.gradle.kts
// declare a "configuration" named "someConfiguration" val someConfiguration by configurations.creating dependencies { // add a project dependency to the "someConfiguration" configuration someConfiguration(project(":lib")) } Configurations can inherit dependencies from other configurations by extending from them. Now, notice that the code above doesn't tell us anything about the intended consumer of this configuration. In particular, it doesn't tell us how the configuration is meant to be used. Let's say that lib is a Java library: it might expose different things, such as its API, implementation, or test fixtures. It might be necessary to change how we resolve the dependencies of app depending upon the task we're performing (compiling against the API of lib, executing the application, compiling tests, etc.). To address this problem, you'll often find companion configurations, which are meant to unambiguously declare the usage:
Example 35. Configurations representing concrete dependency graphs
build.gradle
configurations { // declare a configuration that is going to resolve the compile classpath of the application compileClasspath.extendsFrom(someConfiguration) // declare a configuration that is going to resolve the runtime classpath of the application runtimeClasspath.extendsFrom(someConfiguration) } build.gradle.kts
configurations { // declare a configuration that is going to resolve the compile classpath of the application compileClasspath.extendsFrom(someConfiguration) // declare a configuration that is going to resolve the runtime classpath of the application runtimeClasspath.extendsFrom(someConfiguration) } At this point, we have 3 different configurations with different roles:
-
someConfigurationdeclares the dependencies of my application. It's just a bucket that can hold a list of dependencies. -
compileClasspathandruntimeClasspathare configurations meant to be resolved: when resolved they should contain the compile classpath, and the runtime classpath of the application respectively.
This distinction is represented by the canBeResolved flag in the Configuration type. A configuration that can be resolved is a configuration for which we can compute a dependency graph, because it contains all the necessary information for resolution to happen. That is to say we're going to compute a dependency graph, resolve the components in the graph, and eventually get artifacts. A configuration which has canBeResolved set to false is not meant to be resolved. Such a configuration is there only to declare dependencies. The reason is that depending on the usage (compile classpath, runtime classpath), it can resolve to different graphs. It is an error to try to resolve a configuration which has canBeResolved set to false. To some extent, this is similar to an abstract class (canBeResolved=false) which is not supposed to be instantiated, and a concrete class extending the abstract class (canBeResolved=true). A resolvable configuration will extend at least one non-resolvable configuration (and may extend more than one).
On the other end, at the library project side (the producer), we also use configurations to represent what can be consumed. For example, the library may expose an API or a runtime, and we would attach artifacts to either one, the other, or both. Typically, to compile against lib, we need the API of lib, but we don't need its runtime dependencies. So the lib project will expose an apiElements configuration, which is aimed at consumers looking for its API. Such a configuration is consumable, but is not meant to be resolved. This is expressed via the canBeConsumed flag of a Configuration:
Example 36. Setting up configurations
build.gradle
configurations { // A configuration meant for consumers that need the API of this component exposedApi { // This configuration is an "outgoing" configuration, it's not meant to be resolved canBeResolved = false // As an outgoing configuration, explain that consumers may want to consume it canBeConsumed = true } // A configuration meant for consumers that need the implementation of this component exposedRuntime { canBeResolved = false canBeConsumed = true } } build.gradle.kts
configurations { // A configuration meant for consumers that need the API of this component create("exposedApi") { // This configuration is an "outgoing" configuration, it's not meant to be resolved isCanBeResolved = false // As an outgoing configuration, explain that consumers may want to consume it isCanBeConsumed = true } // A configuration meant for consumers that need the implementation of this component create("exposedRuntime") { isCanBeResolved = false isCanBeConsumed = true } } In short, a configuration's role is determined by the canBeResolved and canBeConsumed flag combinations:
| Configuration role | can be resolved | can be consumed |
| Bucket of dependencies | false | false |
| Resolve for certain usage | true | false |
| Exposed to consumers | false | true |
| Legacy, don't use | true | true |
For backwards compatibility, both flags have a default value of true, but as a plugin author, you should always determine the right values for those flags, or you might accidentally introduce resolution errors.
Choosing the right configuration for dependencies
The choice of the configuration where you declare a dependency is important. However there is no fixed rule into which configuration a dependency must go. It mostly depends on the way the configurations are organised, which is most often a property of the applied plugin(s).
For example, in the java plugin, the created configuration are documented and should serve as the basis for determining where to declare a dependency, based on its role for your code.
As a recommendation, plugins should clearly document the way their configurations are linked together and should strive as much as possible to isolate their roles.
Defining custom configurations
You can define configurations yourself, so-called custom configurations. A custom configuration is useful for separating the scope of dependencies needed for a dedicated purpose.
Let's say you wanted to declare a dependency on the Jasper Ant task for the purpose of pre-compiling JSP files that should not end up in the classpath for compiling your source code. It's fairly simple to achieve that goal by introducing a custom configuration and using it in a task.
Example 37. Declaring and using a custom configuration
build.gradle
configurations { jasper } repositories { mavenCentral() } dependencies { jasper 'org.apache.tomcat.embed:tomcat-embed-jasper:9.0.2' } tasks.register('preCompileJsps') { doLast { ant.taskdef(classname: 'org.apache.jasper.JspC', name: 'jasper', classpath: configurations.jasper.asPath) ant.jasper(validateXml: false, uriroot: file('src/main/webapp'), outputDir: file("$buildDir/compiled-jsps")) } } build.gradle.kts
val jasper by configurations.creating repositories { mavenCentral() } dependencies { jasper("org.apache.tomcat.embed:tomcat-embed-jasper:9.0.2") } tasks.register("preCompileJsps") { doLast { ant.withGroovyBuilder { "taskdef"("classname" to "org.apache.jasper.JspC", "name" to "jasper", "classpath" to jasper.asPath) "jasper"("validateXml" to false, "uriroot" to file("src/main/webapp"), "outputDir" to file("$buildDir/compiled-jsps")) } } } A project's configurations are managed by a configurations object. Configurations have a name and can extend each other. To learn more about this API have a look at ConfigurationContainer.
Different kinds of dependencies
Module dependencies
Module dependencies are the most common dependencies. They refer to a module in a repository.
Example 38. Module dependencies
build.gradle
dependencies { runtimeOnly group: 'org.springframework', name: 'spring-core', version: '2.5' runtimeOnly 'org.springframework:spring-core:2.5', 'org.springframework:spring-aop:2.5' runtimeOnly( [group: 'org.springframework', name: 'spring-core', version: '2.5'], [group: 'org.springframework', name: 'spring-aop', version: '2.5'] ) runtimeOnly('org.hibernate:hibernate:3.0.5') { transitive = true } runtimeOnly group: 'org.hibernate', name: 'hibernate', version: '3.0.5', transitive: true runtimeOnly(group: 'org.hibernate', name: 'hibernate', version: '3.0.5') { transitive = true } } build.gradle.kts
dependencies { runtimeOnly(group = "org.springframework", name = "spring-core", version = "2.5") runtimeOnly("org.springframework:spring-aop:2.5") runtimeOnly("org.hibernate:hibernate:3.0.5") { isTransitive = true } runtimeOnly(group = "org.hibernate", name = "hibernate", version = "3.0.5") { isTransitive = true } } See the DependencyHandler class in the API documentation for more examples and a complete reference.
Gradle provides different notations for module dependencies. There is a string notation and a map notation. A module dependency has an API which allows further configuration. Have a look at ExternalModuleDependency to learn all about the API. This API provides properties and configuration methods. Via the string notation you can define a subset of the properties. With the map notation you can define all properties. To have access to the complete API, either with the map or with the string notation, you can assign a single dependency to a configuration together with a closure.
| If you declare a module dependency, Gradle looks for a module metadata file ( |
| In Maven, a module can have one and only one artifact. In Gradle and Ivy, a module can have multiple artifacts. Each artifact can have a different set of dependencies. |
File dependencies
Projects sometimes do not rely on a binary repository product e.g. JFrog Artifactory or Sonatype Nexus for hosting and resolving external dependencies. It's common practice to host those dependencies on a shared drive or check them into version control alongside the project source code. Those dependencies are referred to as file dependencies, the reason being that they represent a file without any metadata (like information about transitive dependencies, the origin or its author) attached to them.
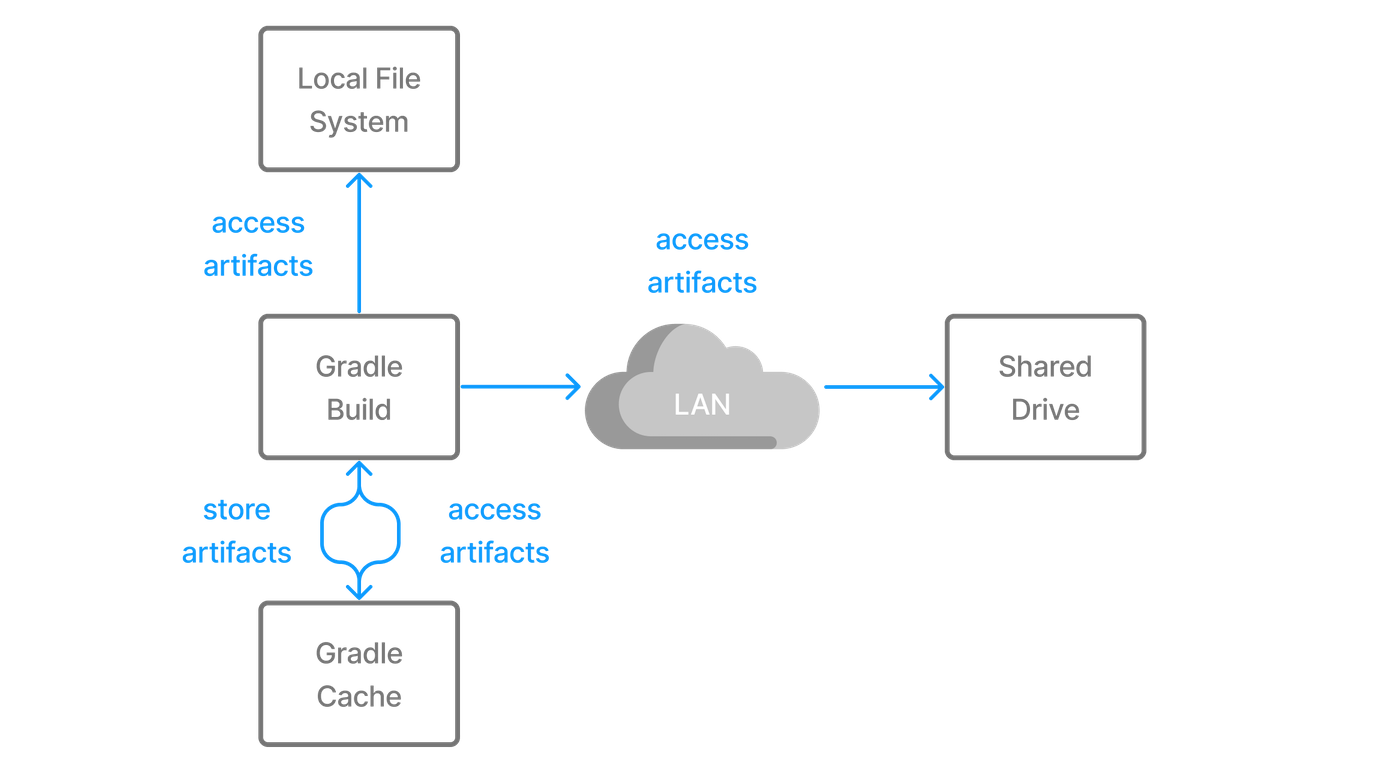
Figure 6. Resolving file dependencies from the local file system and a shared drive
The following example resolves file dependencies from the directories ant, libs and tools.
Example 39. Declaring multiple file dependencies
build.gradle
configurations { antContrib externalLibs deploymentTools } dependencies { antContrib files('ant/antcontrib.jar') externalLibs files('libs/commons-lang.jar', 'libs/log4j.jar') deploymentTools(fileTree('tools') { include '*.exe' }) } build.gradle.kts
configurations { create("antContrib") create("externalLibs") create("deploymentTools") } dependencies { "antContrib"(files("ant/antcontrib.jar")) "externalLibs"(files("libs/commons-lang.jar", "libs/log4j.jar")) "deploymentTools"(fileTree("tools") { include("*.exe") }) } | The order of the files in a |
File dependencies allow you to directly add a set of files to a configuration, without first adding them to a repository. This can be useful if you cannot, or do not want to, place certain files in a repository. Or if you do not want to use any repositories at all for storing your dependencies.
To add some files as a dependency for a configuration, you simply pass a file collection as a dependency:
Example 40. File dependencies
build.gradle
dependencies { runtimeOnly files('libs/a.jar', 'libs/b.jar') runtimeOnly fileTree('libs') { include '*.jar' } } build.gradle.kts
dependencies { runtimeOnly(files("libs/a.jar", "libs/b.jar")) runtimeOnly(fileTree("libs") { include("*.jar") }) } File dependencies are not included in the published dependency descriptor for your project. However, file dependencies are included in transitive project dependencies within the same build. This means they cannot be used outside the current build, but they can be used within the same build.
| The order of the files in a |
You can declare which tasks produce the files for a file dependency. You might do this when, for example, the files are generated by the build.
Example 41. Generated file dependencies
build.gradle
dependencies { implementation files(layout.buildDirectory.dir('classes')) { builtBy 'compile' } } tasks.register('compile') { doLast { println 'compiling classes' } } tasks.register('list') { dependsOn configurations.compileClasspath doLast { println "classpath = ${configurations.compileClasspath.collect { File file -> file.name }}" } } build.gradle.kts
dependencies { implementation(files(layout.buildDirectory.dir("classes")) { builtBy("compile") }) } tasks.register("compile") { doLast { println("compiling classes") } } tasks.register("list") { dependsOn(configurations["compileClasspath"]) doLast { println("classpath = ${configurations["compileClasspath"].map { file: File -> file.name }}") } } $ gradle -q list compiling classes classpath = [classes]
Versioning of file dependencies
It is recommended to clearly express the intention and a concrete version for file dependencies. File dependencies are not considered by Gradle's version conflict resolution. Therefore, it is extremely important to assign a version to the file name to indicate the distinct set of changes shipped with it. For example commons-beanutils-1.3.jar lets you track the changes of the library by the release notes.
As a result, the dependencies of the project are easier to maintain and organize. It is much easier to uncover potential API incompatibilities by the assigned version.
Project dependencies
Software projects often break up software components into modules to improve maintainability and prevent strong coupling. Modules can define dependencies between each other to reuse code within the same project.
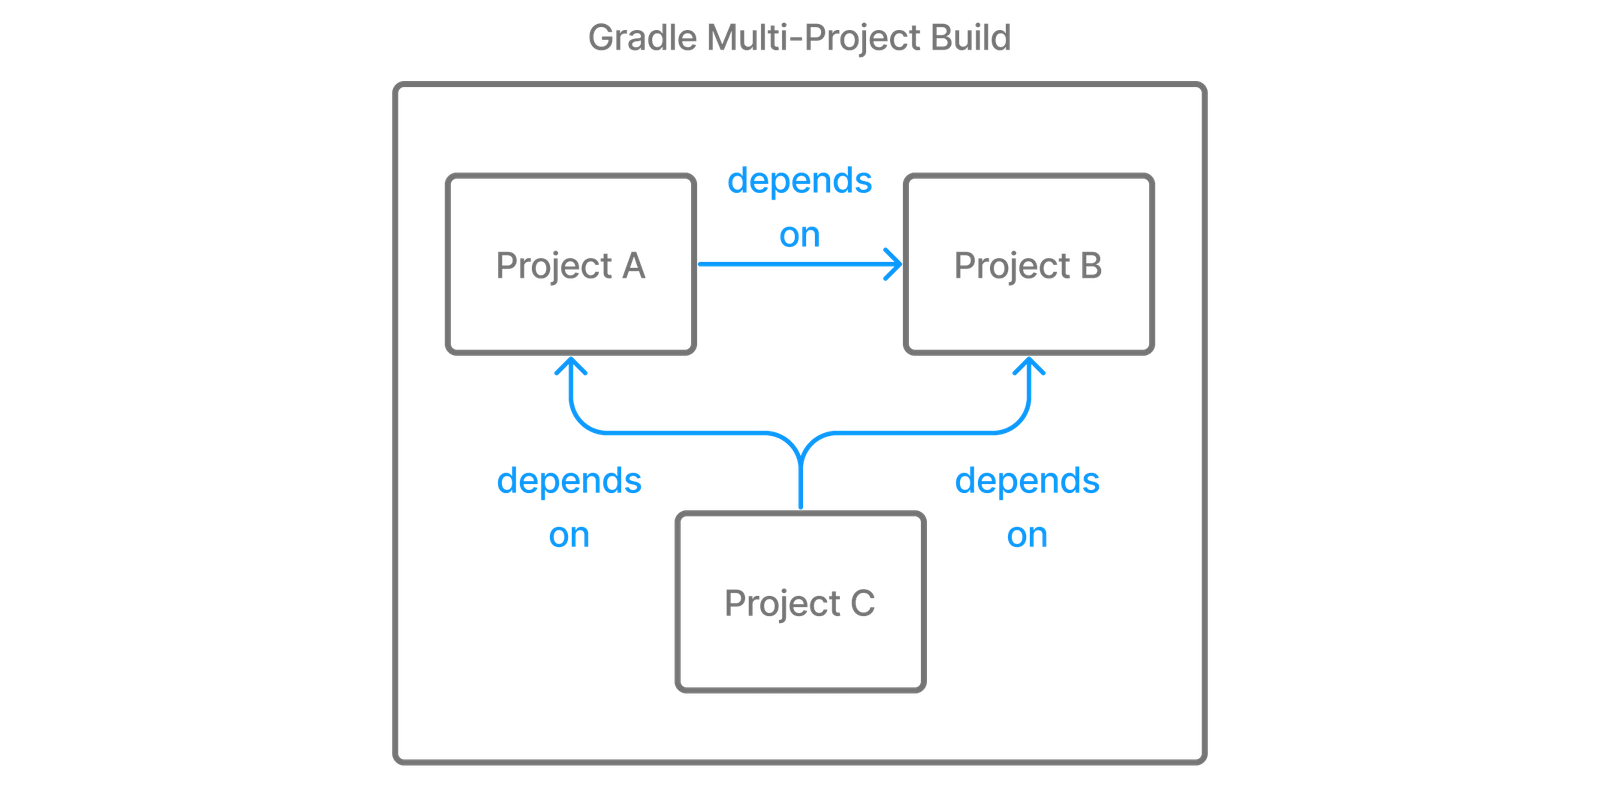
Figure 7. Dependencies between projects
Gradle can model dependencies between modules. Those dependencies are called project dependencies because each module is represented by a Gradle project.
Example 42. Project dependencies
build.gradle
dependencies { implementation project(':shared') } build.gradle.kts
dependencies { implementation(project(":shared")) } At runtime, the build automatically ensures that project dependencies are built in the correct order and added to the classpath for compilation. The chapter Authoring Multi-Project Builds discusses how to set up and configure multi-project builds in more detail.
For more information see the API documentation for ProjectDependency.
The following example declares the dependencies on the utils and api project from the web-service project. The method Project.project(java.lang.String) creates a reference to a specific subproject by path.
Example 43. Declaring project dependencies
web-service/build.gradle
dependencies { implementation project(':utils') implementation project(':api') } web-service/build.gradle.kts
dependencies { implementation(project(":utils")) implementation(project(":api")) } Type-safe project dependencies
| Type-safe dependency accessors are an incubating feature which must be enabled explicitly. Implementation may change at any time. To add support for type-safe project accessors, add this to your |
One issue with the project(":some:path") notation is that you have to remember the path to every project you want to depend on. In addition, changing a project path requires you to change all places where the project dependency is used, but it is easy to miss one or more occurrences (because you have to rely on search and replace).
Since Gradle 7, Gradle offers an experimental type-safe API for project dependencies. The same example as above can now be rewritten as:
Example 44. Declaring project dependencies using the type-safe API
web-service/build.gradle
dependencies { implementation projects.utils implementation projects.api } web-service/build.gradle.kts
dependencies { implementation(projects.utils) implementation(projects.api) } The type-safe API has the advantage of providing IDE completion so you don't need to figure out the actual names of the projects.
If you add or remove a project and that you use the Kotlin DSL, build script compilation would fail in case you forget to update a dependency.
The project accessors are mapped from the project path. For example, if a project path is :commons:utils:some:lib then the project accessor will be projects.commons.utils.some.lib (which is the short-hand notation for projects.getCommons().getUtils().getSome().getLib()).
A project name with kebab case (some-lib) or snake case (some_lib) will be converted to camel case in accessors: projects.someLib.
Local forks of module dependencies
A module dependency can be substituted by a dependency to a local fork of the sources of that module, if the module itself is built with Gradle. This can be done by utilising composite builds. This allows you, for example, to fix an issue in a library you use in an application by using, and building, a locally patched version instead of the published binary version. The details of this are described in the section on composite builds.
Gradle distribution-specific dependencies
Gradle API dependency
You can declare a dependency on the API of the current version of Gradle by using the DependencyHandler.gradleApi() method. This is useful when you are developing custom Gradle tasks or plugins.
Example 45. Gradle API dependencies
build.gradle
dependencies { implementation gradleApi() } build.gradle.kts
dependencies { implementation(gradleApi()) } Gradle TestKit dependency
You can declare a dependency on the TestKit API of the current version of Gradle by using the DependencyHandler.gradleTestKit() method. This is useful for writing and executing functional tests for Gradle plugins and build scripts.
Example 46. Gradle TestKit dependencies
build.gradle
dependencies { testImplementation gradleTestKit() } build.gradle.kts
dependencies { testImplementation(gradleTestKit()) } Local Groovy dependency
You can declare a dependency on the Groovy that is distributed with Gradle by using the DependencyHandler.localGroovy() method. This is useful when you are developing custom Gradle tasks or plugins in Groovy.
Example 47. Gradle's Groovy dependencies
build.gradle
dependencies { implementation localGroovy() } build.gradle.kts
dependencies { implementation(localGroovy()) } Documenting dependencies
When you declare a dependency or a dependency constraint, you can provide a custom reason for the declaration. This makes the dependency declarations in your build script and the dependency insight report easier to interpret.
Example 48. Giving a reason for choosing a certain module version in a dependency declaration
build.gradle
plugins { id 'java-library' } repositories { mavenCentral() } dependencies { implementation('org.ow2.asm:asm:7.1') { because 'we require a JDK 9 compatible bytecode generator' } } build.gradle.kts
plugins { `java-library` } repositories { mavenCentral() } dependencies { implementation("org.ow2.asm:asm:7.1") { because("we require a JDK 9 compatible bytecode generator") } } Example: Using the dependency insight report with custom reasons
Output of gradle -q dependencyInsight --dependency asm
> gradle -q dependencyInsight --dependency asm org.ow2.asm:asm:7.1 variant "compile" [ org.gradle.status = release (not requested) org.gradle.usage = java-api org.gradle.libraryelements = jar (compatible with: classes) org.gradle.category = library Requested attributes not found in the selected variant: org.gradle.dependency.bundling = external org.gradle.jvm.environment = standard-jvm org.gradle.jvm.version = 11 ] Selection reasons: - Was requested : we require a JDK 9 compatible bytecode generator org.ow2.asm:asm:7.1 \--- compileClasspath A web-based, searchable dependency report is available by adding the --scan option.
Resolving specific artifacts from a module dependency
Whenever Gradle tries to resolve a module from a Maven or Ivy repository, it looks for a metadata file and the default artifact file, a JAR. The build fails if none of these artifact files can be resolved. Under certain conditions, you might want to tweak the way Gradle resolves artifacts for a dependency.
-
The dependency only provides a non-standard artifact without any metadata e.g. a ZIP file.
-
The module metadata declares more than one artifact e.g. as part of an Ivy dependency descriptor.
-
You only want to download a specific artifact without any of the transitive dependencies declared in the metadata.
Gradle is a polyglot build tool and not limited to just resolving Java libraries. Let's assume you wanted to build a web application using JavaScript as the client technology. Most projects check in external JavaScript libraries into version control. An external JavaScript library is no different than a reusable Java library so why not download it from a repository instead?
Google Hosted Libraries is a distribution platform for popular, open-source JavaScript libraries. With the help of the artifact-only notation you can download a JavaScript library file e.g. JQuery. The @ character separates the dependency's coordinates from the artifact's file extension.
Example 49. Resolving a JavaScript artifact for a declared dependency
build.gradle
repositories { ivy { url 'https://ajax.googleapis.com/ajax/libs' patternLayout { artifact '[organization]/[revision]/[module].[ext]' } metadataSources { artifact() } } } configurations { js } dependencies { js 'jquery:jquery:3.2.1@js' } build.gradle.kts
repositories { ivy { url = uri("https://ajax.googleapis.com/ajax/libs") patternLayout { artifact("[organization]/[revision]/[module].[ext]") } metadataSources { artifact() } } } configurations { create("js") } dependencies { "js"("jquery:jquery:3.2.1@js") } Some modules ship different "flavors" of the same artifact or they publish multiple artifacts that belong to a specific module version but have a different purpose. It's common for a Java library to publish the artifact with the compiled class files, another one with just the source code in it and a third one containing the Javadocs.
In JavaScript, a library may exist as uncompressed or minified artifact. In Gradle, a specific artifact identifier is called classifier, a term generally used in Maven and Ivy dependency management.
Let's say we wanted to download the minified artifact of the JQuery library instead of the uncompressed file. You can provide the classifier min as part of the dependency declaration.
Example 50. Resolving a JavaScript artifact with classifier for a declared dependency
build.gradle
repositories { ivy { url 'https://ajax.googleapis.com/ajax/libs' patternLayout { artifact '[organization]/[revision]/[module](.[classifier]).[ext]' } metadataSources { artifact() } } } configurations { js } dependencies { js 'jquery:jquery:3.2.1:min@js' } build.gradle.kts
repositories { ivy { url = uri("https://ajax.googleapis.com/ajax/libs") patternLayout { artifact("[organization]/[revision]/[module](.[classifier]).[ext]") } metadataSources { artifact() } } } configurations { create("js") } dependencies { "js"("jquery:jquery:3.2.1:min@js") } Supported Metadata formats
External module dependencies require module metadata (so that, typically, Gradle can figure out the transitive dependencies of a module). To do so, Gradle supports different metadata formats.
You can also tweak which format will be looked up in the repository definition.
Gradle Module Metadata files
Gradle Module Metadata has been specifically designed to support all features of Gradle's dependency management model and is hence the preferred format. You can find its specification here.
POM files
Gradle natively supports Maven POM files. It's worth noting that by default Gradle will first look for a POM file, but if this file contains a special marker, Gradle will use Gradle Module Metadata instead.
Ivy files
Similarly, Gradle supports Apache Ivy metadata files. Again, Gradle will first look for an ivy.xml file, but if this file contains a special marker, Gradle will use Gradle Module Metadata instead.
Understanding the difference between libraries and applications
Producers vs consumers
A key concept in dependency management with Gradle is the difference between consumers and producers.
When you build a library, you are effectively on the producer side: you are producing artifacts which are going to be consumed by someone else, the consumer.
A lot of problems with traditional build systems is that they don't make the difference between a producer and a consumer.
A consumer needs to be understood in the large sense:
-
a project that depends on another project is a consumer
-
a task that depends on an artifact is a finer grained consumer
In dependency management, a lot of the decisions we make depend on the type of project we are building, that is to say, what kind of consumer we are.
Producer variants
A producer may want to generate different artifacts for different kinds of consumers: for the same source code, different binaries are produced. Or, a project may produce artifacts which are for consumption by other projects (same repository) but not for external use.
A typical example in the Java world is the Guava library which is published in different versions: one for Java projects, and one for Android projects.
However, it's the consumer responsibility to tell what version to use, and it's the dependency management engine responsibility to ensure consistency of the graph (for example making sure that you don't end up with both Java and Android versions of Guava on your classpath). This is where the variant model of Gradle comes into play.
In Gradle, producer variants are exposed via consumable configurations.
Strong encapsulation
In order for a producer to compile a library, it needs all its implementation dependencies on the compile classpath. There are dependencies which are only required as an implementation detail of the library and there are libraries which are effectively part of the API.
However, a library depending on this produced library only needs to "see" the public API of your library and therefore the dependencies of this API. It's a subset of the compile classpath of the producer: this is strong encapsulation of dependencies.
The consequence is that a dependency which is assigned to the implementation configuration of a library does not end up on the compile classpath of the consumer. On the other hand, a dependency which is assigned to the api configuration of a library would end up on the compile classpath of the consumer. At runtime, however, all dependencies are required. Gradle makes the difference between different kinds of consumer even within a single project: the Java compile task, for example, is a different consumer than the Java exec task.
More details on the segregation of API and runtime dependencies in the Java world can be found here.
Being respectful of consumers
Whenever, as a developer, you decide to include a dependency, you must understand that there are consequences for your consumers. For example, if you add a dependency to your project, it becomes a transitive dependency of your consumers, and therefore may participate in conflict resolution if the consumer needs a different version.
A lot of the problems Gradle handles are about fixing the mismatch between the expectations of a consumer and a producer.
However, some projects are easier than others:
-
if you are at the end of the consumption chain, that is to say you build an application, then there are effectively no consumer of your project (apart from final customers): adding exclusions will have no other consequence than fixing your problem.
-
however if you are a library, adding exclusions may prevent consumers from working properly, because they would exercise a path of the code that you don't
Always keep in mind that the solution you choose to fix a problem can "leak" to your consumers. This documentation aims at guiding you to find the right solution to the right problem, and more importantly, make decisions which help the resolution engine to take the right decisions in case of conflicts.
Viewing and debugging dependencies
Gradle provides sufficient tooling to navigate large dependency graphs and mitigate situations that can lead to dependency hell. Users can choose to render the full graph of dependencies as well as identify the selection reason and origin for a dependency. The origin of a dependency can be a declared dependency in the build script or a transitive dependency in graph plus their corresponding configuration. Gradle offers both capabilities through visual representation via build scans and as command line tooling.
Build scans
| If you do not know what build scans are, be sure to check them out! |
A build scan can visualize dependencies as a navigable, searchable tree. Additional context information can be rendered by clicking on a specific dependency in the graph.

Figure 8. Dependency tree in a build scan
Listing dependencies in a project
Gradle can visualize the whole dependency tree for every configuration available in the project.
Rendering the dependency tree is particularly useful if you'd like to identify which dependencies have been resolved at runtime. It also provides you with information about any dependency conflict resolution that occurred in the process and clearly indicates the selected version. The dependency report always contains declared and transitive dependencies.
| The |
Let's say you'd want to create tasks for your project that use the JGit library to execute SCM operations e.g. to model a release process. You can declare dependencies for any external tooling with the help of a custom configuration so that it doesn't pollute other contexts like the compilation classpath for your production source code.
Every Gradle project provides the task dependencies to render the so-called dependency report from the command line. By default the dependency report renders dependencies for all configurations. To focus on the information about one configuration, provide the optional parameter --configuration.
For example, to show dependencies that would be on the test runtime classpath in a Java project, run:
gradle -q dependencies --configuration testRuntimeClasspath
Just like with project and task names, you can use abbreviated names to select a configuration. For example, you can specify tRC instead of testRuntimeClasspath if the pattern matches to a single configuration. |
Example 51. Declaring the JGit dependency with a custom configuration
build.gradle
repositories { mavenCentral() } configurations { scm } dependencies { scm 'org.eclipse.jgit:org.eclipse.jgit:4.9.2.201712150930-r' } build.gradle.kts
repositories { mavenCentral() } configurations { create("scm") } dependencies { "scm"("org.eclipse.jgit:org.eclipse.jgit:4.9.2.201712150930-r") } Example: Rendering the dependency report for a custom configuration
Output of gradle -q dependencies --configuration scm
> gradle -q dependencies --configuration scm ------------------------------------------------------------ Root project 'dependencies-report' ------------------------------------------------------------ scm \--- org.eclipse.jgit:org.eclipse.jgit:4.9.2.201712150930-r +--- com.jcraft:jsch:0.1.54 +--- com.googlecode.javaewah:JavaEWAH:1.1.6 +--- org.apache.httpcomponents:httpclient:4.3.6 | +--- org.apache.httpcomponents:httpcore:4.3.3 | +--- commons-logging:commons-logging:1.1.3 | \--- commons-codec:commons-codec:1.6 \--- org.slf4j:slf4j-api:1.7.2 A web-based, searchable dependency report is available by adding the --scan option.
The dependencies report provides detailed information about the dependencies available in the graph. Any dependency that could not be resolved is marked with FAILED in red color. Dependencies with the same coordinates that can occur multiple times in the graph are omitted and indicated by an asterisk. Dependencies that had to undergo conflict resolution render the requested and selected version separated by a right arrow character.
Identifying which dependency version was selected and why
Large software projects inevitably deal with an increased number of dependencies either through direct or transitive dependencies. The dependencies report provides you with the raw list of dependencies but does not explain why they have been selected or which dependency is responsible for pulling them into the graph.
Let's have a look at a concrete example. A project may request two different versions of the same dependency either as direct or transitive dependency. Gradle applies version conflict resolution to ensure that only one version of the dependency exists in the dependency graph. In this example the conflicting dependency is represented by commons-codec:commons-codec.
Example 52. Declaring the JGit dependency and a conflicting dependency
build.gradle
repositories { mavenCentral() } configurations { scm } dependencies { scm 'org.eclipse.jgit:org.eclipse.jgit:4.9.2.201712150930-r' scm 'commons-codec:commons-codec:1.7' } build.gradle.kts
repositories { mavenCentral() } configurations { create("scm") } dependencies { "scm"("org.eclipse.jgit:org.eclipse.jgit:4.9.2.201712150930-r") "scm"("commons-codec:commons-codec:1.7") } The dependency tree in a build scan renders the selection reason (conflict resolution) as well as the origin of a dependency if you click on a dependency and select the "Required By" tab.
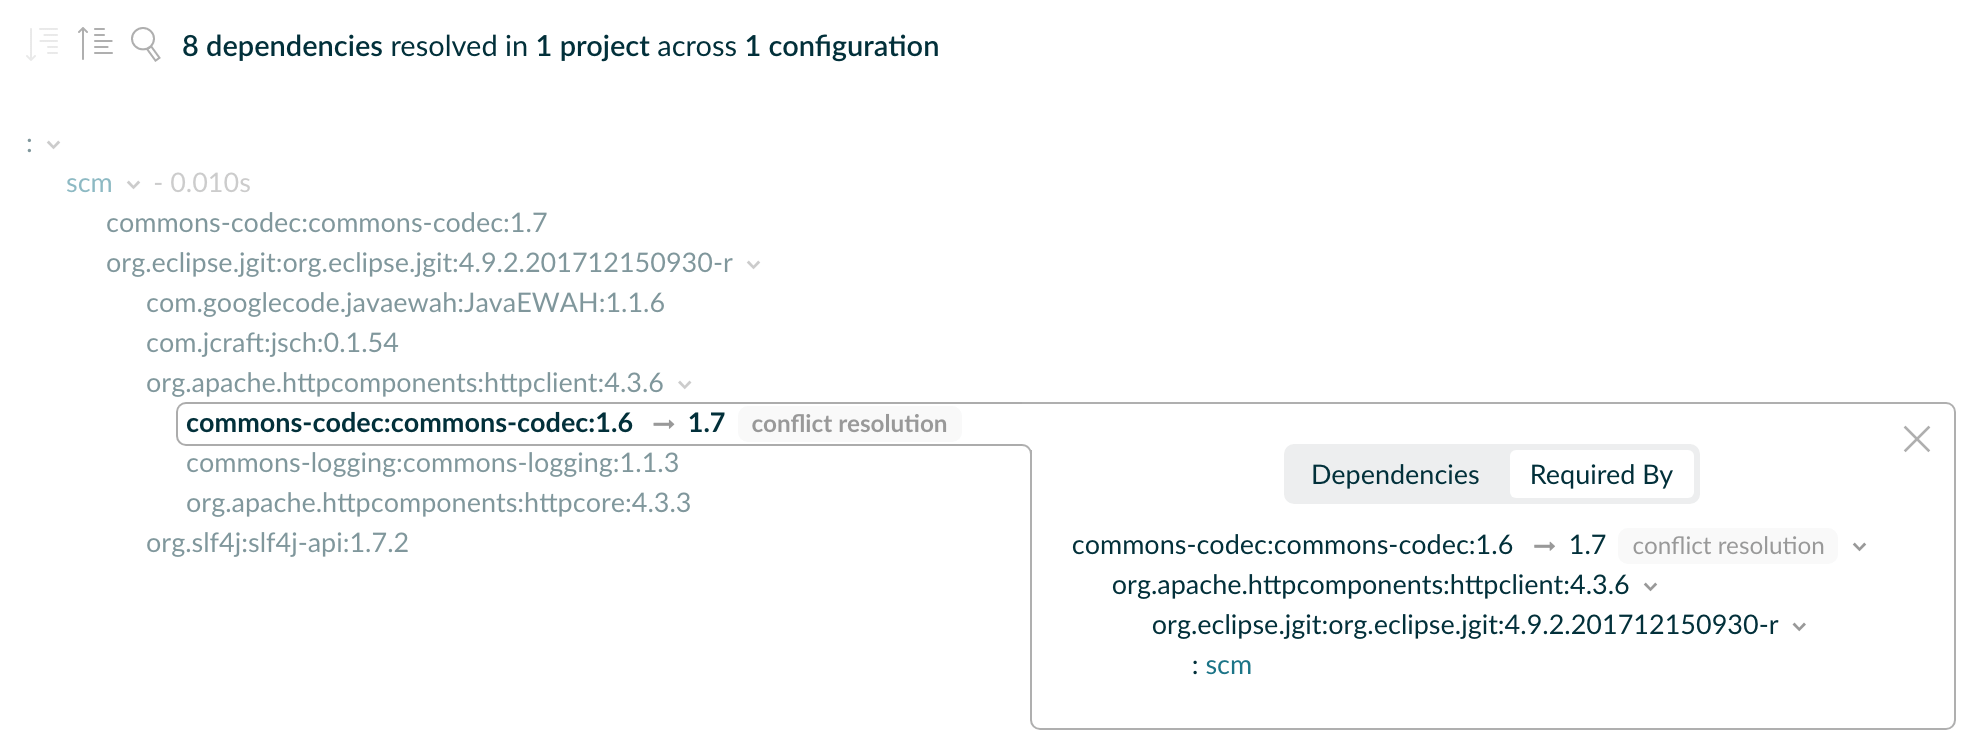
Figure 9. Dependency insight capabilities in a build scan
Every Gradle project provides the task dependencyInsight to render the so-called dependency insight report from the command line. Given a dependency in the dependency graph you can identify the selection reason and track down the origin of the dependency selection. You can think of the dependency insight report as the inverse representation of the dependency report for a given dependency.
The task takes the following parameters:
-
--dependency <dependency>(mandatory) -
Indicates which dependency to focus on. It can be a complete
group:name, or part of it. If multiple dependencies match, they are all printed in the report. -
--configuration <name>(mandatory) -
Indicates which configuration to resolve for showing the dependency information (camelCase also supported like in
dependenciestask). Note that the Java plugin wires a convention with the valuecompileClasspath, making the parameter optional. -
--singlepath(optional) -
Indicates to render only a single path to the dependency. This might be useful to trim down the output in large graphs.
| The |
Example: Using the dependency insight report for a given dependency
Output of gradle -q dependencyInsight --dependency commons-codec --configuration scm
> gradle -q dependencyInsight --dependency commons-codec --configuration scm commons-codec:commons-codec:1.7 variant "default" [ org.gradle.status = release (not requested) ] Selection reasons: - By conflict resolution : between versions 1.7 and 1.6 commons-codec:commons-codec:1.7 \--- scm commons-codec:commons-codec:1.6 -> 1.7 \--- org.apache.httpcomponents:httpclient:4.3.6 \--- org.eclipse.jgit:org.eclipse.jgit:4.9.2.201712150930-r \--- scm A web-based, searchable dependency report is available by adding the --scan option.
As indicated above, omitting the --configuration parameter in a project that is not a Java project will lead to an error:
> Dependency insight report cannot be generated because the input configuration was not specified. It can be specified from the command line, e.g: ':dependencyInsight --configuration someConf --dependency someDep'
For more information about configurations, see the documentation on declaring dependencies, which describes what dependency configurations are.
Understanding selection reasons
The "Selection reasons" part of the dependency insight report will list the different reasons as to why a dependency was selected. Have a look at the table below to understand the meaning of the different terms used:
| Reason | Meaning |
|---|---|
| (Absent) | This means that no other reason than having a reference, direct or transitive, was present |
| Was requested : <text> | The dependency appears in the graph, and the inclusion came with a |
| Was requested : didn't match versions <versions> | The dependency appears in the graph, with a dynamic version, which did not include the listed versions. This can also be followed by a |
| Was requested : reject version <versions> | The dependency appears in the graph, with a rich version containing one or more |
| By conflict resolution : between versions <version> | The dependency appeared multiple times in the graph, with different version requests. This resulted in conflict resolution to select the most appropriate version. |
| By constraint | A dependency constraint participated in the version selection. This can also be followed by a |
| By ancestor | There is a rich version with a |
| Selected by rule | A dependency resolution rule overruled the default selection process. This can also be followed by a |
| Rejection : <version> by rule because <text> | A |
| Rejection: version <version>: <attributes information> | The dependency has a dynamic version, and some versions did not match the requested attributes. |
| Forced | The build enforces the version of the dependency. |
Note that if multiple selection reasons exist in the graph, they will all be listed.
Resolving version conflicts
If the selected version does not match your expectation, Gradle offers a series of tools to help you control transitive dependencies.
Resolving variant selection errors
Sometimes a selection error will happen at the variant selection level. Have a look at the dedicated section to understand these errors and how to resolve them.
Resolving unsafe configuration resolution errors
Resolving a configuration can have side effects on Gradle's project model, so Gradle needs manage access to each project's configurations. There are a number of ways a configuration might be resolved unsafely. Gradle will produce a deprecation warning for each unsafe access. Each of these are bad practices and can cause strange and indeterminate errors.
If your build has an unsafe access deprecation warning, it needs to be fixed.
For example:
-
A task from one project directly resolves a configuration in another project in the task's action.
-
A task specifies a configuration from another project as an input file collection.
-
A build script for one project resolves a configuration in another project during evaluation.
-
Project configurations are resolved in the settings file.
In most cases, this issue can be resolved by creating a cross-project dependency on the other project. See the documentation for sharing outputs between projects for more information.
If you find a use case that can't be resolved using these techniques, please let us know by filing a GitHub Issue adhering to our issue guidelines.
Understanding dependency resolution
This chapter covers the way dependency resolution works inside Gradle. After covering how you can declare repositories and dependencies, it makes sense to explain how these declarations come together during dependency resolution.
Dependency resolution is a process that consists of two phases, which are repeated until the dependency graph is complete:
-
When a new dependency is added to the graph, perform conflict resolution to determine which version should be added to the graph.
-
When a specific dependency, that is a module with a version, is identified as part of the graph, retrieve its metadata so that its dependencies can be added in turn.
The following section will describe what Gradle identifies as conflicts and how it can resolve them automatically. After that, the retrieval of metadata will be covered, explaining how Gradle can follow dependency links.
How Gradle handles conflicts?
When doing dependency resolution, Gradle handles two types of conflicts:
- Version conflicts
-
That is when two or more dependencies require a given dependency but with different versions.
- Implementation conflicts
-
That is when the dependency graph contains multiple modules that provide the same implementation, or capability in Gradle terminology.
The following sections will explain in detail how Gradle attempts to resolve these conflicts.
The dependency resolution process is highly customizable to meet enterprise requirements. For more information, see the chapter on Controlling transitive dependencies.
Version conflict resolution
A version conflict occurs when two components:
-
Depend on the same module, let's say
com.google.guava:guava -
But on different versions, let's say
20.0and25.1-android-
Our project itself depends on
com.google.guava:guava:20.0 -
Our project also depends on
com.google.inject:guice:4.2.2which itself depends oncom.google.guava:guava:25.1-android
-
Resolution strategy
Given the conflict above, there exist multiple ways to handle it, either by selecting a version or failing the resolution. Different tools that handle dependency management have different ways of handling these type of conflicts.
| Maven will take the shortest path to a dependency and use that version. In case there are multiple paths of the same length, the first one wins. This means that in the example above, the version of The main drawback of this method is that it is ordering dependent. Keeping order in a very large graph can be a challenge. For example, what if the new version of a dependency ends up having its own dependency declarations in a different order than the previous version? With Maven, this could have unwanted impact on resolved versions. |
| Apache Ivy is a very flexible dependency management tool. It offers the possibility to customize dependency resolution, including conflict resolution. This flexibility comes with the price of making it hard to reason about. |
Gradle will consider all requested versions, wherever they appear in the dependency graph. Out of these versions, it will select the highest one.
As you have seen, Gradle supports a concept of rich version declaration, so what is the highest version depends on the way versions were declared:
-
If no ranges are involved, then the highest version that is not rejected will be selected.
-
If a version declared as
strictlyis lower than that version, selection will fail.
-
-
If ranges are involved:
-
If there is a non range version that falls within the specified ranges or is higher than their upper bound, it will be selected.
-
If there are only ranges, the highest existing version of the range with the highest upper bound will be selected.
-
If a version declared as
strictlyis lower than that version, selection will fail.
-
Note that in the case where ranges come into play, Gradle requires metadata to determine which versions do exist for the considered range. This causes an intermediate lookup for metadata, as described in How Gradle retrieves dependency metadata?.
Implementation conflict resolution
Gradle uses variants and capabilities to identify what a module provides.
This is a unique feature that deserves its own chapter to understand what it means and enables.
A conflict occurs the moment two modules either:
-
Attempt to select incompatible variants,
-
Declare the same capability
Learn more about handling these type of conflicts in Selecting between candidates.
How Gradle retrieves dependency metadata?
Gradle requires metadata about the modules included in your dependency graph. That information is required for two main points:
-
Determine the existing versions of a module when the declared version is dynamic.
-
Determine the dependencies of the module for a given version.
Discovering versions
Faced with a dynamic version, Gradle needs to identify the concrete matching versions:
-
Each repository is inspected, Gradle does not stop on the first one returning some metadata. When multiple are defined, they are inspected in the order they were added.
-
For Maven repositories, Gradle will use the
maven-metadata.xmlwhich provides information about the available versions. -
For Ivy repositories, Gradle will resort to directory listing.
This process results in a list of candidate versions that are then matched to the dynamic version expressed. At this point, version conflict resolution is resumed.
Note that Gradle caches the version information, more information can be found in the section Controlling dynamic version caching.
Obtaining module metadata
Given a required dependency, with a version, Gradle attempts to resolve the dependency by searching for the module the dependency points at.
-
Each repository is inspected in order.
-
Depending on the type of repository, Gradle looks for metadata files describing the module (
.module,.pomorivy.xmlfile) or directly for artifact files. -
Modules that have a module metadata file (
.module,.pomorivy.xmlfile) are preferred over modules that have an artifact file only. -
Once a repository returns a metadata result, following repositories are ignored.
-
-
Metadata for the dependency is retrieved and parsed, if found
-
If the module metadata is a POM file that has a parent POM declared, Gradle will recursively attempt to resolve each of the parent modules for the POM.
-
-
All of the artifacts for the module are then requested from the same repository that was chosen in the process above.
-
All of that data, including the repository source and potential misses are then stored in the The Dependency Cache.
| The penultimate point above is what can make the integration with Maven Local problematic. As it is a cache for Maven, it will sometimes miss some artifacts of a given module. If Gradle is sourcing such a module from Maven Local, it will consider the missing artifacts to be missing altogether. |
Repository disabling
When Gradle fails to retrieve information from a repository, it will disable it for the duration of the build and fail all dependency resolution.
That last point is important for reproducibility. If the build was allowed to continue, ignoring the faulty repository, subsequent builds could have a different result once the repository is back online.
HTTP Retries
Gradle will make several attempts to connect to a given repository before disabling it. If connection fails, Gradle will retry on certain errors which have a chance of being transient, increasing the amount of time waiting between each retry.
Blacklisting happens when the repository cannot be contacted, either because of a permanent error or because the maximum retries was reached.
The Dependency Cache
Gradle contains a highly sophisticated dependency caching mechanism, which seeks to minimise the number of remote requests made in dependency resolution, while striving to guarantee that the results of dependency resolution are correct and reproducible.
The Gradle dependency cache consists of two storage types located under GRADLE_USER_HOME/caches:
-
A file-based store of downloaded artifacts, including binaries like jars as well as raw downloaded meta-data like POM files and Ivy files. The storage path for a downloaded artifact includes the SHA1 checksum, meaning that 2 artifacts with the same name but different content can easily be cached.
-
A binary store of resolved module metadata, including the results of resolving dynamic versions, module descriptors, and artifacts.
The Gradle cache does not allow the local cache to hide problems and create other mysterious and difficult to debug behavior. Gradle enables reliable and reproducible enterprise builds with a focus on bandwidth and storage efficiency.
Separate metadata cache
Gradle keeps a record of various aspects of dependency resolution in binary format in the metadata cache. The information stored in the metadata cache includes:
-
The result of resolving a dynamic version (e.g.
1.+) to a concrete version (e.g.1.2). -
The resolved module metadata for a particular module, including module artifacts and module dependencies.
-
The resolved artifact metadata for a particular artifact, including a pointer to the downloaded artifact file.
-
The absence of a particular module or artifact in a particular repository, eliminating repeated attempts to access a resource that does not exist.
Every entry in the metadata cache includes a record of the repository that provided the information as well as a timestamp that can be used for cache expiry.
Repository caches are independent
As described above, for each repository there is a separate metadata cache. A repository is identified by its URL, type and layout. If a module or artifact has not been previously resolved from this repository, Gradle will attempt to resolve the module against the repository. This will always involve a remote lookup on the repository, however in many cases no download will be required.
Dependency resolution will fail if the required artifacts are not available in any repository specified by the build, even if the local cache has a copy of this artifact which was retrieved from a different repository. Repository independence allows builds to be isolated from each other in an advanced way that no build tool has done before. This is a key feature to create builds that are reliable and reproducible in any environment.
Artifact reuse
Before downloading an artifact, Gradle tries to determine the checksum of the required artifact by downloading the sha file associated with that artifact. If the checksum can be retrieved, an artifact is not downloaded if an artifact already exists with the same id and checksum. If the checksum cannot be retrieved from the remote server, the artifact will be downloaded (and ignored if it matches an existing artifact).
As well as considering artifacts downloaded from a different repository, Gradle will also attempt to reuse artifacts found in the local Maven Repository. If a candidate artifact has been downloaded by Maven, Gradle will use this artifact if it can be verified to match the checksum declared by the remote server.
Checksum based storage
It is possible for different repositories to provide a different binary artifact in response to the same artifact identifier. This is often the case with Maven SNAPSHOT artifacts, but can also be true for any artifact which is republished without changing its identifier. By caching artifacts based on their SHA1 checksum, Gradle is able to maintain multiple versions of the same artifact. This means that when resolving against one repository Gradle will never overwrite the cached artifact file from a different repository. This is done without requiring a separate artifact file store per repository.
Cache Locking
The Gradle dependency cache uses file-based locking to ensure that it can safely be used by multiple Gradle processes concurrently. The lock is held whenever the binary metadata store is being read or written, but is released for slow operations such as downloading remote artifacts.
This concurrent access is only supported if the different Gradle processes can communicate together. This is usually not the case for containerized builds.
Cache Cleanup
Gradle keeps track of which artifacts in the dependency cache are accessed. Using this information, the cache is periodically (at most every 24 hours) scanned for artifacts that have not been used for more than 30 days. Obsolete artifacts are then deleted to ensure the cache does not grow indefinitely.
Dealing with ephemeral builds
It's a common practice to run builds in ephemeral containers. A container is typically spawned to only execute a single build before it is destroyed. This can become a practical problem when a build depends on a lot of dependencies which each container has to re-download. To help with this scenario, Gradle provides a couple of options:
-
copying the dependency cache into each container
-
sharing a read-only dependency cache between multiple containers
Copying and reusing the cache
The dependency cache, both the file and metadata parts, are fully encoded using relative paths. This means that it is perfectly possible to copy a cache around and see Gradle benefit from it.
The path that can be copied is $GRADLE_HOME/caches/modules-<version>. The only constraint is placing it using the same structure at the destination, where the value of GRADLE_HOME can be different.
Do not copy the *.lock or gc.properties files if they exist.
Note that creating the cache and consuming it should be done using compatible Gradle version, as shown in the table below. Otherwise, the build might still require some interactions with remote repositories to complete missing information, which might be available in a different version. If multiple incompatible Gradle versions are in play, all should be used when seeding the cache.
| Module cache version | File cache version | Metadata cache version | Gradle version(s) |
|---|---|---|---|
| | | | Gradle 6.1 to Gradle 6.3 |
| | | | Gradle 6.4 to Gradle 6.7 |
| | | | Gradle 6.8 and above |
Sharing the dependency cache with other Gradle instances
Instead of copying the dependency cache into each container, it's possible to mount a shared, read-only directory that will act as a dependency cache for all containers. This cache, unlike the classical dependency cache, is accessed without locking, making it possible for multiple builds to read from the cache concurrently. It's important that the read-only cache is not written to when other builds may be reading from it.
When using the shared read-only cache, Gradle looks for dependencies (artifacts or metadata) in both the writable cache in the local Gradle user home directory and the shared read-only cache. If a dependency is present in the read-only cache, it will not be downloaded. If a dependency is missing from the read-only cache, it will be downloaded and added to the writable cache. In practice, this means that the writable cache will only contain dependencies that are unavailable in the read-only cache.
The read-only cache should be sourced from a Gradle dependency cache that already contains some of the required dependencies. The cache can be incomplete; however, an empty shared cache will only add overhead.
| The shared read-only dependency cache is an incubating feature. |
The first step in using a shared dependency cache is to create one by copying of an existing local cache. For this you need to follow the instructions above.
Then set the GRADLE_RO_DEP_CACHE environment variable to point to the directory containing the cache:
$GRADLE_RO_DEP_CACHE |-- modules-2 : the read-only dependency cache, should be mounted with read-only privileges $GRADLE_HOME |-- caches |-- modules-2 : the container specific dependency cache, should be writable |-- ... |-- ...
In a CI environment, it's a good idea to have one build which "seeds" a Gradle dependency cache, which is then copied to a different directory. This directory can then be used as the read-only cache for other builds. You shouldn't use an existing Gradle installation cache as the read-only cache, because this directory may contain locks and may be modified by the seeding build.
Accessing the resolution result programmatically
While most users only need access to a "flat list" of files, there are cases where it can be interesting to reason on a graph and get more information about the resolution result:
-
for tooling integration, where a model of the dependency graph is required
-
for tasks generating a visual representation (image,
.dotfile, …) of a dependency graph -
for tasks providing diagnostics (similar to the
dependencyInsighttask) -
for tasks which need to perform dependency resolution at execution time (e.g, download files on demand)
For those use cases, Gradle provides lazy, thread-safe APIs, accessible by calling the Configuration.getIncoming() method:
-
the ResolutionResult API gives access to a resolved dependency graph, whether the resolution was successful or not.
-
the artifacts API provides a simple access to the resolved artifacts, untransformed, but with lazy download of artifacts (they would only be downloaded on demand).
-
the artifact view API provides an advanced, filtered view of artifacts, possibly transformed.
Verifying dependencies
Working with external dependencies and plugins published on third-party repositories puts your build at risk. In particular, you need to be aware of what binaries are brought in transitively and if they are legit. To mitigate the security risks and avoid integrating compromised dependencies in your project, Gradle supports dependency verification.
| Dependency verification is, by nature, an inconvenient feature to use. It means that whenever you're going to update a dependency, builds are likely to fail. It means that merging branches are going to be harder because each branch can have different dependencies. It means that you will be tempted to switch it off. So why should you bother? Dependency verification is about trust in what you get and what you ship. Without dependency verification it's easy for an attacker to compromise your supply chain. There are many real world examples of tools compromised by adding a malicious dependency. Dependency verification is meant to protect yourself from those attacks, by forcing you to ensure that the artifacts you include in your build are the ones that you expect. It is not meant, however, to prevent you from including vulnerable dependencies. Finding the right balance between security and convenience is hard but Gradle will try to let you choose the "right level" for you. |
Dependency verification consists of two different and complementary operations:
-
checksum verification, which allows asserting the integrity of a dependency
-
signature verification, which allows asserting the provenance of a dependency
Gradle supports both checksum and signature verification out of the box but performs no dependency verification by default. This section will guide you into configuring dependency verification properly for your needs.
This feature can be used for:
-
detecting compromised dependencies
-
detecting compromised plugins
-
detecting tampered dependencies in the local dependency caches
Enabling dependency verification
The verification metadata file
| Currently the only source of dependency verification metadata is this XML configuration file. Future versions of Gradle may include other sources (for example via external services). |
Dependency verification is automatically enabled once the configuration file for dependency verification is discovered. This configuration file is located at $PROJECT_ROOT/gradle/verification-metadata.xml. This file minimally consists of the following:
<?xml version="1.0" encoding="UTF-8"?> <verification-metadata> <configuration> <verify-metadata>true</verify-metadata> <verify-signatures>false</verify-signatures> </configuration> </verification-metadata> Doing so, Gradle will verify all artifacts using checksums, but will not verify signatures. Gradle will verify any artifact downloaded using its dependency management engine, which includes, but is not limited to:
-
artifact files (e.g jar files, zips, …) used during a build
-
metadata artifacts (POM files, Ivy descriptors, Gradle Module Metadata)
-
plugins (both project and settings plugins)
-
artifacts resolved using the advanced dependency resolution APIs
Gradle will not verify changing dependencies (in particular SNAPSHOT dependencies) nor locally produced artifacts (typically jars produced during the build itself) as by nature their checksums and signatures would always change.
With such a minimal configuration file, a project using any external dependency or plugin would immediately start failing because it doesn't contain any checksum to verify.
A dependency verification configuration is global: a single file is used to configure verification of the whole build. In particular, the same file is used for both the (sub)projects and buildSrc.
An easy way to get started is therefore to generate the minimal configuration for an existing build.
Configuring the console output
By default, if dependency verification fails, Gradle will generate a small summary about the verification failure as well as an HTML report containing the full information about the failures. If your environment prevents you from reading this HTML report file (for example if you run a build on CI and that it's not easy to fetch the remote artifacts), Gradle provides a way to opt-in a verbose console report. For this, you need to add this Gradle property to your gradle.properties file:
org.gradle.dependency.verification.console=verbose
Bootstrapping dependency verification
It's worth mentioning that while Gradle can generate a dependency verification file for you, you should always check whatever Gradle generated for you because your build may already contain compromised dependencies without you knowing about it. Please refer to the appropriate checksum verification or signature verification section for more information.
If you plan on using signature verification, please also read the corresponding section of the docs.
Bootstrapping can either be used to create a file from the beginning, or also to update an existing file with new information. Therefore, it's recommended to always use the same parameters once you started bootstrapping.
The dependency verification file can be generated with the following CLI instructions:
gradle --write-verification-metadata sha256 help
The write-verification-metadata flag requires the list of checksums that you want to generate or pgp for signatures.
Executing this command line will cause Gradle to:
-
resolve all resolvable configurations, which includes:
-
configurations from the root project
-
configurations from all subprojects
-
configurations from
buildSrc -
included builds configurations
-
configurations used by plugins
-
-
download all artifacts discovered during resolution
-
compute the requested checksums and possibly verify signatures depending on what you asked
-
At the end of the build, generate the configuration file which will contain the inferred verification metadata
As a consequence, the verification-metadata.xml file will be used in subsequent builds to verify dependencies.
| There are dependencies that Gradle cannot discover this way. In particular, you will notice that the CLI above uses the The difference is that Gradle may discover more dependencies and artifacts depending on the tasks you execute. As a matter of fact, Gradle cannot automatically discover detached configurations, which are basically dependency graphs resolved as an internal implementation detail of the execution of a task: they are not, in particular, declared as an input of the task because they effectively depend on the configuration of the task at execution time. A good way to start is just to use the simplest task, Gradle won't verify either checksums or signatures of plugins which use their own HTTP clients. Only plugins which use the infrastructure provided by Gradle for performing requests will see their requests verified. |
If an included build is used:
-
the configuration file of the current build is used for verification
-
so if the included build itself uses verification, its configuration is ignored in favor of the current one
-
which means that including a build works similarly to upgrading a dependency: it may require you to update your current verification metadata
Using dry mode
By default, bootstrapping is incremental, which means that if you run it multiple times, information is added to the file and in particular you can rely on your VCS to check the diffs. There are situations where you would just want to see what the generated verification metadata file would look like without actually changing the existing one or overwriting it.
For this purpose, you can just add --dry-run:
gradle --write-verification-metadata sha256 help --dry-run
Then instead of generating the verification-metadata.xml file, a new file will be generated, called verification-metadata.dryrun.xml.
| Because |
Disabling metadata verification
By default, Gradle will not only verify artifacts (jars, …) but also the metadata associated with those artifacts (typically POM files). Verifying this ensures the maximum level of security: metadata files typically tell what transitive dependencies will be included, so a compromised metadata file may cause the introduction of undesired dependencies in the graph. However, because all artifacts are verified, such artifacts would in general easily be discovered by you, because they would cause a checksum verification failure (checksums would be missing from verification metadata). Because metadata verification can significantly increase the size of your configuration file, you may therefore want to disable verification of metadata. If you understand the risks of doing so, set the <verify-metadata> flag to false in the configuration file:
<?xml version="1.0" encoding="UTF-8"?> <verification-metadata> <configuration> <verify-metadata>false</verify-metadata> <verify-signatures>false</verify-signatures> </configuration> <!-- the rest of this file doesn't need to declare anything about metadata files --> </verification-metadata> Verifying dependency checksums
Checksum verification allows you to ensure the integrity of an artifact. This is the simplest thing that Gradle can do for you to make sure that the artifacts you use are un-tampered.
Gradle supports MD5, SHA1, SHA-256 and SHA-512 checksums. However, only SHA-256 and SHA-512 checksums are considered secure nowadays.
Adding the checksum for an artifact
External components are identified by GAV coordinates, then each of the artifacts by their file names. To declare the checksums of an artifact, you need to add the corresponding section in the verification metadata file. For example, to declare the checksum for Apache PDFBox. The GAV coordinates are:
-
group
org.apache.pdfbox -
name
pdfbox -
version
2.0.17
Using this dependency will trigger the download of 2 different files:
-
pdfbox-2.0.17.jarwhich is the main artifact -
pdfbox-2.0.17.pomwhich is the metadata file associated with this artifact
As as consequence, you need to declare the checksums for both of them (unless you disabled metadata verification):
<?xml version="1.0" encoding="UTF-8"?> <verification-metadata> <configuration> <verify-metadata>true</verify-metadata> <verify-signatures>false</verify-signatures> </configuration> <components> <component group="org.apache.pdfbox" name="pdfbox" version="2.0.17"> <artifact name="pdfbox-2.0.17.jar"> <sha512 value="7e11e54a21c395d461e59552e88b0de0ebaf1bf9d9bcacadf17b240d9bbc29bf6beb8e36896c186fe405d287f5d517b02c89381aa0fcc5e0aa5814e44f0ab331" origin="PDFBox Official site (https://pdfbox.apache.org/download.cgi)"/> </artifact> <artifact name="pdfbox-2.0.17.pom"> <sha512 value="82de436b38faf6121d8d2e71dda06e79296fc0f7bc7aba0766728c8d306fd1b0684b5379c18808ca724bf91707277eba81eb4fe19518e99e8f2a56459b79742f" origin="Generated by Gradle"/> </artifact> </component> </components> </verification-metadata> Where to get checksums from?
In general, checksums are published alongside artifacts on public repositories. However, if a dependency is compromised in a repository, it's likely its checksum will be too, so it's a good practice to get the checksum from a different place, usually the website of the library itself.
In fact, it's a good security practice to publish the checksums of artifacts on a different server than the server where the artifacts themselves are hosted: it's harder to compromise a library both on the repository and the official website.
In the example above, the checksum was published on the website for the JAR, but not the POM file. This is why it's usually easier to let Gradle generate the checksums and verify by reviewing the generated file carefully.
In this example, not only could we check that the checksum was correct, but we could also find it on the official website, which is why we changed the value of the of origin attribute on the sha512 element from Generated by Gradle to PDFBox Official site. Changing the origin gives users a sense of how trustworthy your build it.
Interestingly, using pdfbox will require much more than those 2 artifacts, because it will also bring in transitive dependencies. If the dependency verification file only included the checksums for the main artifacts you used, the build would fail with an error like this one:
Execution failed for task ':compileJava'. > Dependency verification failed for configuration ':compileClasspath': - On artifact commons-logging-1.2.jar (commons-logging:commons-logging:1.2) in repository 'MavenRepo': checksum is missing from verification metadata. - On artifact commons-logging-1.2.pom (commons-logging:commons-logging:1.2) in repository 'MavenRepo': checksum is missing from verification metadata.
What this indicates is that your build requires commons-logging when executing compileJava, however the verification file doesn't contain enough information for Gradle to verify the integrity of the dependencies, meaning you need to add the required information to the verification metadata file.
See troubleshooting dependency verification for more insights on what to do in this situation.
What checksums are verified?
If a dependency verification metadata file declares more than one checksum for a dependency, Gradle will verify all of them and fail if any of them fails. For example, the following configuration would check both the md5 and sha1 checksums:
<component group="org.apache.pdfbox" name="pdfbox" version="2.0.17"> <artifact name="pdfbox-2.0.17.jar"> <md5 value="c713a8e252d0add65e9282b151adf6b4" origin="official site"/> <sha1 value="b5c8dff799bd967c70ccae75e6972327ae640d35" origin="official site"/> </artifact> </component> There are multiple reasons why you'd like to do so:
-
an official site doesn't publish secure checksums (SHA-256, SHA-512) but publishes multiple insecure ones (MD5, SHA1). While it's easy to fake a MD5 checksum and hard but possible to fake a SHA1 checksum, it's harder to fake both of them for the same artifact.
-
you might want to add generated checksums to the list above
-
when updating dependency verification file with more secure checksums, you don't want to accidentally erase checksums
Verifying dependency signatures
In addition to checksums, Gradle supports verification of signatures. Signatures are used to assess the provenance of a dependency (it tells who signed the artifacts, which usually corresponds to who produced it).
As enabling signature verification usually means a higher level of security, you might want to replace checksum verification with signature verification.
| Signatures can also be used to assess the integrity of a dependency similarly to checksums. Signatures are signatures of the hash of artifacts, not artifacts themselves. This means that if the signature is done on an unsafe hash (even SHA1), then you're not correctly assessing the integrity of a file. For this reason, if you care about both, you need to add both signatures and checksums to your verification metadata. |
However:
-
Gradle only supports verification of signatures published on remote repositories as ASCII-armored PGP files
-
Not all artifacts are published with signatures
-
A good signature doesn't mean that the signatory was legit
As a consequence, signature verification will often be used alongside checksum verification.
| About expired keys It's very common to find artifacts which are signed with an expired key. This is not a problem for verification: key expiry is mostly used to avoid signing with a stolen key. If an artifact was signed before expiry, it's still valid. |
Enabling signature verification
Because verifying signatures is more expensive (both I/O and CPU wise) and harder to check manually, it's not enabled by default.
Enabling it requires you to change the configuration option in the verification-metadata.xml file:
<?xml version="1.0" encoding="UTF-8"?> <verification-metadata> <configuration> <verify-signatures>true</verify-signatures> </configuration> </verification-metadata> Understanding signature verification
Once signature verification is enabled, for each artifact, Gradle will:
-
try to download the corresponding
.ascfile -
if it's present
-
automatically download the keys required to perform verification of the signature
-
verify the artifact using the downloaded public keys
-
if signature verification passes, perform additional requested checksum verification
-
-
if it's absent, fallback to checksum verification
That is to say that Gradle's verification mechanism is much stronger if signature verification is enabled than just with checksum verification. In particular:
-
if an artifact is signed with multiple keys, all of them must pass validation or the build will fail
-
if an artifact passes verification, any additional checksum configured for the artifact will also be checked
However, it's not because an artifact passes signature verification that you can trust it: you need to trust the keys.
In practice, it means you need to list the keys that you trust for each artifact, which is done by adding a pgp entry instead of a sha1 for example:
<component group="com.github.javaparser" name="javaparser-core" version="3.6.11"> <artifact name="javaparser-core-3.6.11.jar"> <pgp value="8756c4f765c9ac3cb6b85d62379ce192d401ab61"/> </artifact> </component> | Gradle supports both full fingerprint ids or long (64-bit) key ids in |
This effectively means that you trust com.github.javaparser:javaparser-core:3.6.11 if it's signed with the key 8756c4f765c9ac3cb6b85d62379ce192d401ab61.
Without this, the build would fail with this error:
> Dependency verification failed for configuration ':compileClasspath': - On artifact javaparser-core-3.6.11.jar (com.github.javaparser:javaparser-core:3.6.11) in repository 'MavenRepo': Artifact was signed with key '8756c4f765c9ac3cb6b85d62379ce192d401ab61' (Bintray (by JFrog) <****>) and passed verification but the key isn't in your trusted keys list.
| The key IDs that Gradle shows in error messages are the key IDs found in the signature file it tries to verify. It doesn't mean that it's necessarily the keys that you should trust. In particular, if the signature is correct but done by a malicious entity, Gradle wouldn't tell you. |
Trusting keys globally
Signature verification has the advantage that it can make the configuration of dependency verification easier by not having to explicitly list all artifacts like for checksum verification only. In fact, it's common that the same key can be used to sign several artifacts. If this is the case, you can move the trusted key from the artifact level to the global configuration block:
<?xml version="1.0" encoding="UTF-8"?> <verification-metadata> <configuration> <verify-metadata>true</verify-metadata> <verify-signatures>true</verify-signatures> <trusted-keys> <trusted-key id="379ce192d401ab61" group="com.github.javaparser"/> </trusted-keys> </configuration> <components/> </verification-metadata> The configuration above means that for any artifact belonging to the group com.github.javaparser, we trust it if it's signed with the 379ce192d401ab61.
The trusted-key element works similarly to the trusted-artifact element:
-
group, the group of the artifact to trust -
name, the name of the artifact to trust -
version, the version of the artifact to trust -
file, the name of the artifact file to trust -
regex, a boolean saying if thegroup,name,versionandfileattributes need to be interpreted as regular expressions (defaults tofalse)
| You should be careful when trusting a key globally: try to limit it to the appropriate groups or artifacts:
It means you can trust the key Remember that anybody can put an arbitrary name when generating a PGP key, so never trust the key solely based on the key name. Verify if the key is listed at the official site. For example, Apache projects typically provide a KEYS.txt file that you can trust. |
Specifying key servers and ignoring keys
Gradle will automatically download the public keys required to verify a signature. For this it uses a list of well known and trusted key servers (the list may change between Gradle versions, please refer to the implementation to figure out what servers are used by default).
You can explicitly set the list of key servers that you want to use by adding them to the configuration:
<?xml version="1.0" encoding="UTF-8"?> <verification-metadata> <configuration> <verify-metadata>true</verify-metadata> <verify-signatures>true</verify-signatures> <key-servers> <key-server uri="hkp://my-key-server.org"/> <key-server uri="https://my-other-key-server.org"/> </key-servers> </configuration> </verification-metadata> Despite this, it's possible that a key is not available:
-
because it wasn't published to a public key server
-
because it was lost
In this case, you can ignore a key in the configuration block:
<?xml version="1.0" encoding="UTF-8"?> <verification-metadata> <configuration> <verify-metadata>true</verify-metadata> <verify-signatures>true</verify-signatures> <ignored-keys> <ignored-key id="abcdef1234567890" reason="Key is not available in any key server"/> </ignored-keys> </configuration> </verification-metadata> As soon as a key is ignored, it will not be used for verification, even if the signature file mentions it. However, if the signature cannot be verified with at least one other key, Gradle will mandate that you provide a checksum.
Exporting keys for faster verification
Gradle automatically downloads the required keys but this operation can be quite slow and requires everyone to download the keys. To avoid this, Gradle offers the ability to use a local keyring file containing the required public keys.
Gradle supports 2 different file formats for keyrings: a binary format (.gpg file) and a plain text format (.keys).
There are pros and cons for each of the formats: the binary format is more compact and can be updated directly via GPG commands, but is completely opaque (binary). On the opposite, the plain text format is human readable, can be easily updated by hand and makes it easier to do code reviews thanks to readable diffs.
If the gradle/verification-keyring.gpg or gradle/verification-keyring.keys file is present, Gradle will search for keys there in priority.
Note that the plain text file will be ignored if there's already a .gpg file (the binary version takes precedence).
You can generate the binary version using GPG, for example issuing the following commands (syntax may depend on the tool you use):
$ gpg --no-default-keyring --keyring gradle/verification-keyring.gpg --recv-keys 379ce192d401ab61 gpg: keybox 'gradle/verification-keyring.gpg' created gpg: key 379CE192D401AB61: public key "Bintray (by JFrog) <****>" imported gpg: Total number processed: 1 gpg: imported: 1 $ gpg --no-default-keyring --keyring gradle/verification-keyring.gpg --recv-keys 6a0975f8b1127b83 gpg: key 0729A0AFF8999A87: public key "Kotlin Release <****>" imported gpg: Total number processed: 1 gpg: imported: 1 The plain text version, on the other hand, can be updated manually. The file must be formatted with the US-ASCII encoding and consists of a list of keys in ASCII armored format.
In the example above, you could amend an existing KEYS file by issuing the following commands:
$ gpg --no-default-keyring --keyring /tmp/keyring.gpg --recv-keys 379ce192d401ab61 gpg: keybox '/tmp/keyring.gpg' created gpg: key 379CE192D401AB61: public key "Bintray (by JFrog) <****>" imported gpg: Total number processed: 1 gpg: imported: 1 # First let's add a header so that we can recognize the added key $ gpg --keyring /tmp/keyring.gpg --list-sigs 379CE192D401AB61 > gradle/verification-keyring.keys # Then write its ASCII armored version $ gpg --keyring /tmp/keyring.gpg --export --armor 379CE192D401AB61 > gradle/verification-keyring.keys Or, alternatively, you can ask Gradle to export all keys it used for verification of this build to the keyring during bootstrapping:
./gradlew --write-verification-metadata pgp,sha256 --export-keys
| This command will generate both the binary version and the ASCII armored file. You should only pick one for your project. It's a good idea to commit this file to VCS (as long as you trust your VCS). If you use git and use the binary version, make sure to make it treat this file as binary, by adding this to your |
Bootstrapping and signature verification
| Signature verification bootstrapping takes an optimistic point of view that signature verification is enough. Therefore, if you also care about integrity, you must first bootstrap using checksum verification, then with signature verification. |
Similarly to bootstrapping for checksums, Gradle provides a convenience for bootstrapping a configuration file with signature verification enabled. For this, just add the pgp option to the list of verifications to generate. However, because there might be verification failures, missing keys or missing signature files, you must provide a fallback checksum verification algorithm:
./gradlew --write-verification-metadata pgp,sha256
this means that Gradle will verify the signatures and fallback to SHA-256 checksums when there's a problem.
When bootstrapping, Gradle performs optimistic verification and therefore assumes a sane build environment. It will therefore:
-
automatically add the trusted keys as soon as verification passes
-
automatically add ignored keys for keys which couldn't be downloaded from public key servers
-
automatically generate checksums for artifacts without signatures or ignored keys
If, for some reason, verification fails during the generation, Gradle will automatically generate an ignored key entry but warn you that you must absolutely check what happens.
This situation is common as explained for this section: a typical case is when the POM file for a dependency differs from one repository to the other (often in a non-meaningful way).
In addition, Gradle will try to group keys automatically and generate the trusted-keys block which reduced the configuration file size as much as possible.
Forcing use of local keyrings only
The local keyring files (.gpg or .keys) can be used to avoid reaching out to key servers whenever a key is required to verify an artifact. However, it may be that the local keyring doesn't contain a key, in which case Gradle would use the key servers to fetch the missing key. If the local keyring file isn't regularly updated, using key export, then it may be that your CI builds, for example, would reach out to key servers too often (especially if you use disposable containers for builds).
To avoid this, Gradle offers the ability to disallow use of key servers altogether: only the local keyring file would be used, and if a key is missing from this file, the build will fail.
To enable this mode, you need to disable key servers in the configuration file:
<?xml version="1.0" encoding="UTF-8"?> <verification-metadata> <configuration> <key-servers enabled="false"/> ... </configuration> ... </verification-metadata> If you are asking Gradle to generate a verification metadata file and that an existing verification metadata file sets enabled to false, then this flag will be ignored, so that potentially missing keys are downloaded. |
Troubleshooting dependency verification
Dealing with a verification failure
Dependency verification can fail in different ways, this section explains how you should deal with the various cases.
Missing verification metadata
The simplest failure you can have is when verification metadata is missing from the dependency verification file. This is the case for example if you use checksum verification, then you update a dependency and new versions of the dependency (and potentially its transitive dependencies) are brought in.
Gradle will tell you what metadata is missing:
Execution failed for task ':compileJava'. > Dependency verification failed for configuration ':compileClasspath': - On artifact commons-logging-1.2.jar (commons-logging:commons-logging:1.2) in repository 'MavenRepo': checksum is missing from verification metadata.
-
the missing module group is
commons-logging, it's artifact name iscommons-loggingand its version is1.2. The corresponding artifact iscommons-logging-1.2.jarso you need to add the following entry to the verification file:
<component group="commons-logging" name="commons-logging" version="1.2"> <artifact name="commons-logging-1.2.jar"> <sha256 value="daddea1ea0be0f56978ab3006b8ac92834afeefbd9b7e4e6316fca57df0fa636" origin="official distribution"/> </artifact> </component> Alternatively, you can ask Gradle to generate the missing information by using the bootstrapping mechanism: existing information in the metadata file will be preserved, Gradle will only add the missing verification metadata.
Incorrect checksums
A more problematic issue is when the actual checksum verification fails:
Execution failed for task ':compileJava'. > Dependency verification failed for configuration ':compileClasspath': - On artifact commons-logging-1.2.jar (commons-logging:commons-logging:1.2) in repository 'MavenRepo': expected a 'sha256' checksum of '91f7a33096ea69bac2cbaf6d01feb934cac002c48d8c8cfa9c240b40f1ec21df' but was 'daddea1ea0be0f56978ab3006b8ac92834afeefbd9b7e4e6316fca57df0fa636'
This time, Gradle tells you what dependency is at fault, what was the expected checksum (the one you declared in the verification metadata file) and the one which was actually computed during verification.
Such a failure indicates that a dependency may have been compromised. At this stage, you must perform manual verification and check what happens. Several things can happen:
-
a dependency was tampered in the local dependency cache of Gradle. This is usually harmless: erase the file from the cache and Gradle would redownload the dependency.
-
a dependency is available in multiple sources with slightly different binaries (additional whitespace, …)
-
please inform the maintainers of the library that they have such an issue
-
you can use
also-trustto accept the additional checksums
-
-
the dependency was compromised
-
immediately inform the maintainers of the library
-
notify the repository maintainers of the compromised library
-
Note that a variation of a compromised library is often name squatting, when a hacker would use GAV coordinates which look legit but are actually different by one character, or repository shadowing, when a dependency with the official GAV coordinates is published in a malicious repository which comes first in your build.
Untrusted signatures
If you have signature verification enabled, Gradle will perform verification of the signatures but will not trust them automatically:
> Dependency verification failed for configuration ':compileClasspath': - On artifact javaparser-core-3.6.11.jar (com.github.javaparser:javaparser-core:3.6.11) in repository 'MavenRepo': Artifact was signed with key '379ce192d401ab61' (Bintray (by JFrog) <****>) and passed verification but the key isn't in your trusted keys list.
In this case it means you need to check yourself if the key that was used for verification (and therefore the signature) can be trusted, in which case refer to this section of the documentation to figure out how to declare trusted keys.
Failed signature verification
If Gradle fails to verify a signature, you will need to take action and verify artifacts manually because this may indicate a compromised dependency.
If such a thing happens, Gradle will fail with:
> Dependency verification failed for configuration ':compileClasspath': - On artifact javaparser-core-3.6.11.jar (com.github.javaparser:javaparser-core:3.6.11) in repository 'MavenRepo': Artifact was signed with key '379ce192d401ab61' (Bintray (by JFrog) <****>) but signature didn't match
There are several options:
-
signature was wrong in the first place, which happens frequently with dependencies published on different repositories.
-
the signature is correct but the artifact has been compromised (either in the local dependency cache or remotely)
The right approach here is to go to the official site of the dependency and see if they publish signatures for their artifacts. If they do, verify that the signature that Gradle downloaded matches the one published.
If you have checked that the dependency is not compromised and that it's "only" the signature which is wrong, you should declare an artifact level key exclusion:
<components> <component group="com.github.javaparser" name="javaparser-core" version="3.6.11"> <artifact name="javaparser-core-3.6.11.pom"> <ignored-keys> <ignored-key id="379ce192d401ab61" reason="internal repo has corrupted POM"/> </ignored-keys> </artifact> </component> </components> However, if you only do so, Gradle will still fail because all keys for this artifact will be ignored and you didn't provide a checksum:
<components> <component group="com.github.javaparser" name="javaparser-core" version="3.6.11"> <artifact name="javaparser-core-3.6.11.pom"> <ignored-keys> <ignored-key id="379ce192d401ab61" reason="internal repo has corrupted POM"/> </ignored-keys> <sha256 value="a2023504cfd611332177f96358b6f6db26e43d96e8ef4cff59b0f5a2bee3c1e1"/> </artifact> </component> </components> Manual verification of a dependency
You will likely face a dependency verification failure (either checksum verification or signature verification) and will need to figure out if the dependency has been compromised or not.
In this section we give an example how you can manually check if a dependency was compromised.
For this we will take this example failure:
> Dependency verification failed for configuration ':compileClasspath': - On artifact j2objc-annotations-1.1.jar (com.google.j2objc:j2objc-annotations:1.1) in repository 'MyCompany Mirror': Artifact was signed with key '29579f18fa8fd93b' but signature didn't match
This error message gives us the GAV coordinates of the problematic dependency, as well as an indication of where the dependency was fetched from. Here, the dependency comes from MyCompany Mirror, which is a repository declared in our build.
The first thing to do is therefore to download the artifact and its signature manually from the mirror:
$ curl https://my-company-mirror.com/repo/com/google/j2objc/j2objc-annotations/1.1/j2objc-annotations-1.1.jar --output j2objc-annotations-1.1.jar $ curl https://my-company-mirror.com/repo/com/google/j2objc/j2objc-annotations/1.1/j2objc-annotations-1.1.jar.asc --output j2objc-annotations-1.1.jar.asc
Then we can use the key information provided in the error message to import the key locally:
$ gpg --recv-keys 29579f18fa8fd93b
And perform verification:
$ gpg --verify j2objc-annotations-1.1.jar.asc gpg: assuming signed data in 'j2objc-annotations-1.1.jar' gpg: Signature made Thu 19 Jan 2017 12:06:51 AM CET gpg: using RSA key 29579F18FA8FD93B gpg: BAD signature from "Tom Ball <****>" [unknown]
What this tells us is that the problem is not on the local machine: the repository already contains a bad signature.
The next step is to do the same by downloading what is actually on Maven Central:
$ curl https://my-company-mirror.com/repo/com/google/j2objc/j2objc-annotations/1.1/j2objc-annotations-1.1.jar --output central-j2objc-annotations-1.1.jar $ curl https://my-company-mirror.com/repo/com/google/j2objc/j2objc-annotations/1/1/j2objc-annotations-1.1.jar.asc --output central-j2objc-annotations-1.1.jar.asc
And we can now check the signature again:
$ gpg --verify central-j2objc-annotations-1.1.jar.asc gpg: assuming signed data in 'central-j2objc-annotations-1.1.jar' gpg: Signature made Thu 19 Jan 2017 12:06:51 AM CET gpg: using RSA key 29579F18FA8FD93B gpg: Good signature from "Tom Ball <****>" [unknown] gpg: WARNING: This key is not certified with a trusted signature! gpg: There is no indication that the signature belongs to the owner. Primary key fingerprint: B801 E2F8 EF03 5068 EC11 39CC 2957 9F18 FA8F D93B
This indicates that the dependency is valid on Maven Central. At this stage, we already know that the problem lives in the mirror, it may have been compromised, but we need to verify.
A good idea is to compare the 2 artifacts, which you can do with a tool like diffoscope.
We then figure out that the intent wasn't malicious but that somehow a build has been overwritten with a newer version (the version in Central is newer than the one in our repository).
In this case, you can decide to:
-
ignore the signature for this artifact and trust the different possible checksums (both for the old artifact and the new version)
-
or cleanup your mirror so that it contains the same version as in Maven Central
It's worth noting that if you choose to delete the version from your repository, you will also need to remove it from the local Gradle cache.
This is facilitated by the fact the error message tells you were the file is located:
> Dependency verification failed for configuration ':compileClasspath': - On artifact j2objc-annotations-1.1.jar (com.google.j2objc:j2objc-annotations:1.1) in repository 'MyCompany Mirror': Artifact was signed with key '29579f18fa8fd93b' but signature didn't match This can indicate that a dependency has been compromised. Please carefully verify the signatures and checksums. For your information here are the path to the files which failed verification: - GRADLE_USER_HOME/caches/modules-2/files-2.1/com.google.j2objc/j2objc-annotations/1.1/976d8d30bebc251db406f2bdb3eb01962b5685b3/j2objc-annotations-1.1.jar (signature: GRADLE_USER_HOME/caches/modules-2/files-2.1/com.google.j2objc/j2objc-annotations/1.1/82e922e14f57d522de465fd144ec26eb7da44501/j2objc-annotations-1.1.jar.asc) GRADLE_USER_HOME = /home/jiraya/.gradle
You can safely delete the artifact file as Gradle would automatically re-download it:
rm -rf ~/.gradle/caches/modules-2/files-2.1/com.google.j2objc/j2objc-annotations/1.1
Disabling verification or making it lenient
Dependency verification can be expensive, or sometimes verification could get in the way of day to day development (because of frequent dependency upgrades, for example).
Alternatively, you might want to enable verification on CI servers but not on local machines.
Gradle actually provides 3 different verification modes:
-
strict, which is the default. Verification fails as early as possible, in order to avoid the use of compromised dependencies during the build. -
lenient, which will run the build even if there are verification failures. The verification errors will be displayed during the build without causing a build failure. -
offwhen verification is totally ignored.
All those modes can be activated on the CLI using the --dependency-verification flag, for example:
./gradlew --dependency-verification lenient build
Alternatively, you can set the org.gradle.dependency.verification system property, either on the CLI:
./gradlew -Dorg.gradle.dependency.verification=lenient build
or in a gradle.properties file:
org.gradle.dependency.verification=lenient
Trusting some particular artifacts
You might want to trust some artifacts more than others. For example, it's legitimate to think that artifacts produced in your company and found in your internal repository only are safe, but you want to check every external component.
| This is a typical company policy. In practice, nothing prevents your internal repository from being compromised, so it's a good idea to check your internal artifacts too! |
For this purpose, Gradle offers a way to automatically trust some artifacts. You can trust all artifacts in a group by adding this to your configuration:
<?xml version="1.0" encoding="UTF-8"?> <verification-metadata> <configuration> <trusted-artifacts> <trust group="com.mycompany"/> </trusted-artifacts> </configuration> </verification-metadata> This means that all components which group is com.mycompany will automatically be trusted. Trusted means that Gradle will not perform any verification whatsoever.
The trust element accepts those attributes:
-
group, the group of the artifact to trust -
name, the name of the artifact to trust -
version, the version of the artifact to trust -
file, the name of the artifact file to trust -
regex, a boolean saying if thegroup,name,versionandfileattributes need to be interpreted as regular expressions (defaults tofalse)
In the example above it means that the trusted artifacts would be artifacts in com.mycompany but not com.mycompany.other. To trust all artifacts in com.mycompany and all subgroups, you can use:
<?xml version="1.0" encoding="UTF-8"?> <verification-metadata> <configuration> <trusted-artifacts> <trust group="^com[.]mycompany($|([.].*))" regex="true"/> </trusted-artifacts> </configuration> </verification-metadata> Trusting multiple checksums for an artifact
It's quite common to have different checksums for the same artifact in the wild. How is that possible? Despite progress, it's often the case that developers publish, for example, to Maven Central and another repository separately, using different builds. In general, this is not a problem but sometimes it means that the metadata files would be different (different timestamps, additional whitespaces, …). Add to this that your build may use several repositories or repository mirrors and it makes it quite likely that a single build can "see" different metadata files for the same component! In general, it's not malicious (but you must verify that the artifact is actually correct), so Gradle lets you declare the additional artifact checksums. For example:
<component group="org.apache" name="apache" version="13"> <artifact name="apache-13.pom"> <sha256 value="2fafa38abefe1b40283016f506ba9e844bfcf18713497284264166a5dbf4b95e"> <also-trust value="ff513db0361fd41237bef4784968bc15aae478d4ec0a9496f811072ccaf3841d"/> </sha256> </artifact> </component> You can have as many also-trust entries as needed, but in general you shouldn't have more than 2.
Skipping Javadocs and sources
By default Gradle will verify all downloaded artifacts, which includes Javadocs and sources. In general this is not a problem but you might face an issue with IDEs which automatically try to download them during import: if you didn't set the checksums for those too, importing would fail.
To avoid this, you can configure Gradle to trust automatically all javadocs/sources:
<trusted-artifacts> <trust file=".*-javadoc[.]jar" regex="true"/> <trust file=".*-sources[.]jar" regex="true"/> </trusted-artifacts> Cleaning up the verification file
If you do nothing, the dependency verification metadata will grow over time as you add new dependencies or change versions: Gradle will not automatically remove unused entries from this file. The reason is that there's no way for Gradle to know upfront if a dependency will effectively be used during the build or not.
As a consequence, adding dependencies or changing dependency version can easily lead to more entries in the file, while leaving unnecessary entries out there.
One option to cleanup the file is to move the existing verification-metadata.xml file to a different location and call Gradle with the --dry-run mode: while not perfect (it will not notice dependencies only resolved at configuration time), it generates a new file that you can compare with the existing one.
We need to move the existing file because both the bootstrapping mode and the dry-run mode are incremental: they copy information from the existing metadata verification file (in particular, trusted keys).
Refreshing missing keys
Gradle caches missing keys for 24 hours, meaning it will not attempt to re-download the missing keys for 24 hours after failing.
If you want to retry immediately, you can run with the --refresh-keys CLI flag:
./gradlew build --refresh-keys
Disabling dependency verification for some configurations only
In order to provide the strongest security level possible, dependency verification is enabled globally. This will ensure, for example, that you trust all the plugins you use. However, the plugins themselves may need to resolve additional dependencies that it doesn't make sense to ask the user to accept. For this purpose, Gradle provides an API which allows disabling dependency verification on some specific configurations.
| Disabling dependency verification, if you care about security, is not a good idea. This API mostly exist for cases where it doesn't make sense to check dependencies. However, in order to be on the safe side, Gradle will systematically print a warning whenever verification has been disabled for a specific configuration. |
As an example, a plugin may want to check if there are newer versions of a library available and list those versions. It doesn't make sense, in this context, to ask the user to put the checksums of the POM files of the newer releases because by definition, they don't know about them. So the plugin might need to run its code independently of the dependency verification configuration.
To do this, you need to call the ResolutionStrategy#disableDependencyVerification method:
Example 53. Disabling dependency verification
build.gradle
configurations { myPluginClasspath { resolutionStrategy { disableDependencyVerification() } } } build.gradle.kts
configurations { "myPluginClasspath" { resolutionStrategy { disableDependencyVerification() } } } It's also possible to disable verification on detached configurations like in the following example:
Example 54. Disabling dependency verification
build.gradle
tasks.register("checkDetachedDependencies") { doLast { def detachedConf = configurations.detachedConfiguration(dependencies.create("org.apache.commons:commons-lang3:3.3.1")) detachedConf.resolutionStrategy.disableDependencyVerification() println(detachedConf.files) } } build.gradle.kts
tasks.register("checkDetachedDependencies") { doLast { val detachedConf = configurations.detachedConfiguration(dependencies.create("org.apache.commons:commons-lang3:3.3.1")) detachedConf.resolutionStrategy.disableDependencyVerification() println(detachedConf.files) } } Declaring Versions
Declaring Versions and Ranges
The simplest version declaration is a simple string representing the version to use. Gradle supports different ways of declaring a version string:
-
An exact version: e.g.
1.3,1.3.0-beta3,1.0-20150201.131010-1 -
A Maven-style version range: e.g.
[1.0,),[1.1, 2.0),(1.2, 1.5]-
The
[and]symbols indicate an inclusive bound;(and)indicate an exclusive bound. -
When the upper or lower bound is missing, the range has no upper or lower bound.
-
The symbol
]can be used instead of(for an exclusive lower bound, and[instead of)for exclusive upper bound. e.g]1.0, 2.0[ -
An upper bound exclude acts as a prefix exclude. This means that
[1.0, 2.0[will also exclude all versions starting with2.0that are smaller than2.0. For example versions like2.0-dev1or2.0-SNAPSHOTare no longer included in the range.
-
-
A prefix version range: e.g.
1.+,1.3.+-
Only versions exactly matching the portion before the
+are included. -
The range
+on it's own will include any version.
-
-
A
latest-statusversion: e.g.latest.integration,latest.release-
Will match the highest versioned module with the specified status. See ComponentMetadata.getStatus().
-
-
A Maven
SNAPSHOTversion identifier: e.g.1.0-SNAPSHOT,1.4.9-beta1-SNAPSHOT
Version ordering
Versions have an implicit ordering. Version ordering is used to:
-
Determine if a particular version is included in a range.
-
Determine which version is 'newest' when performing conflict resolution.
Versions are ordered based on the following rules:
-
Each version is split into it's constituent "parts":
-
The characters
[. - _ +]are used to separate the different "parts" of a version. -
Any part that contains both digits and letters is split into separate parts for each:
1a1 == 1.a.1 -
Only the parts of a version are compared. The actual separator characters are not significant:
1.a.1 == 1-a+1 == 1.a-1 == 1a1
-
-
The equivalent parts of 2 versions are compared using the following rules:
-
If both parts are numeric, the highest numeric value is higher:
1.1<1.2 -
If one part is numeric, it is considered higher than the non-numeric part:
1.a<1.1 -
If both are not numeric, the parts are compared alphabetically, case-sensitive:
1.A<1.B<1.a<1.b -
A version with an extra numeric part is considered higher than a version without:
1.1<1.1.0 -
A version with an extra non-numeric part is considered lower than a version without:
1.1.a<1.1
-
-
Certain string values have special meaning for the purposes of ordering:
-
The string
devis consider lower than any other string part:1.0-dev<1.0-alpha<1.0-rc. -
The strings
rc,final,gaandreleaseare considered higher than any other string part (sorted in that order):1.0-zeta<1.0-RC<1.0-FINAL<1.0-GA<1.0-RELEASE<1.0. -
The string
SPwill be ordered higher thanrelease, it remains however lower than an unqualified version, limiting its use to versioning schemes using eitherFINAL,GAorRELEASE:1.0-RELEASE<1.0-SP1<1.0 -
The string
snapshotwill be ordered higher thanrc:1.0-RC<1.0-SNAPSHOT<1.0. -
Numeric snapshot versions have no special meaning, and are sorted like any other numeric part:
1.0<1.0-20150201.121010-123<1.1.
-
Simple version declaration semantics
When you declare a version using the short-hand notation, for example:
Example 55. A simple declaration
build.gradle
dependencies { implementation('org.slf4j:slf4j-api:1.7.15') } build.gradle.kts
dependencies { implementation("org.slf4j:slf4j-api:1.7.15") } Then the version is considered a required version which means that it should minimally be 1.7.15 but can be upgraded by the engine (optimistic upgrade).
There is, however, a shorthand notation for strict versions, using the !! notation:
Example 56. Shorthand notation for strict dependencies
build.gradle
dependencies { // short-hand notation with !! implementation('org.slf4j:slf4j-api:1.7.15!!') // is equivalent to implementation("org.slf4j:slf4j-api") { version { strictly '1.7.15' } } // or... implementation('org.slf4j:slf4j-api:[1.7, 1.8[!!1.7.25') // is equivalent to implementation('org.slf4j:slf4j-api') { version { strictly '[1.7, 1.8[' prefer '1.7.25' } } } build.gradle.kts
dependencies { // short-hand notation with !! implementation("org.slf4j:slf4j-api:1.7.15!!") // is equivalent to implementation("org.slf4j:slf4j-api") { version { strictly("1.7.15") } } // or... implementation("org.slf4j:slf4j-api:[1.7, 1.8[!!1.7.25") // is equivalent to implementation("org.slf4j:slf4j-api") { version { strictly("[1.7, 1.8[") prefer("1.7.25") } } } A strict version cannot be upgraded and overrides whatever transitive dependencies originating from this dependency provide. It is recommended to use ranges for strict versions.
The notation [1.7, 1.8[!!1.7.25 above is equivalent to:
-
strictly
[1.7, 1.8[ -
prefer
1.7.25
which means that the engine must select a version between 1.7 (included) and 1.8 (excluded), and that if no other component in the graph needs a different version, it should prefer 1.7.25.
Declaring a dependency without version
A recommended practice for larger projects is to declare dependencies without versions and use dependency constraints for version declaration. The advantage is that dependency constraints allow you to manage versions of all dependencies, including transitive ones, in one place.
Example 57. Declaring a dependency without version
build.gradle
dependencies { implementation 'org.springframework:spring-web' } dependencies { constraints { implementation 'org.springframework:spring-web:5.0.2.RELEASE' } } build.gradle.kts
dependencies { implementation("org.springframework:spring-web") } dependencies { constraints { implementation("org.springframework:spring-web:5.0.2.RELEASE") } } Declaring Rich Versions
Gradle supports a rich model for declaring versions, which allows to combine different level of version information. The terms and their meaning are explained below, from the strongest to the weakest:
-
strictly -
Any version not matched by this version notation will be excluded. This is the strongest version declaration. On a declared dependency, a
strictlycan downgrade a version. When on a transitive dependency, it will cause dependency resolution to fail if no version acceptable by this clause can be selected. See overriding dependency version for details. This term supports dynamic versions.When defined, this overrides any previous
requiredeclaration and clears previousreject.
-
require -
Implies that the selected version cannot be lower than what
requireaccepts but could be higher through conflict resolution, even if higher has an exclusive higher bound. This is what a direct dependency translates to. This term supports dynamic versions.When defined, this overrides any previous
strictlydeclaration and clears previousreject.
-
prefer -
This is a very soft version declaration. It applies only if there is no stronger non dynamic opinion on a version for the module. This term does not support dynamic versions.
Definition can complement
strictlyorrequire.When defined, this overrides any previous
preferdeclaration and clears previousreject.
There is also an additional term outside of the level hierarchy:
-
reject -
Declares that specific version(s) are not accepted for the module. This will cause dependency resolution to fail if the only versions selectable are also rejected. This term supports dynamic versions.
The following table illustrates a number of use cases and how to combine the different terms for rich version declaration:
| Which version(s) of this dependency are acceptable? | strictly | require | prefer | rejects | Selection result |
|---|---|---|---|---|---|
| Tested with version | 1.5 | Any version starting from | |||
| Tested with | [1.0, 2.0[ | 1.5 | Any version between | ||
| Tested with | [1.0, 2.0[ | 1.5 | Any version between | ||
| Same as above, with | [1.0, 2.0[ | 1.5 | 1.4 | Any version between | |
| No opinion, works with | 1.5 | | |||
| No opinion, prefer latest release. | | The latest release at build time. | |||
| On the edge, latest release, no downgrade. | | The latest release at build time. | |||
| No other version than 1.5. | 1.5 | 1.5, or failure if another | |||
| | [1.5,1.6[ | Latest |
Lines annotated with a lock (🔒) indicate that leveraging dependency locking makes sense in this context. Another concept that relates with rich version declaration is the ability to publish resolved versions instead of declared ones.
Using strictly, especially for a library, must be a well thought process as it has an impact on downstream consumers. At the same time, used correctly, it will help consumers understand what combination of libraries do not work together in their context. See overriding dependency version for more information.
| Rich version information will be preserved in the Gradle Module Metadata format. However conversion to Ivy or Maven metadata formats will be lossy. The highest level will be published, that is |
Rich version declaration is accessed through the version DSL method on a dependency or constraint declaration which gives access to MutableVersionConstraint.
Example 58. Rich version declaration
build.gradle
dependencies { implementation('org.slf4j:slf4j-api') { version { strictly '[1.7, 1.8[' prefer '1.7.25' } } constraints { implementation('org.springframework:spring-core') { version { require '4.2.9.RELEASE' reject '4.3.16.RELEASE' } } } } build.gradle.kts
dependencies { implementation("org.slf4j:slf4j-api") { version { strictly("[1.7, 1.8[") prefer("1.7.25") } } constraints { add("implementation", "org.springframework:spring-core") { version { require("4.2.9.RELEASE") reject("4.3.16.RELEASE") } } } } Handling versions which change over time
There are many situations when you want to use the latest version of a particular module dependency, or the latest in a range of versions. This can be a requirement during development, or you may be developing a library that is designed to work with a range of dependency versions. You can easily depend on these constantly changing dependencies by using a dynamic version. A dynamic version can be either a version range (e.g. 2.+) or it can be a placeholder for the latest version available e.g. latest.integration.
Alternatively, the module you request can change over time even for the same version, a so-called changing version. An example of this type of changing module is a Maven SNAPSHOT module, which always points at the latest artifact published. In other words, a standard Maven snapshot is a module that is continually evolving, it is a "changing module".
| Using dynamic versions and changing modules can lead to unreproducible builds. As new versions of a particular module are published, its API may become incompatible with your source code. Use this feature with caution! |
Declaring a dynamic version
Projects might adopt a more aggressive approach for consuming dependencies to modules. For example you might want to always integrate the latest version of a dependency to consume cutting edge features at any given time. A dynamic version allows for resolving the latest version or the latest version of a version range for a given module.
| Using dynamic versions in a build bears the risk of potentially breaking it. As soon as a new version of the dependency is released that contains an incompatible API change your source code might stop compiling. |
Example 59. Declaring a dependency with a dynamic version
build.gradle
plugins { id 'java-library' } repositories { mavenCentral() } dependencies { implementation 'org.springframework:spring-web:5.+' } build.gradle.kts
plugins { `java-library` } repositories { mavenCentral() } dependencies { implementation("org.springframework:spring-web:5.+") } A build scan can effectively visualize dynamic dependency versions and their respective, selected versions.
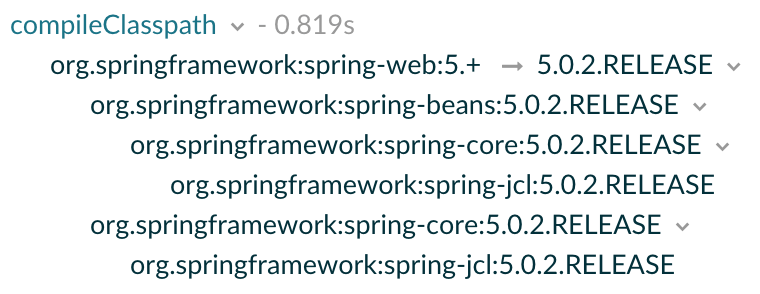
Figure 10. Dynamic dependencies in build scan
By default, Gradle caches dynamic versions of dependencies for 24 hours. Within this time frame, Gradle does not try to resolve newer versions from the declared repositories. The threshold can be configured as needed for example if you want to resolve new versions earlier.
Declaring a changing version
A team might decide to implement a series of features before releasing a new version of the application or library. A common strategy to allow consumers to integrate an unfinished version of their artifacts early and often is to release a module with a so-called changing version. A changing version indicates that the feature set is still under active development and hasn't released a stable version for general availability yet.
In Maven repositories, changing versions are commonly referred to as snapshot versions. Snapshot versions contain the suffix -SNAPSHOT. The following example demonstrates how to declare a snapshot version on the Spring dependency.
Example 60. Declaring a dependency with a changing version
build.gradle
plugins { id 'java-library' } repositories { mavenCentral() maven { url 'https://repo.spring.io/snapshot/' } } dependencies { implementation 'org.springframework:spring-web:5.0.3.BUILD-SNAPSHOT' } build.gradle.kts
plugins { `java-library` } repositories { mavenCentral() maven { url = uri("https://repo.spring.io/snapshot/") } } dependencies { implementation("org.springframework:spring-web:5.0.3.BUILD-SNAPSHOT") } By default, Gradle caches changing versions of dependencies for 24 hours. Within this time frame, Gradle does not try to resolve newer versions from the declared repositories. The threshold can be configured as needed for example if you want to resolve new snapshot versions earlier.
Gradle is flexible enough to treat any version as changing version e.g. if you wanted to model snapshot behavior for an Ivy module. All you need to do is to set the property ExternalModuleDependency.setChanging(boolean) to true.
Controlling dynamic version caching
By default, Gradle caches dynamic versions and changing modules for 24 hours. During that time frame Gradle does not contact any of the declared, remote repositories for new versions. If you want Gradle to check the remote repository more frequently or with every execution of your build, then you will need to change the time to live (TTL) threshold.
| Using a short TTL threshold for dynamic or changing versions may result in longer build times due to the increased number of HTTP(s) calls. |
You can override the default cache modes using command line options. You can also change the cache expiry times in your build programmatically using the resolution strategy.
Controlling dependency caching programmatically
You can fine-tune certain aspects of caching programmatically using the ResolutionStrategy for a configuration. The programmatic approach is useful if you would like to change the settings permanently.
By default, Gradle caches dynamic versions for 24 hours. To change how long Gradle will cache the resolved version for a dynamic version, use:
Example 61. Dynamic version cache control
build.gradle
configurations.all { resolutionStrategy.cacheDynamicVersionsFor 10, 'minutes' } build.gradle.kts
configurations.all { resolutionStrategy.cacheDynamicVersionsFor(10, "minutes") } By default, Gradle caches changing modules for 24 hours. To change how long Gradle will cache the meta-data and artifacts for a changing module, use:
Example 62. Changing module cache control
build.gradle
configurations.all { resolutionStrategy.cacheChangingModulesFor 4, 'hours' } build.gradle.kts
configurations.all { resolutionStrategy.cacheChangingModulesFor(4, "hours") } Controlling dependency caching from the command line
Avoiding network access with offline mode
The --offline command line switch tells Gradle to always use dependency modules from the cache, regardless if they are due to be checked again. When running with offline, Gradle will never attempt to access the network to perform dependency resolution. If required modules are not present in the dependency cache, build execution will fail.
Refreshing dependencies
You can control the behavior of dependency caching for a distinct build invocation from the command line. Command line options are helpful for making a selective, ad-hoc choice for a single execution of the build.
At times, the Gradle Dependency Cache can become out of sync with the actual state of the configured repositories. Perhaps a repository was initially misconfigured, or perhaps a "non-changing" module was published incorrectly. To refresh all dependencies in the dependency cache, use the --refresh-dependencies option on the command line.
The --refresh-dependencies option tells Gradle to ignore all cached entries for resolved modules and artifacts. A fresh resolve will be performed against all configured repositories, with dynamic versions recalculated, modules refreshed, and artifacts downloaded. However, where possible Gradle will check if the previously downloaded artifacts are valid before downloading again. This is done by comparing published SHA1 values in the repository with the SHA1 values for existing downloaded artifacts.
-
new versions of dynamic dependencies
-
new versions of changing modules (modules which use the same version string but can have different contents)
| Refreshing dependencies will cause Gradle to invalidate its listing caches. However:
In other words, refreshing dependencies only has an impact if you actually use dynamic dependencies or that you have changing dependencies that you were not aware of (in which case it is your responsibility to declare them correctly to Gradle as changing dependencies). It's a common misconception to think that using |
Using component selection rules
Component selection rules may influence which component instance should be selected when multiple versions are available that match a version selector. Rules are applied against every available version and allow the version to be explicitly rejected by rule. This allows Gradle to ignore any component instance that does not satisfy conditions set by the rule. Examples include:
-
For a dynamic version like
1.+certain versions may be explicitly rejected from selection. -
For a static version like
1.4an instance may be rejected based on extra component metadata such as the Ivy branch attribute, allowing an instance from a subsequent repository to be used.
Rules are configured via the ComponentSelectionRules object. Each rule configured will be called with a ComponentSelection object as an argument which contains information about the candidate version being considered. Calling ComponentSelection.reject(java.lang.String) causes the given candidate version to be explicitly rejected, in which case the candidate will not be considered for the selector.
The following example shows a rule that disallows a particular version of a module but allows the dynamic version to choose the next best candidate.
Example 63. Component selection rule
build.gradle
configurations { rejectConfig { resolutionStrategy { componentSelection { // Accept the highest version matching the requested version that isn't '1.5' all { ComponentSelection selection -> if (selection.candidate.group == 'org.sample' && selection.candidate.module == 'api' && selection.candidate.version == '1.5') { selection.reject("version 1.5 is broken for 'org.sample:api'") } } } } } } dependencies { rejectConfig "org.sample:api:1.+" } build.gradle.kts
configurations { create("rejectConfig") { resolutionStrategy { componentSelection { // Accept the highest version matching the requested version that isn't '1.5' all { if (candidate.group == "org.sample" && candidate.module == "api" && candidate.version == "1.5") { reject("version 1.5 is broken for 'org.sample:api'") } } } } } } dependencies { "rejectConfig"("org.sample:api:1.+") } Note that version selection is applied starting with the highest version first. The version selected will be the first version found that all component selection rules accept. A version is considered accepted if no rule explicitly rejects it.
Similarly, rules can be targeted at specific modules. Modules must be specified in the form of group:module.
Example 64. Component selection rule with module target
build.gradle
configurations { targetConfig { resolutionStrategy { componentSelection { withModule("org.sample:api") { ComponentSelection selection -> if (selection.candidate.version == "1.5") { selection.reject("version 1.5 is broken for 'org.sample:api'") } } } } } } build.gradle.kts
configurations { create("targetConfig") { resolutionStrategy { componentSelection { withModule("org.sample:api") { if (candidate.version == "1.5") { reject("version 1.5 is broken for 'org.sample:api'") } } } } } } Component selection rules can also consider component metadata when selecting a version. Possible additional metadata that can be considered are ComponentMetadata and IvyModuleDescriptor. Note that this extra information may not always be available and thus should be checked for null values.
Example 65. Component selection rule with metadata
build.gradle
configurations { metadataRulesConfig { resolutionStrategy { componentSelection { // Reject any versions with a status of 'experimental' all { ComponentSelection selection -> if (selection.candidate.group == 'org.sample' && selection.metadata?.status == 'experimental') { selection.reject("don't use experimental candidates from 'org.sample'") } } // Accept the highest version with either a "release" branch or a status of 'milestone' withModule('org.sample:api') { ComponentSelection selection -> if (selection.getDescriptor(IvyModuleDescriptor)?.branch != "release" && selection.metadata?.status != 'milestone') { selection.reject("'org.sample:api' must be a release branch or have milestone status") } } } } } } build.gradle.kts
configurations { create("metadataRulesConfig") { resolutionStrategy { componentSelection { // Reject any versions with a status of 'experimental' all { if (candidate.group == "org.sample" && metadata?.status == "experimental") { reject("don't use experimental candidates from 'org.sample'") } } // Accept the highest version with either a "release" branch or a status of 'milestone' withModule("org.sample:api") { if (getDescriptor(IvyModuleDescriptor::class)?.branch != "release" && metadata?.status != "milestone") { reject("'org.sample:api' must have testing branch or milestone status") } } } } } } Note that a ComponentSelection argument is always required as parameter when declaring a component selection rule.
Locking dependency versions
Use of dynamic dependency versions (e.g. 1.+ or [1.0,2.0)) makes builds non-deterministic. This causes builds to break without any obvious change, and worse, can be caused by a transitive dependency that the build author has no control over.
To achieve reproducible builds, it is necessary to lock versions of dependencies and transitive dependencies such that a build with the same inputs will always resolve the same module versions. This is called dependency locking.
It enables, amongst others, the following scenarios:
-
Companies dealing with multi repositories no longer need to rely on
-SNAPSHOTor changing dependencies, which sometimes result in cascading failures when a dependency introduces a bug or incompatibility. Now dependencies can be declared against major or minor version range, enabling to test with the latest versions on CI while leveraging locking for stable developer builds. -
Teams that want to always use the latest of their dependencies can use dynamic versions, locking their dependencies only for releases. The release tag will contain the lock states, allowing that build to be fully reproducible when bug fixes need to be developed.
Combined with publishing resolved versions, you can also replace the declared dynamic version part at publication time. Consumers will instead see the versions that your release resolved.
Locking is enabled per dependency configuration. Once enabled, you must create an initial lock state. It will cause Gradle to verify that resolution results do not change, resulting in the same selected dependencies even if newer versions are produced. Modifications to your build that would impact the resolved set of dependencies will cause it to fail. This makes sure that changes, either in published dependencies or build definitions, do not alter resolution without adapting the lock state.
| Dependency locking makes sense only with dynamic versions. It will have no impact on changing versions (like |
Enabling locking on configurations
Example 66. Locking a specific configuration
build.gradle
configurations { compileClasspath { resolutionStrategy.activateDependencyLocking() } } build.gradle.kts
configurations { compileClasspath { resolutionStrategy.activateDependencyLocking() } } | Only configurations that can be resolved will have lock state attached to them. Applying locking on non resolvable-configurations is simply a no-op. |
Or the following, as a way to lock all configurations:
Example 67. Locking all configurations
build.gradle
dependencyLocking { lockAllConfigurations() } build.gradle.kts
dependencyLocking { lockAllConfigurations() } | The above will lock all project configurations, but not the buildscript ones. |
You can also disable locking on a specific configuration. This can be useful if a plugin configured locking on all configurations but you happen to add one that should not be locked.
Example 68. Unlocking a specific configuration
build.gradle
configurations { compileClasspath { resolutionStrategy.deactivateDependencyLocking() } } build.gradle.kts
configurations.compileClasspath { resolutionStrategy.deactivateDependencyLocking() } Locking buildscript classpath configuration
If you apply plugins to your build, you may want to leverage dependency locking there as well. In order to lock the classpath configuration used for script plugins, do the following:
Example 69. Locking buildscript classpath configuration
build.gradle
buildscript { configurations.classpath { resolutionStrategy.activateDependencyLocking() } } build.gradle.kts
buildscript { configurations.classpath { resolutionStrategy.activateDependencyLocking() } } Generating and updating dependency locks
In order to generate or update lock state, you specify the --write-locks command line argument in addition to the normal tasks that would trigger configurations to be resolved. This will cause the creation of lock state for each resolved configuration in that build execution. Note that if lock state existed previously, it is overwritten.
| Gradle will not write lock state to disk if the build fails. This prevents persisting possibly invalid state. |
Lock all configurations in one build execution
When locking multiple configurations, you may want to lock them all at once, during a single build execution.
For this, you have two options:
-
Run
gradle dependencies --write-locks. This will effectively lock all resolvable configurations that have locking enabled. Note that in a multi project setup,dependenciesonly is executed on one project, the root one in this case. -
Declare a custom task that will resolve all configurations
Example 70. Resolving all configurations
build.gradle
tasks.register('resolveAndLockAll') { doFirst { assert gradle.startParameter.writeDependencyLocks } doLast { configurations.findAll { // Add any custom filtering on the configurations to be resolved it.canBeResolved }.each { it.resolve() } } } build.gradle.kts
tasks.register("resolveAndLockAll") { doFirst { require(gradle.startParameter.isWriteDependencyLocks) } doLast { configurations.filter { // Add any custom filtering on the configurations to be resolved it.isCanBeResolved }.forEach { it.resolve() } } } That second option, with proper selection of configurations, can be the only option in the native world, where not all configurations can be resolved on a single platform.
Lock state location and format
Lock state will be preserved in a file located at the root of the project or subproject directory. Each file is named gradle.lockfile. The one exception to this rule is for the lock file for the buildscript itself. In that case the file will be named buildscript-gradle.lockfile.
The lockfile will have the following content:
gradle.lockfile
# This is a Gradle generated file for dependency locking. # Manual edits can break the build and are not advised. # This file is expected to be part of source control. org.springframework:spring-beans:5.0.5.RELEASE=compileClasspath, runtimeClasspath org.springframework:spring-core:5.0.5.RELEASE=compileClasspath, runtimeClasspath org.springframework:spring-jcl:5.0.5.RELEASE=compileClasspath, runtimeClasspath empty=annotationProcessor
-
Each line still represents a single dependency in the
group:artifact:versionnotation -
It then lists all configurations that contain the given dependency
-
Module and configurations are ordered alphabetically, to ease diffs
-
The last line of the file lists all empty configurations, that is configurations known to have no dependencies
which matches the following dependency declaration:
Example 71. Dynamic dependency declaration
build.gradle
configurations { compileClasspath { resolutionStrategy.activateDependencyLocking() } runtimeClasspath { resolutionStrategy.activateDependencyLocking() } annotationProcessor { resolutionStrategy.activateDependencyLocking() } } dependencies { implementation 'org.springframework:spring-beans:[5.0,6.0)' } build.gradle.kts
configurations { compileClasspath { resolutionStrategy.activateDependencyLocking() } runtimeClasspath { resolutionStrategy.activateDependencyLocking() } annotationProcessor { resolutionStrategy.activateDependencyLocking() } } dependencies { implementation("org.springframework:spring-beans:[5.0,6.0)") } Migrating from the lockfile per configuration format
If your project uses the legacy lock file format of a file per locked configuration, follow these instructions to migrate to the new format:
-
Follow the documentation for writing or updating dependency lock state.
-
Upon writing the single lock file per project, Gradle will also delete all lock files per configuration for which the state was transferred.
| Migration can be done one configuration at a time. Gradle will keep sourcing the lock state from the per configuration files as long as there is no information for that configuration in the single lock file. |
Configuring the per project lock file name and location
When using the single lock file per project, you can configure its name and location. The main reason for providing this is to enable having a file name that is determined by some project properties, effectively allowing a single project to store different lock state for different execution contexts. One trivial example in the JVM ecosystem is the Scala version that is often found in artifact coordinates.
Example 72. Changing the lock file name
build.gradle
def scalaVersion = "2.12" dependencyLocking { lockFile = file("$projectDir/locking/gradle-${scalaVersion}.lockfile") } build.gradle.kts
val scalaVersion = "2.12" dependencyLocking { lockFile.set(file("$projectDir/locking/gradle-${scalaVersion}.lockfile")) } Running a build with lock state present
The moment a build needs to resolve a configuration that has locking enabled and it finds a matching lock state, it will use it to verify that the given configuration still resolves the same versions.
A successful build indicates that the same dependencies are used as stored in the lock state, regardless if new versions matching the dynamic selector have been produced.
The complete validation is as follows:
-
Existing entries in the lock state must be matched in the build
-
A version mismatch or missing resolved module causes a build failure
-
-
Resolution result must not contain extra dependencies compared to the lock state
Fine tuning dependency locking behaviour with lock mode
While the default lock mode behaves as described above, two other modes are available:
- Strict mode
-
In this mode, in addition to the validations above, dependency locking will fail if a configuration marked as locked does not have lock state associated with it.
- Lenient mode
-
In this mode, dependency locking will still pin dynamic versions but otherwise changes to the dependency resolution are no longer errors.
The lock mode can be controlled from the dependencyLocking block as shown below:
Example 73. Setting the lock mode
build.gradle
dependencyLocking { lockMode = LockMode.STRICT } build.gradle.kts
dependencyLocking { lockMode.set(LockMode.STRICT) } Selectively updating lock state entries
In order to update only specific modules of a configuration, you can use the --update-locks command line flag. It takes a comma (,) separated list of module notations. In this mode, the existing lock state is still used as input to resolution, filtering out the modules targeted by the update.
❯ gradle classes --update-locks org.apache.commons:commons-lang3,org.slf4j:slf4j-api
Wildcards, indicated with *, can be used in the group or module name. They can be the only character or appear at the end of the group or module respectively. The following wildcard notation examples are valid:
-
org.apache.commons:*: will let all modules belonging to grouporg.apache.commonsupdate -
*:guava: will let all modules namedguava, whatever their group, update -
org.springframework.spring*:spring*: will let all modules having their group starting withorg.springframework.springand name starting withspringupdate
| The resolution may cause other module versions to update, as dictated by the Gradle resolution rules. |
Disabling dependency locking
-
Make sure that the configuration for which you no longer want locking is not configured with locking.
-
Next time you update the save lock state, Gradle will automatically clean up all stale lock state from it.
Gradle needs to resolve a configuration, no longer marked as locked, to detect that associated lock state can be dropped.
Ignoring specific dependencies from the lock state
Dependency locking can be used in cases where reproducibility is not the main goal. As a build author, you may want to have different frequency of dependency version updates, based on their origin for example. In that case, it might be convenient to ignore some dependencies because you always want to use the latest version for those. An example is the internal dependencies in an organization which should always use the latest version as opposed to third party dependencies which have a different upgrade cycle.
| This feature can break reproducibility and should be used with caution. There are scenarios that are better served with leveraging different lock modes or using different names for lock files. |
You can configure ignored dependencies in the dependencyLocking project extension:
Example 74. Ignoring dependencies for the lock state
build.gradle
dependencyLocking { ignoredDependencies.add('com.example:*') } build.gradle.kts
dependencyLocking { ignoredDependencies.add("com.example:*") } The notation is a <group>:<name> dependency notation, where * can be used as a trailing wildcard. See the description on updating lock files for more details. Note that the value *:* is not accepted as it is equivalent to disabling locking.
Ignoring dependencies will have the following effects:
-
An ignored dependency applies to all locked configurations. The setting is project scoped.
-
Ignoring a dependency does not mean lock state ignores its transitive dependencies.
-
There is no validation that an ignored dependency is present in any configuration resolution.
-
If the dependency is present in lock state, loading it will filter out the dependency.
-
If the dependency is present in the resolution result, it will be ignored when validating that resolution matches the lock state.
-
Finally, if the dependency is present in the resolution result and the lock state is persisted, it will be absent from the written lock state.
Locking limitations
-
Locking cannot yet be applied to source dependencies.
Controlling Transitive Dependencies
Upgrading versions of transitive dependencies
Direct dependencies vs dependency constraints
A component may have two different kinds of dependencies:
-
direct dependencies are directly required by the component. A direct dependency is also referred to as a first level dependency. For example, if your project source code requires Guava, Guava should be declared as direct dependency.
-
transitive dependencies are dependencies that your component needs, but only because another dependency needs them.
It's quite common that issues with dependency management are about transitive dependencies. Often developers incorrectly fix transitive dependency issues by adding direct dependencies. To avoid this, Gradle provides the concept of dependency constraints.
Adding constraints on transitive dependencies
Dependency constraints allow you to define the version or the version range of both dependencies declared in the build script and transitive dependencies. It is the preferred method to express constraints that should be applied to all dependencies of a configuration. When Gradle attempts to resolve a dependency to a module version, all dependency declarations with version, all transitive dependencies and all dependency constraints for that module are taken into consideration. The highest version that matches all conditions is selected. If no such version is found, Gradle fails with an error showing the conflicting declarations. If this happens you can adjust your dependencies or dependency constraints declarations, or make other adjustments to the transitive dependencies if needed. Similar to dependency declarations, dependency constraint declarations are scoped by configurations and can therefore be selectively defined for parts of a build. If a dependency constraint influenced the resolution result, any type of dependency resolve rules may still be applied afterwards.
Example 75. Define dependency constraints
build.gradle
dependencies { implementation 'org.apache.httpcomponents:httpclient' constraints { implementation('org.apache.httpcomponents:httpclient:4.5.3') { because 'previous versions have a bug impacting this application' } implementation('commons-codec:commons-codec:1.11') { because 'version 1.9 pulled from httpclient has bugs affecting this application' } } } build.gradle.kts
dependencies { implementation("org.apache.httpcomponents:httpclient") constraints { implementation("org.apache.httpcomponents:httpclient:4.5.3") { because("previous versions have a bug impacting this application") } implementation("commons-codec:commons-codec:1.11") { because("version 1.9 pulled from httpclient has bugs affecting this application") } } } In the example, all versions are omitted from the dependency declaration. Instead, the versions are defined in the constraints block. The version definition for commons-codec:1.11 is only taken into account if commons-codec is brought in as transitive dependency, since commons-codec is not defined as dependency in the project. Otherwise, the constraint has no effect. Dependency constraints can also define a rich version constraint and support strict versions to enforce a version even if it contradicts with the version defined by a transitive dependency (e.g. if the version needs to be downgraded).
| Dependency constraints are only published when using Gradle Module Metadata. This means that currently they are only fully supported if Gradle is used for publishing and consuming (i.e. they are 'lost' when consuming modules with Maven or Ivy). |
Dependency constraints themselves can also be added transitively.
Downgrading versions and excluding dependencies
Overriding transitive dependency versions
Gradle resolves any dependency version conflicts by selecting the latest version found in the dependency graph. Some projects might need to divert from the default behavior and enforce an earlier version of a dependency e.g. if the source code of the project depends on an older API of a dependency than some of the external libraries.
| Forcing a version of a dependency requires a conscious decision. Changing the version of a transitive dependency might lead to runtime errors if external libraries do not properly function without them. Consider upgrading your source code to use a newer version of the library as an alternative approach. |
In general, forcing dependencies is done to downgrade a dependency. There might be different use cases for downgrading:
-
a bug was discovered in the latest release
-
your code depends on a lower version which is not binary compatible
-
your code doesn't depend on the code paths which need a higher version of a dependency
In all situations, this is best expressed saying that your code strictly depends on a version of a transitive. Using strict versions, you will effectively depend on the version you declare, even if a transitive dependency says otherwise.
| Strict dependencies are to some extent similar to Maven's nearest first strategy, but there are subtle differences:
|
Let's say a project uses the HttpClient library for performing HTTP calls. HttpClient pulls in Commons Codec as transitive dependency with version 1.10. However, the production source code of the project requires an API from Commons Codec 1.9 which is not available in 1.10 anymore. A dependency version can be enforced by declaring it as strict it in the build script:
Example 76. Setting a strict version
build.gradle
dependencies { implementation 'org.apache.httpcomponents:httpclient:4.5.4' implementation('commons-codec:commons-codec') { version { strictly '1.9' } } } build.gradle.kts
dependencies { implementation("org.apache.httpcomponents:httpclient:4.5.4") implementation("commons-codec:commons-codec") { version { strictly("1.9") } } } Consequences of using strict versions
Using a strict version must be carefully considered, in particular by library authors. As the producer, a strict version will effectively behave like a force: the version declaration takes precedence over whatever is found in the transitive dependency graph. In particular, a strict version will override any other strict version on the same module found transitively.
However, for consumers, strict versions are still considered globally during graph resolution and may trigger an error if the consumer disagrees.
For example, imagine that your project B strictly depends on C:1.0. Now, a consumer, A, depends on both B and C:1.1.
Then this would trigger a resolution error because A says it needs C:1.1 but B, within its subgraph, strictly needs 1.0. This means that if you choose a single version in a strict constraint, then the version can no longer be upgraded, unless the consumer also sets a strict version constraint on the same module.
In the example above, A would have to say it strictly depends on 1.1.
For this reason, a good practice is that if you use strict versions, you should express them in terms of ranges and a preferred version within this range. For example, B might say, instead of strictly 1.0, that it strictly depends on the [1.0, 2.0[ range, but prefers 1.0. Then if a consumer chooses 1.1 (or any other version in the range), the build will no longer fail (constraints are resolved).
Forced dependencies vs strict dependencies
| Forcing dependencies via ExternalDependency.setForce(boolean) is deprecated and no longer recommended: forced dependencies suffer an ordering issue which can be hard to diagnose and will not work well together with other rich version constraints. You should prefer strict versions instead. If you are authoring and publishing a library, you also need to be aware that |
If, for some reason, you can't use strict versions, you can force a dependency doing this:
Example 77. Enforcing a dependency version
build.gradle
dependencies { implementation 'org.apache.httpcomponents:httpclient:4.5.4' implementation('commons-codec:commons-codec:1.9') { force = true } } build.gradle.kts
dependencies { implementation("org.apache.httpcomponents:httpclient:4.5.4") implementation("commons-codec:commons-codec:1.9") { isForce = true } } Example 78. Enforcing a dependency version on the configuration-level
build.gradle
configurations { compileClasspath { resolutionStrategy.force 'commons-codec:commons-codec:1.9' } } dependencies { implementation 'org.apache.httpcomponents:httpclient:4.5.4' } build.gradle.kts
configurations { "compileClasspath" { resolutionStrategy.force("commons-codec:commons-codec:1.9") } } dependencies { implementation("org.apache.httpcomponents:httpclient:4.5.4") } Excluding transitive dependencies
While the previous section showed how you can enforce a certain version of a transitive dependency, this section covers excludes as a way to remove a transitive dependency completely.
| Similar as forcing a version of a dependency, excluding a dependency completely requires a conscious decision. Excluding a transitive dependency might lead to runtime errors if external libraries do not properly function without them. If you use excludes, make sure that you do not utilise any code path requiring the excluded dependency by sufficient test coverage. |
Transitive dependencies can be excluded on the level of a declared dependency. Exclusions are spelled out as a key/value pair via the attributes group and/or module as shown in the example below. For more information, refer to ModuleDependency.exclude(java.util.Map).
Example 79. Excluding a transitive dependency for a particular dependency declaration
build.gradle
dependencies { implementation('commons-beanutils:commons-beanutils:1.9.4') { exclude group: 'commons-collections', module: 'commons-collections' } } build.gradle.kts
dependencies { implementation("commons-beanutils:commons-beanutils:1.9.4") { exclude(group = "commons-collections", module = "commons-collections") } } In this example, we add a dependency to commons-beanutils but exclude the transitive dependency commons-collections. In our code, shown below, we only use one method from the beanutils library, PropertyUtils.setSimpleProperty(). Using this method for existing setters does not require any functionality from commons-collections as we verified through test coverage.
Example 80. Using a utility from the beanutils library
src/main/java/Main.java
import org.apache.commons.beanutils.PropertyUtils; public class Main { public static void main(String[] args) throws Exception { Object person = new Person(); PropertyUtils.setSimpleProperty(person, "name", "Bart Simpson"); PropertyUtils.setSimpleProperty(person, "age", 38); } } Effectively, we are expressing that we only use a subset of the library, which does not require the commons-collection library. This can be seen as implicitly defining a feature variant that has not been explicitly declared by commons-beanutils itself. However, the risk of breaking an untested code path increased by doing this.
For example, here we use the setSimpleProperty() method to modify properties defined by setters in the Person class, which works fine. If we would attempt to set a property not existing on the class, we should get an error like Unknown property on class Person. However, because the error handling path uses a class from commons-collections, the error we now get is NoClassDefFoundError: org/apache/commons/collections/FastHashMap. So if our code would be more dynamic, and we would forget to cover the error case sufficiently, consumers of our library might be confronted with unexpected errors.
This is only an example to illustrate potential pitfalls. In practice, larger libraries or frameworks can bring in a huge set of dependencies. If those libraries fail to declare features separately and can only be consumed in a "all or nothing" fashion, excludes can be a valid method to reduce the library to the feature set actually required.
On the upside, Gradle's exclude handling is, in contrast to Maven, taking the whole dependency graph into account. So if there are multiple dependencies on a library, excludes are only exercised if all dependencies agree on them. For example, if we add opencsv as another dependency to our project above, which also depends on commons-beanutils, commons-collection is no longer excluded as opencsv itself does not exclude it.
Example 81. Excludes only apply if all dependency declarations agree on an exclude
build.gradle
dependencies { implementation('commons-beanutils:commons-beanutils:1.9.4') { exclude group: 'commons-collections', module: 'commons-collections' } implementation 'com.opencsv:opencsv:4.6' // depends on 'commons-beanutils' without exclude and brings back 'commons-collections' } build.gradle.kts
dependencies { implementation("commons-beanutils:commons-beanutils:1.9.4") { exclude(group = "commons-collections", module = "commons-collections") } implementation("com.opencsv:opencsv:4.6") // depends on 'commons-beanutils' without exclude and brings back 'commons-collections' } If we still want to have commons-collections excluded, because our combined usage of commons-beanutils and opencsv does not need it, we need to exclude it from the transitive dependencies of opencsv as well.
Example 82. Excluding a transitive dependency for multiple dependency declaration
build.gradle
dependencies { implementation('commons-beanutils:commons-beanutils:1.9.4') { exclude group: 'commons-collections', module: 'commons-collections' } implementation('com.opencsv:opencsv:4.6') { exclude group: 'commons-collections', module: 'commons-collections' } } build.gradle.kts
dependencies { implementation("commons-beanutils:commons-beanutils:1.9.4") { exclude(group = "commons-collections", module = "commons-collections") } implementation("com.opencsv:opencsv:4.6") { exclude(group = "commons-collections", module = "commons-collections") } } Historically, excludes were also used as a band aid to fix other issues not supported by some dependency management systems. Gradle however, offers a variety of features that might be better suited to solve a certain use case. You may consider to look into the following features:
-
Update or downgrade dependency versions: If versions of dependencies clash, it is usually better to adjust the version through a dependency constraint, instead of attempting to exclude the dependency with the undesired version.
-
Component Metadata Rules: If a library's metadata is clearly wrong, for example if it includes a compile time dependency which is never needed at compile time, a possible solution is to remove the dependency in a component metadata rule. By this, you tell Gradle that a dependency between two modules is never needed — i.e. the metadata was wrong — and therefore should never be considered. If you are developing a library, you have to be aware that this information is not published, and so sometimes an exclude can be the better alternative.
-
Resolving mutually exclusive dependency conflicts: Another situation that you often see solved by excludes is that two dependencies cannot be used together because they represent two implementations of the same thing (the same capability). Some popular examples are clashing logging API implementations (like
log4jandlog4j-over-slf4j) or modules that have different coordinates in different versions (likecom.google.collectionsandguava). In these cases, if this information is not known to Gradle, it is recommended to add the missing capability information via component metadata rules as described in the declaring component capabilities section. Even if you are developing a library, and your consumers will have to deal with resolving the conflict again, it is often the right solution to leave the decision to the final consumers of libraries. I.e. you as a library author should not have to decide which logging implementation your consumers use in the end.
Sharing dependency versions between projects
Central declaration of dependencies
| Central declaration of dependencies is an incubating feature. It requires the activation of the |
Using a version catalog
A version catalog is a list of dependencies, represented as dependency coordinates, that a user can pick from when declaring dependencies in a build script.
For example, instead of declaring a dependency using a string notation, the dependency coordinates can be picked from a version catalog:
Example 83. Using a library declared in a version catalog
build.gradle
dependencies { implementation(libs.groovy.core) } build.gradle.kts
dependencies { implementation(libs.groovy.core) } In this context, libs is a catalog and groovy represents a dependency available in this catalog. A version catalog provides a number of advantages over declaring the dependencies directly in build scripts:
-
For each catalog, Gradle generates type-safe accessors so that you can easily add dependencies with autocompletion in the IDE.
-
Each catalog is visible to all projects of a build. It is a central place to declare a version of a dependency and to make sure that a change to that version applies to every subproject.
-
Catalogs can declare dependency bundles, which are "groups of dependencies" that are commonly used together.
-
Catalogs can separate the group and name of a dependency from its actual version and use version references instead, making it possible to share a version declaration between multiple dependencies.
Adding a dependency using the libs.someLib notation works exactly like if you had hardcoded the group, artifact and version directly in the build script.
| A dependency catalog doesn't enforce the version of a dependency: like a regular dependency notation, it declares the requested version or a rich version. That version is not necessarily the version that is selected during conflict resolution. |
Declaring a version catalog
Version catalogs can be declared in the settings.gradle(.kts) file. In the example above, in order to make groovy available via the libs catalog, we need to associate an alias with GAV (group, artifact, version) coordinates:
Example 84. Declaring a version catalog
settings.gradle
dependencyResolutionManagement { versionCatalogs { libs { alias('groovy-core').to('org.codehaus.groovy:groovy:3.0.5') alias('groovy-json').to('org.codehaus.groovy:groovy-json:3.0.5') alias('groovy-nio').to('org.codehaus.groovy:groovy-nio:3.0.5') alias('commons-lang3').to('org.apache.commons', 'commons-lang3').version { strictly '[3.8, 4.0[' prefer '3.9' } } } } settings.gradle.kts
dependencyResolutionManagement { versionCatalogs { create("libs") { alias("groovy-core").to("org.codehaus.groovy:groovy:3.0.5") alias("groovy-json").to("org.codehaus.groovy:groovy-json:3.0.5") alias("groovy-nio").to("org.codehaus.groovy:groovy-nio:3.0.5") alias("commons-lang3").to("org.apache.commons", "commons-lang3").version { strictly("[3.8, 4.0[") prefer("3.9") } } } } Aliases and their mapping to type safe accessors
Aliases must consist of a series of identifiers separated by a dash (-, recommended), an underscore (_) or a dot (.). Identifiers themselves must consist of ascii characters, preferably lowercase, eventually followed by numbers.
For example:
-
guavais a valid alias -
groovy-coreis a valid alias -
commons-lang3is a valid alias -
androidx.awesome.libis also a valid alias -
but
this.#is.not!
Then type safe accessors are generated for each subgroup. For example, given the following aliases in a version catalog named libs:
guava, groovy-core, groovy-xml, groovy-json, androidx.awesome.lib
We would generate the following type-safe accessors:
-
libs.guava -
libs.groovy.core -
libs.groovy.xml -
libs.groovy.json -
libs.androidx.awesome.lib
Where the libs prefix comes from the version catalog name.
In case you want to avoid the generation of a subgroup accessor, we recommend relying on case to differentiate. For example the aliases groovyCore, groovyJson and groovyXml would be mapped to the libs.groovyCore, libs.groovyJson and libs.groovyXml accessors respectively.
When declaring aliases, it's worth noting that any of the -, _ and . characters can be used as separators, but the generated catalog will have all normalized to .: for example foo-bar as an alias is converted to foo.bar automatically.
| Some keywords are reserved, so they cannot be used as an alias. Next words cannot be used as an alias:
Additional to that next words cannot be used as a first subgroup of an alias for dependencies (for bundles, versions and plugins this restriction doesn't apply):
So for example for dependencies an alias |
Dependencies with same version numbers
In the first example in declaring a version catalog, we can see that we declare 3 aliases for various components of the groovy library and that all of them share the same version number.
Instead of repeating the same version number, we can declare a version and reference it:
Example 85. Declaring versions separately from libraries
settings.gradle
dependencyResolutionManagement { versionCatalogs { libs { version('groovy', '3.0.5') version('checkstyle', '8.37') alias('groovy-core').to('org.codehaus.groovy', 'groovy').versionRef('groovy') alias('groovy-json').to('org.codehaus.groovy', 'groovy-json').versionRef('groovy') alias('groovy-nio').to('org.codehaus.groovy', 'groovy-nio').versionRef('groovy') alias('commons-lang3').to('org.apache.commons', 'commons-lang3').version { strictly '[3.8, 4.0[' prefer '3.9' } } } } settings.gradle.kts
dependencyResolutionManagement { versionCatalogs { create("libs") { version("groovy", "3.0.5") version("checkstyle", "8.37") alias("groovy-core").to("org.codehaus.groovy", "groovy").versionRef("groovy") alias("groovy-json").to("org.codehaus.groovy", "groovy-json").versionRef("groovy") alias("groovy-nio").to("org.codehaus.groovy", "groovy-nio").versionRef("groovy") alias("commons-lang3").to("org.apache.commons", "commons-lang3").version { strictly("[3.8, 4.0[") prefer("3.9") } } } } Versions declared separately are also available via type-safe accessors, making them usable for more use cases than dependency versions, in particular for tooling:
Example 86. Using a version declared in a version catalog
build.gradle
checkstyle { // will use the version declared in the catalog toolVersion = libs.versions.checkstyle.get() } build.gradle.kts
checkstyle { // will use the version declared in the catalog toolVersion = libs.versions.checkstyle.get() } Dependencies declared in a catalog are exposed to build scripts via an extension corresponding to their name. In the example above, because the catalog declared in settings is named libs, the extension is available via the name libs in all build scripts of the current build. Declaring dependencies using the following notation…
Example 87. Dependency notation correspondance
build.gradle
dependencies { implementation libs.groovy.core implementation libs.groovy.json implementation libs.groovy.nio } build.gradle.kts
dependencies { implementation(libs.groovy.core) implementation(libs.groovy.json) implementation(libs.groovy.nio) } …has exactly the same effect as writing:
Example 88. Dependency notation correspondance
build.gradle
dependencies { implementation 'org.codehaus.groovy:groovy:3.0.5' implementation 'org.codehaus.groovy:groovy-json:3.0.5' implementation 'org.codehaus.groovy:groovy-nio:3.0.5' } build.gradle.kts
dependencies { implementation("org.codehaus.groovy:groovy:3.0.5") implementation("org.codehaus.groovy:groovy-json:3.0.5") implementation("org.codehaus.groovy:groovy-nio:3.0.5") } Versions declared in the catalog are rich versions. Please refer to the version catalog builder API for the full version declaration support documentation.
Dependency bundles
Because it's frequent that some dependencies are systematically used together in different projects, a version catalog offers the concept of a "dependency bundle". A bundle is basically an alias for several dependencies. For example, instead of declaring 3 individual dependencies like above, you could write:
Example 89. Using a dependency bundle
build.gradle
dependencies { implementation libs.bundles.groovy } build.gradle.kts
dependencies { implementation(libs.bundles.groovy) } The bundle named groovy needs to be declared in the catalog:
Example 90. Declaring a dependency bundle
settings.gradle
dependencyResolutionManagement { versionCatalogs { libs { version('groovy', '3.0.5') version('checkstyle', '8.37') alias('groovy-core').to('org.codehaus.groovy', 'groovy').versionRef('groovy') alias('groovy-json').to('org.codehaus.groovy', 'groovy-json').versionRef('groovy') alias('groovy-nio').to('org.codehaus.groovy', 'groovy-nio').versionRef('groovy') alias('commons-lang3').to('org.apache.commons', 'commons-lang3').version { strictly '[3.8, 4.0[' prefer '3.9' } bundle('groovy', ['groovy-core', 'groovy-json', 'groovy-nio']) } } } settings.gradle.kts
dependencyResolutionManagement { versionCatalogs { create("libs") { version("groovy", "3.0.5") version("checkstyle", "8.37") alias("groovy-core").to("org.codehaus.groovy", "groovy").versionRef("groovy") alias("groovy-json").to("org.codehaus.groovy", "groovy-json").versionRef("groovy") alias("groovy-nio").to("org.codehaus.groovy", "groovy-nio").versionRef("groovy") alias("commons-lang3").to("org.apache.commons", "commons-lang3").version { strictly("[3.8, 4.0[") prefer("3.9") } bundle("groovy", listOf("groovy-core", "groovy-json", "groovy-nio")) } } } The semantics are again equivalent: adding a single bundle is equivalent to adding all dependencies which are part of the bundle individually.
Plugins
In addition to libraries, version catalog supports declaring plugin versions. While libraries are represented by their group, artifact and version coordinates, Gradle plugins are identified by their id and version only. Therefore, they need to be declared separately:
Example 91. Declaring a plugin version
settings.gradle
dependencyResolutionManagement { versionCatalogs { libs { alias('jmh').toPluginId('me.champeau.jmh').version('0.6.5') } } } settings.gradle.kts
dependencyResolutionManagement { versionCatalogs { create("libs") { alias("jmh").toPluginId("me.champeau.jmh").version("0.6.5") } } } Then the plugin is accessible in the plugins block and can be consumed in any project of the build using:
Example 92. Using a plugin declared in a catalog
build.gradle
plugins { id 'java-library' id 'checkstyle' // Use the plugin `jmh` as declared in the `libs` version catalog alias(libs.plugins.jmh) } build.gradle.kts
plugins { `java-library` checkstyle alias(libs.plugins.jmh) } The libs.versions.toml file
In addition to the settings API above, Gradle offers a conventional file to declare a catalog. If a libs.versions.toml file is found in the gradle subdirectory of the root build, then a catalog will be automatically declared with the contents of this file.
| Declaring a Just like The presence of this file does, however, suggest that most dependencies, if not all, will be declared in this file. Therefore, updating a dependency version, for most users, should only consists of changing a line in this file. |
By default, the libs.versions.toml file will be an input to the libs catalog. It is possible to change the name of the default catalog, for example if you already have an extension with the same name:
Example 93. Changing the default extension name
settings.gradle
dependencyResolutionManagement { defaultLibrariesExtensionName.set('deps') } settings.gradle.kts
dependencyResolutionManagement { defaultLibrariesExtensionName.set("deps") } The version catalog TOML file format
The TOML file consists of 4 major sections:
-
the
[versions]section is used to declare versions which can be referenced by dependencies -
the
[libraries]section is used to declare the aliases to coordinates -
the
[bundles]section is used to declare dependency bundles -
the
[plugins]section is used to declare plugins
For example:
The libs.versions.toml file
[versions] groovy = "3.0.5" checkstyle = "8.37" [libraries] groovy-core = { module = "org.codehaus.groovy:groovy", version.ref = "groovy" } groovy-json = { module = "org.codehaus.groovy:groovy-json", version.ref = "groovy" } groovy-nio = { module = "org.codehaus.groovy:groovy-nio", version.ref = "groovy" } commons-lang3 = { group = "org.apache.commons", name = "commons-lang3", version = { strictly = "[3.8, 4.0[", prefer="3.9" } } [bundles] groovy = ["groovy-core", "groovy-json", "groovy-nio"] [plugins] jmh = { id = "me.champeau.jmh", version = "0.6.5" } Versions can be declared either as a single string, in which case they are interpreted as a required version, or as a rich versions:
[versions] my-lib = { strictly = "[1.0, 2.0[", prefer = "1.2" } Supported members of a version declaration are:
-
require: the required version -
strictly: the strict version -
prefer: the preferred version -
reject: the list of rejected versions -
rejectAll: a boolean to reject all versions
Dependency declaration can either be declared as a simple string, in which case they are interpreted as group:artifact:version coordinates, or separating the version declaration from the group and name:
| For aliases, the rules described in the section aliases and their mapping to type safe accessors apply as well. |
Different dependency notations
[versions] common = "1.4" [libraries] my-lib = "com.mycompany:mylib:1.4" my-other-lib = { module = "com.mycompany:other", version = "1.4" } my-other-lib2 = { group = "com.mycompany", name = "alternate", version = "1.4" } mylib-full-format = { group = "com.mycompany", name = "alternate", version = { require = "1.4" } } [plugins] short-notation = "some.plugin.id:1.4" long-notation = { id = "some.plugin.id", version = "1.4" } reference-notation = { id = "some.plugin.id", version.ref = "common" } In case you want to reference a version declared in the [versions] section, you should use the version.ref property:
[versions] some = "1.4" [libraries] my-lib = { group = "com.mycompany", name="mylib", version.ref="some" } | The TOML file format is very lenient and lets you write "dotted" properties as shortcuts to full object declarations. For example, this: is equivalent to: or |
Type unsafe API
Version catalogs can be accessed through a type unsafe API. This API is available in situations where generated accessors are not. It is accessed through the version catalog extension:
build.gradle
def versionCatalog = extensions.getByType(VersionCatalogsExtension).named("libs") println "Dependency aliases: ${versionCatalog.dependencyAliases}" dependencies { versionCatalog.findDependency("groovy-json").ifPresent { implementation(it) } } build.gradle.kts
val versionCatalog = extensions.getByType<VersionCatalogsExtension>().named("libs") println("Dependency aliases: ${versionCatalog.dependencyAliases}") dependencies { versionCatalog.findDependency("groovy-json").ifPresent { implementation(it) } } Sharing catalogs
Version catalogs are used in a single build (possibly multi-project build) but may also be shared between builds. For example, an organization may want to create a catalog of dependencies that different projects, from different teams, may use.
Importing a catalog from a TOML file
The version catalog builder API supports including a model from an external file. This makes it possible to reuse the catalog of the main build for buildSrc, if needed. For example, the buildSrc/settings.gradle(.kts) file can include this file using:
Example 94. Sharing the dependency catalog with buildSrc
settings.gradle
dependencyResolutionManagement { versionCatalogs { libs { from(files("../gradle/libs.versions.toml")) } } } settings.gradle.kts
dependencyResolutionManagement { versionCatalogs { create("libs") { from(files("../gradle/libs.versions.toml")) } } } This technique can therefore be used to declare multiple catalogs from different files:
Example 95. Declaring additional catalogs
settings.gradle
dependencyResolutionManagement { versionCatalogs { // declares an additional catalog, named 'testLibs', from the 'test-libs.versions.toml' file testLibs { from(files('gradle/test-libs.versions.toml')) } } } settings.gradle.kts
dependencyResolutionManagement { versionCatalogs { // declares an additional catalog, named 'testLibs', from the 'test-libs.versions.toml' file create("testLibs") { from(files("gradle/test-libs.versions.toml")) } } } The version catalog plugin
While importing catalogs from local files is convenient, it doesn't solve the problem of sharing a catalog in an organization or for external consumers. One option to share a catalog is to write a settings plugin, publish it on the Gradle plugin portal or an internal repository, and let the consumers apply the plugin on their settings file.
Alternatively, Gradle offers a version catalog plugin, which offers the ability to declare, then publish a catalog.
To do this, you need to apply the version-catalog plugin:
Example 96. Applying the version catalog plugin
build.gradle
plugins { id 'version-catalog' id 'maven-publish' } build.gradle.kts
plugins { `version-catalog` `maven-publish` } This plugin will then expose the catalog extension that you can use to declare a catalog:
Example 97. Definition of a catalog
build.gradle
catalog { // declare the aliases, bundles and versions in this block versionCatalog { alias('my-lib').to('com.mycompany:mylib:1.2') } } build.gradle.kts
catalog { // declare the aliases, bundles and versions in this block versionCatalog { alias("my-lib").to("com.mycompany:mylib:1.2") } } Such a catalog can then be published by applying either the maven-publish or ivy-publish plugin and configuring the publication to use the versionCatalog component:
Example 98. Publishing a catalog
build.gradle
publishing { publications { maven(MavenPublication) { from components.versionCatalog } } } build.gradle.kts
publishing { publications { create<MavenPublication>("maven") { from(components["versionCatalog"]) } } } When publishing such a project, a libs.versions.toml file will automatically be generated (and uploaded), which can then be consumed from other Gradle builds.
Importing a published catalog
A catalog produced by the version catalog plugin can be imported via the settings API:
Example 99. Using a published catalog
settings.gradle
dependencyResolutionManagement { versionCatalogs { libs { from("com.mycompany:catalog:1.0") } } } settings.gradle.kts
dependencyResolutionManagement { versionCatalogs { create("libs") { from("com.mycompany:catalog:1.0") } } } Overwriting catalog versions
In case a catalog declares a version, you can overwrite the version when importing the catalog:
Example 100. Overwriting versions declared in a published catalog
settings.gradle
dependencyResolutionManagement { versionCatalogs { amendedLibs { from("com.mycompany:catalog:1.0") // overwrite the "groovy" version declared in the imported catalog version("groovy", "3.0.6") } } } settings.gradle.kts
dependencyResolutionManagement { versionCatalogs { create("amendedLibs") { from("com.mycompany:catalog:1.0") // overwrite the "groovy" version declared in the imported catalog version("groovy", "3.0.6") } } } In the example above, any dependency which was using the groovy version as reference will be automatically updated to use 3.0.6.
| Again, overwriting a version doesn't mean that the actual resolved dependency version will be the same: this only changes what is imported, that is to say what is used when declaring a dependency. The actual version will be subject to traditional conflict resolution, if any. |
Using a platform to control transitive versions
A platform is a special software component which can be used to control transitive dependency versions. In most cases it's exclusively composed of dependency constraints which will either suggest dependency versions or enforce some versions. As such, this is a perfect tool whenever you need to share dependency versions between projects. In this case, a project will typically be organized this way:
-
a
platformproject which defines constraints for the various dependencies found in the different sub-projects -
a number of sub-projects which depend on the platform and declare dependencies without version
In the Java ecosystem, Gradle provides a plugin for this purpose.
It's also common to find platforms published as Maven BOMs which Gradle supports natively.
A dependency on a platform is created using the platform keyword:
Example 101. Getting versions declared in a platform
build.gradle
dependencies { // get recommended versions from the platform project api platform(project(':platform')) // no version required api 'commons-httpclient:commons-httpclient' } build.gradle.kts
dependencies { // get recommended versions from the platform project api(platform(project(":platform"))) // no version required api("commons-httpclient:commons-httpclient") } | This
This means that by default, a dependency to a platform triggers the inheritance of all strict versions defined in that platform, which can be useful for platform authors to make sure that all consumers respect their decisions in terms of versions of dependencies. This can be turned off by explicitly calling the |
Importing Maven BOMs
Gradle provides support for importing bill of materials (BOM) files, which are effectively .pom files that use <dependencyManagement> to control the dependency versions of direct and transitive dependencies. The BOM support in Gradle works similar to using <scope>import</scope> when depending on a BOM in Maven. In Gradle however, it is done via a regular dependency declaration on the BOM:
Example 102. Depending on a BOM to import its dependency constraints
build.gradle
dependencies { // import a BOM implementation platform('org.springframework.boot:spring-boot-dependencies:1.5.8.RELEASE') // define dependencies without versions implementation 'com.google.code.gson:gson' implementation 'dom4j:dom4j' } build.gradle.kts
dependencies { // import a BOM implementation(platform("org.springframework.boot:spring-boot-dependencies:1.5.8.RELEASE")) // define dependencies without versions implementation("com.google.code.gson:gson") implementation("dom4j:dom4j") } In the example, the versions of gson and dom4j are provided by the Spring Boot BOM. This way, if you are developing for a platform like Spring Boot, you do not have to declare any versions yourself but can rely on the versions the platform provides.
Gradle treats all entries in the <dependencyManagement> block of a BOM similar to Gradle's dependency constraints. This means that any version defined in the <dependencyManagement> block can impact the dependency resolution result. In order to qualify as a BOM, a .pom file needs to have <packaging>pom</packaging> set.
However often BOMs are not only providing versions as recommendations, but also a way to override any other version found in the graph. You can enable this behavior by using the enforcedPlatform keyword, instead of platform, when importing the BOM:
Example 103. Importing a BOM, making sure the versions it defines override any other version found
build.gradle
dependencies { // import a BOM. The versions used in this file will override any other version found in the graph implementation enforcedPlatform('org.springframework.boot:spring-boot-dependencies:1.5.8.RELEASE') // define dependencies without versions implementation 'com.google.code.gson:gson' implementation 'dom4j:dom4j' // this version will be overridden by the one found in the BOM implementation 'org.codehaus.groovy:groovy:1.8.6' } build.gradle.kts
dependencies { // import a BOM. The versions used in this file will override any other version found in the graph implementation(enforcedPlatform("org.springframework.boot:spring-boot-dependencies:1.5.8.RELEASE")) // define dependencies without versions implementation("com.google.code.gson:gson") implementation("dom4j:dom4j") // this version will be overridden by the one found in the BOM implementation("org.codehaus.groovy:groovy:1.8.6") } | Using Instead, if your reusable software component has a strong opinion on some third party dependency versions, consider using a rich version declaration with a |
Should I use a platform or a catalog?
Because platforms and catalogs both talk about dependency versions and can both be used to share dependency versions in a project, there might be a confusion regarding what to use and if one is preferable to the other.
In short, you should:
-
use catalogs to only define dependencies and their versions for projects and to generate type-safe accessors
-
use platform to apply versions to dependency graph and to affect dependency resolution
A catalog helps with centralizing the dependency versions and is only, as it name implies, a catalog of dependencies you can pick from. We recommend using it to declare the coordinates of your dependencies, in all cases. It will be used by Gradle to generate type-safe accessors, present short-hand notations for external dependencies and it allows sharing those coordinates between different projects easily. Using a catalog will not have any kind of consequence on downstream consumers: it's transparent to them.
A platform is a more heavyweight construct: it's a component of a dependency graph, like any other library. If you depend on a platform, that platform is itself a component in the graph. It means, in particular, that:
-
Constraints defined in a platform can influence transitive dependencies, not only the direct dependencies of your project.
-
A platform is versioned, and a transitive dependency in the graph can depend on a different version of the platform, causing various dependency upgrades.
-
A platform can tie components together, and in particular can be used as a construct for aligning versions.
-
A dependency on a platform is "inherited" by the consumers of your dependency: it means that a dependency on a platform can influence what versions of libraries would be used by your consumers even if you don't directly, or transitively, depend on components the platform references.
In summary, using a catalog is always a good engineering practice as it centralizes common definitions, allows sharing of dependency versions or plugin versions, but it is an "implementation detail" of the build: it will not be visible to consumers and unused elements of a catalog are just ignored.
A platform is meant to influence the dependency resolution graph, for example by adding constraints on transitive dependencies: it's a solution for structuring a dependency graph and influencing the resolution result.
In practice, your project can both use a catalog and declare a platform which itself uses the catalog:
Example 104. Using a catalog within a platform definition
build.gradle
plugins { id 'java-platform' } dependencies { constraints { api(libs.mylib) } } build.gradle.kts
plugins { `java-platform` } dependencies { constraints { api(libs.mylib) } } Aligning dependency versions
Dependency version alignment allows different modules belonging to the same logical group (a platform) to have identical versions in a dependency graph.
Handling inconsistent module versions
Gradle supports aligning versions of modules which belong to the same "platform". It is often preferable, for example, that the API and implementation modules of a component are using the same version. However, because of the game of transitive dependency resolution, it is possible that different modules belonging to the same platform end up using different versions. For example, your project may depend on the jackson-databind and vert.x libraries, as illustrated below:
Example 105. Declaring dependencies
build.gradle
dependencies { // a dependency on Jackson Databind implementation 'com.fasterxml.jackson.core:jackson-databind:2.8.9' // and a dependency on vert.x implementation 'io.vertx:vertx-core:3.5.3' } build.gradle.kts
dependencies { // a dependency on Jackson Databind implementation("com.fasterxml.jackson.core:jackson-databind:2.8.9") // and a dependency on vert.x implementation("io.vertx:vertx-core:3.5.3") } Because vert.x depends on jackson-core, we would actually resolve the following dependency versions:
-
jackson-coreversion2.9.5(brought byvertx-core) -
jackson-databindversion2.9.5(by conflict resolution) -
jackson-annotationversion2.9.0(dependency ofjackson-databind:2.9.5)
It's easy to end up with a set of versions which do not work well together. To fix this, Gradle supports dependency version alignment, which is supported by the concept of platforms. A platform represents a set of modules which "work well together". Either because they are actually published as a whole (when one of the members of the platform is published, all other modules are also published with the same version), or because someone tested the modules and indicates that they work well together (typically, the Spring Platform).
Aligning versions natively with Gradle
Gradle natively supports alignment of modules produced by Gradle. This is a direct consequence of the transitivity of dependency constraints. So if you have a multi-project build, and you wish that consumers get the same version of all your modules, Gradle provides a simple way to do this using the Java Platform Plugin.
For example, if you have a project that consists of 3 modules:
-
lib -
utils -
core, depending onlibandutils
And a consumer that declares the following dependencies:
-
coreversion 1.0 -
libversion 1.1
Then by default resolution would select core:1.0 and lib:1.1, because lib has no dependency on core. We can fix this by adding a new module in our project, a platform, that will add constraints on all the modules of your project:
Example 106. The platform module
build.gradle
plugins { id 'java-platform' } dependencies { // The platform declares constraints on all components that // require alignment constraints { api(project(":core")) api(project(":lib")) api(project(":utils")) } } build.gradle.kts
plugins { `java-platform` } dependencies { // The platform declares constraints on all components that // require alignment constraints { api(project(":core")) api(project(":lib")) api(project(":utils")) } } Once this is done, we need to make sure that all modules now depend on the platform, like this:
Example 107. Declaring a dependency on the platform
build.gradle
dependencies { // Each project has a dependency on the platform api(platform(project(":platform"))) // And any additional dependency required implementation(project(":lib")) implementation(project(":utils")) } build.gradle.kts
dependencies { // Each project has a dependency on the platform api(platform(project(":platform"))) // And any additional dependency required implementation(project(":lib")) implementation(project(":utils")) } It is important that the platform contains a constraint on all the components, but also that each component has a dependency on the platform. By doing this, whenever Gradle will add a dependency to a module of the platform on the graph, it will also include constraints on the other modules of the platform. This means that if we see another module belonging to the same platform, we will automatically upgrade to the same version.
In our example, it means that we first see core:1.0, which brings a platform 1.0 with constraints on lib:1.0 and lib:1.0. Then we add lib:1.1 which has a dependency on platform:1.1. By conflict resolution, we select the 1.1 platform, which has a constraint on core:1.1. Then we conflict resolve between core:1.0 and core:1.1, which means that core and lib are now aligned properly.
| This behavior is enforced for published components only if you use Gradle Module Metadata. |
Aligning versions of modules not published with Gradle
Whenever the publisher doesn't use Gradle, like in our Jackson example, we can explain to Gradle that all Jackson modules "belong to" the same platform and benefit from the same behavior as with native alignment. There are two options to express that a set of modules belong to a platform:
-
A platform is published as a BOM and can be used: For example,
com.fasterxml.jackson:jackson-bomcan be used as platform. The information missing to Gradle in that case is that the platform should be added to the dependencies if one of its members is used. -
No existing platform can be used. Instead, a virtual platform should be created by Gradle: In this case, Gradle builds up the platform itself based on all the members that are used.
To provide the missing information to Gradle, you can define component metadata rules as explained in the following.
Align versions of modules using a published BOM
Example 108. A dependency version alignment rule
build.gradle
abstract class JacksonBomAlignmentRule implements ComponentMetadataRule { void execute(ComponentMetadataContext ctx) { ctx.details.with { if (id.group.startsWith("com.fasterxml.jackson")) { // declare that Jackson modules belong to the platform defined by the Jackson BOM belongsTo("com.fasterxml.jackson:jackson-bom:${id.version}", false) } } } } build.gradle.kts
abstract class JacksonBomAlignmentRule: ComponentMetadataRule { override fun execute(ctx: ComponentMetadataContext) { ctx.details.run { if (id.group.startsWith("com.fasterxml.jackson")) { // declare that Jackson modules belong to the platform defined by the Jackson BOM belongsTo("com.fasterxml.jackson:jackson-bom:${id.version}", false) } } } } By using the belongsTo with false (not virtual), we declare that all modules belong to the same published platform. In this case, the platform is com.fasterxml.jackson:jackson-bom and Gradle will look for it, as for any other module, in the declared repositories.
Example 109. Making use of a dependency version alignment rule
build.gradle
dependencies { components.all(JacksonBomAlignmentRule) } build.gradle.kts
dependencies { components.all<JacksonBomAlignmentRule>() } Using the rule, the versions in the example above align to whatever the selected version of com.fasterxml.jackson:jackson-bom defines. In this case, com.fasterxml.jackson:jackson-bom:2.9.5 will be selected as 2.9.5 is the highest version of a module selected. In that BOM, the following versions are defined and will be used: jackson-core:2.9.5, jackson-databind:2.9.5 and jackson-annotation:2.9.0. The lower versions of jackson-annotation here might be the desired result as it is what the BOM recommends.
This behavior is working reliable since Gradle 6.1. Effectively, it is similar to a component metadata rule that adds a platform dependency to all members of the platform using withDependencies. |
Align versions of modules without a published platform
Example 110. A dependency version alignment rule
build.gradle
abstract class JacksonAlignmentRule implements ComponentMetadataRule { void execute(ComponentMetadataContext ctx) { ctx.details.with { if (id.group.startsWith("com.fasterxml.jackson")) { // declare that Jackson modules all belong to the Jackson virtual platform belongsTo("com.fasterxml.jackson:jackson-virtual-platform:${id.version}") } } } } build.gradle.kts
abstract class JacksonAlignmentRule: ComponentMetadataRule { override fun execute(ctx: ComponentMetadataContext) { ctx.details.run { if (id.group.startsWith("com.fasterxml.jackson")) { // declare that Jackson modules all belong to the Jackson virtual platform belongsTo("com.fasterxml.jackson:jackson-virtual-platform:${id.version}") } } } } By using the belongsTo keyword without further parameter (platform is virtual), we declare that all modules belong to the same virtual platform, which is treated specially by the engine. A virtual platform will not be retrieved from a repository. The identifier, in this case com.fasterxml.jackson:jackson-virtual-platform, is something you as the build author define yourself. The "content" of the platform is then created by Gradle on the fly by collecting all belongsTo statements pointing at the same virtual platform.
Example 111. Making use of a dependency version alignment rule
build.gradle
dependencies { components.all(JacksonAlignmentRule) } build.gradle.kts
dependencies { components.all<JacksonAlignmentRule>() } Using the rule, all versions in the example above would align to 2.9.5. In this case, also jackson-annotation:2.9.5 will be taken, as that is how we defined our local virtual platform.
For both published and virtual platforms, Gradle lets you override the version choice of the platform itself by specifying an enforced dependency on the platform:
Example 112. Forceful platform downgrade
build.gradle
dependencies { // Forcefully downgrade the virtual Jackson platform to 2.8.9 implementation enforcedPlatform('com.fasterxml.jackson:jackson-virtual-platform:2.8.9') } build.gradle.kts
dependencies { // Forcefully downgrade the virtual Jackson platform to 2.8.9 implementation(enforcedPlatform("com.fasterxml.jackson:jackson-virtual-platform:2.8.9")) } Handling mutually exclusive dependencies
Introduction to component capabilities
Often a dependency graph would accidentally contain multiple implementations of the same API. This is particularly common with logging frameworks, where multiple bindings are available, and that one library chooses a binding when another transitive dependency chooses another. Because those implementations live at different GAV coordinates, the build tool has usually no way to find out that there's a conflict between those libraries. To solve this, Gradle provides the concept of capability.
It's illegal to find two components providing the same capability in a single dependency graph. Intuitively, it means that if Gradle finds two components that provide the same thing on classpath, it's going to fail with an error indicating what modules are in conflict. In our example, it means that different bindings of a logging framework provide the same capability.
Capability coordinates
A capability is defined by a (group, module, version) triplet. Each component defines an implicit capability corresponding to its GAV coordinates (group, artifact, version). For example, the org.apache.commons:commons-lang3:3.8 module has an implicit capability with group org.apache.commons, name commons-lang3 and version 3.8. It is important to realize that capabilities are versioned.
Declaring component capabilities
By default, Gradle will fail if two components in the dependency graph provide the same capability. Because most modules are currently published without Gradle Module Metadata, capabilities are not always automatically discovered by Gradle. It is however interesting to use rules to declare component capabilities in order to discover conflicts as soon as possible, during the build instead of runtime.
A typical example is whenever a component is relocated at different coordinates in a new release. For example, the ASM library lived at asm:asm coordinates until version 3.3.1, then changed to org.ow2.asm:asm since 4.0. It is illegal to have both ASM <= 3.3.1 and 4.0+ on the classpath, because they provide the same feature, it's just that the component has been relocated. Because each component has an implicit capability corresponding to its GAV coordinates, we can "fix" this by having a rule that will declare that the asm:asm module provides the org.ow2.asm:asm capability:
Example 113. Conflict resolution by capability
build.gradle
@CompileStatic class AsmCapability implements ComponentMetadataRule { void execute(ComponentMetadataContext context) { context.details.with { if (id.group == "asm" && id.name == "asm") { allVariants { it.withCapabilities { // Declare that ASM provides the org.ow2.asm:asm capability, but with an older version it.addCapability("org.ow2.asm", "asm", id.version) } } } } } } build.gradle.kts
class AsmCapability : ComponentMetadataRule { override fun execute(context: ComponentMetadataContext) = context.details.run { if (id.group == "asm" && id.name == "asm") { allVariants { withCapabilities { // Declare that ASM provides the org.ow2.asm:asm capability, but with an older version addCapability("org.ow2.asm", "asm", id.version) } } } } } Now the build is going to fail whenever the two components are found in the same dependency graph.
| At this stage, Gradle will only make more builds fail. It will not automatically fix the problem for you, but it helps you realize that you have a problem. It is recommended to write such rules in plugins which are then applied to your builds. Then, users have to express their preferences, if possible, or fix the problem of having incompatible things on the classpath, as explained in the following section. |
Selecting between candidates
At some point, a dependency graph is going to include either incompatible modules, or modules which are mutually exclusive. For example, you may have different logger implementations and you need to choose one binding. Capabilities help realizing that you have a conflict, but Gradle also provides tools to express how to solve the conflicts.
Selecting between different capability candidates
In the relocation example above, Gradle was able to tell you that you have two versions of the same API on classpath: an "old" module and a "relocated" one. Now we can solve the conflict by automatically choosing the component which has the highest capability version:
Example 114. Conflict resolution by capability versioning
build.gradle
configurations.all { resolutionStrategy.capabilitiesResolution.withCapability('org.ow2.asm:asm') { selectHighestVersion() } } build.gradle.kts
configurations.all { resolutionStrategy.capabilitiesResolution.withCapability("org.ow2.asm:asm") { selectHighestVersion() } } However, fixing by choosing the highest capability version conflict resolution is not always suitable. For a logging framework, for example, it doesn't matter what version of the logging frameworks we use, we should always select Slf4j.
In this case, we can fix it by explicitly selecting slf4j as the winner:
Example 115. Substitute log4j with slf4j
build.gradle
configurations.all { resolutionStrategy.capabilitiesResolution.withCapability("log4j:log4j") { def toBeSelected = candidates.find { it.id instanceof ModuleComponentIdentifier && it.id.module == 'log4j-over-slf4j' } if (toBeSelected != null) { select(toBeSelected) } because 'use slf4j in place of log4j' } } build.gradle.kts
configurations.all { resolutionStrategy.capabilitiesResolution.withCapability("log4j:log4j") { val toBeSelected = candidates.firstOrNull { it.id.let { id -> id is ModuleComponentIdentifier && id.module == "log4j-over-slf4j" } } if (toBeSelected != null) { select(toBeSelected) } because("use slf4j in place of log4j") } } Note that this approach works also well if you have multiple Slf4j bindings on the classpath: bindings are basically different logger implementations and you need only one. However, the selected implementation may depend on the configuration being resolved. For example, for tests, slf4j-simple may be enough but for production, slf4-over-log4j may be better.
| Resolution can only be made in favor of a module found in the graph. The If no resolution is given for all conflicts on a given capability, the build will fail given the module chosen for resolution was not part of the graph at all. In addition |
Each module that is pulled from a repository has metadata associated with it, such as its group, name, version as well as the different variants it provides with their artifacts and dependencies. Sometimes, this metadata is incomplete or incorrect. To manipulate such incomplete metadata from within the build script, Gradle offers an API to write component metadata rules. These rules take effect after a module's metadata has been downloaded, but before it is used in dependency resolution.
Basics of writing a component metadata rule
Component metadata rules are applied in the components (ComponentMetadataHandler) section of the dependencies block (DependencyHandler) of a build script or in the settings script. The rules can be defined in two different ways:
-
As an action directly when they are applied in the components section
-
As an isolated class implementing the ComponentMetadataRule interface
While defining rules inline as action can be convenient for experimentation, it is generally recommended to define rules as separate classes. Rules that are written as isolated classes can be annotated with @CacheableRule to cache the results of their application such that they do not need to be re-executed each time dependencies are resolved.
Example 116. Example of a configurable component metadata rule
build.gradle
@CacheableRule abstract class TargetJvmVersionRule implements ComponentMetadataRule { final Integer jvmVersion @Inject TargetJvmVersionRule(Integer jvmVersion) { this.jvmVersion = jvmVersion } @Inject abstract ObjectFactory getObjects() void execute(ComponentMetadataContext context) { context.details.withVariant("compile") { attributes { attribute(TargetJvmVersion.TARGET_JVM_VERSION_ATTRIBUTE, jvmVersion) attribute(Usage.USAGE_ATTRIBUTE, objects.named(Usage, Usage.JAVA_API)) } } } } dependencies { components { withModule("commons-io:commons-io", TargetJvmVersionRule) { params(7) } withModule("commons-collections:commons-collections", TargetJvmVersionRule) { params(8) } } implementation("commons-io:commons-io:2.6") implementation("commons-collections:commons-collections:3.2.2") } build.gradle.kts
@CacheableRule abstract class TargetJvmVersionRule @Inject constructor(val jvmVersion: Int) : ComponentMetadataRule { @get:Inject abstract val objects: ObjectFactory override fun execute(context: ComponentMetadataContext) { context.details.withVariant("compile") { attributes { attribute(TargetJvmVersion.TARGET_JVM_VERSION_ATTRIBUTE, jvmVersion) attribute(Usage.USAGE_ATTRIBUTE, objects.named(Usage.JAVA_API)) } } } } dependencies { components { withModule<TargetJvmVersionRule>("commons-io:commons-io") { params(7) } withModule<TargetJvmVersionRule>("commons-collections:commons-collections") { params(8) } } implementation("commons-io:commons-io:2.6") implementation("commons-collections:commons-collections:3.2.2") } As can be seen in the examples above, component metadata rules are defined by implementing ComponentMetadataRule which has a single execute method receiving an instance of ComponentMetadataContext as parameter. In this example, the rule is also further configured through an ActionConfiguration. This is supported by having a constructor in your implementation of ComponentMetadataRule accepting the parameters that were configured and the services that need injecting.
Gradle enforces isolation of instances of ComponentMetadataRule. This means that all parameters must be Serializable or known Gradle types that can be isolated.
In addition, Gradle services can be injected into your ComponentMetadataRule. Because of this, the moment you have a constructor, it must be annotated with @javax.inject.Inject. A commonly required service is ObjectFactory to create instances of strongly typed value objects like a value for setting an Attribute. A service which is helpful for advanced usage of component metadata rules with custom metadata is the RepositoryResourceAccessor.
A component metadata rule can be applied to all modules — all(rule) — or to a selected module — withModule(groupAndName, rule). Usually, a rule is specifically written to enrich metadata of one specific module and hence the withModule API should be preferred.
Declaring rules in a central place
| Declaring component metadata rules in settings is an incubating feature |
Instead of declaring rules for each subproject individually, it is possible to declare rules in the settings.gradle(.kts) file for the whole build. Rules declared in settings are the conventional rules applied to each project: if the project doesn't declare any rules, the rules from the settings script will be used.
Example 117. Declaring a rule in settings
settings.gradle
dependencyResolutionManagement { components { withModule("com.google.guava:guava", GuavaRule) } } settings.gradle.kts
dependencyResolutionManagement { components { withModule<GuavaRule>("com.google.guava:guava") } } By default, rules declared in a project will override whatever is declared in settings. It is possible to change this default, for example to always prefer the settings rules:
Example 118. Preferring rules declared in settings
settings.gradle
dependencyResolutionManagement { rulesMode.set(RulesMode.PREFER_SETTINGS) } settings.gradle.kts
dependencyResolutionManagement { rulesMode.set(RulesMode.PREFER_SETTINGS) } If this method is called and that a project or plugin declares rules, a warning will be issued. You can make this a failure instead by using this alternative:
Example 119. Enforcing rules declared in settings
settings.gradle
dependencyResolutionManagement { rulesMode.set(RulesMode.FAIL_ON_PROJECT_RULES) } settings.gradle.kts
dependencyResolutionManagement { rulesMode.set(RulesMode.FAIL_ON_PROJECT_RULES) } The default behavior is equivalent to calling this method:
Example 120. Preferring rules declared in projects
settings.gradle
dependencyResolutionManagement { rulesMode.set(RulesMode.PREFER_PROJECT) } settings.gradle.kts
dependencyResolutionManagement { rulesMode.set(RulesMode.PREFER_PROJECT) } Which parts of metadata can be modified?
The component metadata rules API is oriented at the features supported by Gradle Module Metadata and the dependencies API in build scripts. The main difference between writing rules and defining dependencies and artifacts in the build script is that component metadata rules, following the structure of Gradle Module Metadata, operate on variants directly. On the contrary, in build scripts you often influence the shape of multiple variants at once (e.g. an api dependency is added to the api and runtime variant of a Java library, the artifact produced by the jar task is also added to these two variants).
Variants can be addressed for modification through the following methods:
-
allVariants: modify all variants of a component -
withVariant(name): modify a single variant identified by its name -
addVariant(name)oraddVariant(name, base): add a new variant to the component either from scratch or by copying the details of an existing variant (base)
The following details of each variant can be adjusted:
-
The attributes that identify the variant —
attributes {}block -
The capabilities the variant provides —
withCapabilities { }block -
The dependencies of the variant, including rich versions —
withDependencies {}block -
The dependency constraints of the variant, including rich versions —
withDependencyConstraints {}block -
The location of the published files that make up the actual content of the variant —
withFiles { }block
There are also a few properties of the whole component that can be changed:
-
The component level attributes, currently the only meaningful attribute there is
org.gradle.status -
The status scheme to influence interpretation of the
org.gradle.statusattribute during version selection -
The belongsTo property for version alignment through virtual platforms
Depending on the format of the metadata of a module, it is mapped differently to the variant-centric representation of the metadata:
-
If the module has Gradle Module Metadata, the data structure the rule operates on is very similar to what you find in the module's
.modulefile. -
If the module was published only with
.pommetadata, a number of fixed variants is derived as explained in the mapping of POM files to variants section. -
If the module was published only with an
ivy.xmlfile, the Ivy configurations defined in the file can be accessed instead of variants. Their dependencies, dependency constraints and files can be modified. Additionally, theaddVariant(name, baseVariantOrConfiguration) { }API can be used to derive variants from Ivy configurations if desired (for example, compile and runtime variants for the Java library plugin can be defined with this).
When to use Component Metadata Rules?
In general, if you consider using component metadata rules to adjust the metadata of a certain module, you should check first if that module was published with Gradle Module Metadata (.module file) or traditional metadata only (.pom or ivy.xml).
If a module was published with Gradle Module Metadata, the metadata is likely complete although there can still be cases where something is just plainly wrong. For these modules you should only use component metadata rules if you have clearly identified a problem with the metadata itself. If you have an issue with the dependency resolution result, you should first check if you can solve the issue by declaring dependency constraints with rich versions. In particular, if you are developing a library that you publish, you should remember that dependency constraints, in contrast to component metadata rules, are published as part of the metadata of your own library. So with dependency constraints, you automatically share the solution of dependency resolution issues with your consumers, while component metadata rules are only applied to your own build.
If a module was published with traditional metadata (.pom or ivy.xml only, no .module file) it is more likely that the metadata is incomplete as features such as variants or dependency constraints are not supported in these formats. Still, conceptually such modules can contain different variants or might have dependency constraints they just omitted (or wrongly defined as dependencies). In the next sections, we explore a number existing oss modules with such incomplete metadata and the rules for adding the missing metadata information.
As a rule of thumb, you should contemplate if the rule you are writing also works out of context of your build. That is, does the rule still produce a correct and useful result if applied in any other build that uses the module(s) it affects?
Fixing wrong dependency details
Let's consider as an example the publication of the Jaxen XPath Engine on Maven central. The pom of version 1.1.3 declares a number of dependencies in the compile scope which are not actually needed for compilation. These have been removed in the 1.1.4 pom. Assuming that we need to work with 1.1.3 for some reason, we can fix the metadata with the following rule:
Example 121. Rule to remove unused dependencies of Jaxen metadata
build.gradle
@CacheableRule abstract class JaxenDependenciesRule implements ComponentMetadataRule { void execute(ComponentMetadataContext context) { context.details.allVariants { withDependencies { removeAll { it.group in ["dom4j", "jdom", "xerces", "maven-plugins", "xml-apis", "xom"] } } } } } build.gradle.kts
@CacheableRule abstract class JaxenDependenciesRule: ComponentMetadataRule { override fun execute(context: ComponentMetadataContext) { context.details.allVariants { withDependencies { removeAll { it.group in listOf("dom4j", "jdom", "xerces", "maven-plugins", "xml-apis", "xom") } } } } } Within the withDependencies block you have access to the full list of dependencies and can use all methods available on the Java collection interface to inspect and modify that list. In addition, there are add(notation, configureAction) methods accepting the usual notations similar to declaring dependencies in the build script. Dependency constraints can be inspected and modified the same way in the withDependencyConstraints block.
If we take a closer look at the Jaxen 1.1.4 pom, we observe that the dom4j, jdom and xerces dependencies are still there but marked as optional. Optional dependencies in poms are not automatically processed by Gradle nor Maven. The reason is that they indicate that there are optional feature variants provided by the Jaxen library which require one or more of these dependencies, but the information what these features are and which dependency belongs to which is missing. Such information cannot be represented in pom files, but in Gradle Module Metadata through variants and capabilities. Hence, we can add this information in a rule as well.
Example 122. Rule to add optional feature to Jaxen metadata
build.gradle
@CacheableRule abstract class JaxenCapabilitiesRule implements ComponentMetadataRule { void execute(ComponentMetadataContext context) { context.details.addVariant("runtime-dom4j", "runtime") { withCapabilities { removeCapability("jaxen", "jaxen") addCapability("jaxen", "jaxen-dom4j", context.details.id.version) } withDependencies { add("dom4j:dom4j:1.6.1") } } } } build.gradle.kts
@CacheableRule abstract class JaxenCapabilitiesRule: ComponentMetadataRule { override fun execute(context: ComponentMetadataContext) { context.details.addVariant("runtime-dom4j", "runtime") { withCapabilities { removeCapability("jaxen", "jaxen") addCapability("jaxen", "jaxen-dom4j", context.details.id.version) } withDependencies { add("dom4j:dom4j:1.6.1") } } } } Here, we first use the addVariant(name, baseVariant) method to create an additional variant, which we identify as feature variant by defining a new capability jaxen-dom4j to represent the optional dom4j integration feature of Jaxen. This works similar to defining optional feature variants in build scripts. We then use one of the add methods for adding dependencies to define which dependencies this optional feature needs.
In the build script, we can then add a dependency to the optional feature and Gradle will use the enriched metadata to discover the correct transitive dependencies.
Example 123. Applying and utilising rules for Jaxen metadata
build.gradle
dependencies { components { withModule("jaxen:jaxen", JaxenDependenciesRule) withModule("jaxen:jaxen", JaxenCapabilitiesRule) } implementation("jaxen:jaxen:1.1.3") runtimeOnly("jaxen:jaxen:1.1.3") { capabilities { requireCapability("jaxen:jaxen-dom4j") } } } build.gradle.kts
dependencies { components { withModule<JaxenDependenciesRule>("jaxen:jaxen") withModule<JaxenCapabilitiesRule>("jaxen:jaxen") } implementation("jaxen:jaxen:1.1.3") runtimeOnly("jaxen:jaxen:1.1.3") { capabilities { requireCapability("jaxen:jaxen-dom4j") } } } Making variants published as classified jars explicit
While in the previous example, all variants, "main variants" and optional features, were packaged in one jar file, it is common to publish certain variants as separate files. In particular, when the variants are mutual exclusive — i.e. they are not feature variants, but different variants offering alternative choices. One example all pom-based libraries already have are the runtime and compile variants, where Gradle can choose only one depending on the task at hand. Another of such alternatives discovered often in the Java ecosystems are jars targeting different Java versions.
As example, we look at version 0.7.9 of the asynchronous programming library Quasar published on Maven central. If we inspect the directory listing, we discover that a quasar-core-0.7.9-jdk8.jar was published, in addition to quasar-core-0.7.9.jar. Publishing additional jars with a classifier (here jdk8) is common practice in maven repositories. And while both Maven and Gradle allow you to reference such jars by classifier, they are not mentioned at all in the metadata. Thus, there is no information that these jars exist and if there are any other differences, like different dependencies, between the variants represented by such jars.
In Gradle Module Metadata, this variant information would be present and for the already published Quasar library, we can add it using the following rule:
Example 124. Rule to add JDK 8 variants to Quasar metadata
build.gradle
@CacheableRule abstract class QuasarRule implements ComponentMetadataRule { void execute(ComponentMetadataContext context) { ["compile", "runtime"].each { base -> context.details.addVariant("jdk8${base.capitalize()}", base) { attributes { attribute(TargetJvmVersion.TARGET_JVM_VERSION_ATTRIBUTE, 8) } withFiles { removeAllFiles() addFile("${context.details.id.name}-${context.details.id.version}-jdk8.jar") } } context.details.withVariant(base) { attributes { attribute(TargetJvmVersion.TARGET_JVM_VERSION_ATTRIBUTE, 7) } } } } } build.gradle.kts
@CacheableRule abstract class QuasarRule: ComponentMetadataRule { override fun execute(context: ComponentMetadataContext) { listOf("compile", "runtime").forEach { base -> context.details.addVariant("jdk8${base.capitalize()}", base) { attributes { attribute(TargetJvmVersion.TARGET_JVM_VERSION_ATTRIBUTE, 8) } withFiles { removeAllFiles() addFile("${context.details.id.name}-${context.details.id.version}-jdk8.jar") } } context.details.withVariant(base) { attributes { attribute(TargetJvmVersion.TARGET_JVM_VERSION_ATTRIBUTE, 7) } } } } } In this case, it is pretty clear that the classifier stands for a target Java version, which is a known Java ecosystem attribute. Because we also need both a compile and runtime for Java 8, we create two new variants but use the existing compile and runtime variants as base. This way, all other Java ecosystem attributes are already set correctly and all dependencies are carried over. Then we set the TARGET_JVM_VERSION_ATTRIBUTE to 8 for both variants, remove any existing file from the new variants with removeAllFiles(), and add the jdk8 jar file with addFile(). The removeAllFiles() is needed, because the reference to the main jar quasar-core-0.7.5.jar is copied from the corresponding base variant.
We also enrich the existing compile and runtime variants with the information that they target Java 7 — attribute(TARGET_JVM_VERSION_ATTRIBUTE, 7).
Now, we can request a Java 8 versions for all of our dependencies on the compile classpath in the build script and Gradle will automatically select the best fitting variant for each library. In the case of Quasar this will now be the jdk8Compile variant exposing the quasar-core-0.7.9-jdk8.jar.
Example 125. Applying and utilising rule for Quasar metadata
build.gradle
configurations.compileClasspath.attributes { attribute(TargetJvmVersion.TARGET_JVM_VERSION_ATTRIBUTE, 8) } dependencies { components { withModule("co.paralleluniverse:quasar-core", QuasarRule) } implementation("co.paralleluniverse:quasar-core:0.7.9") } build.gradle.kts
configurations["compileClasspath"].attributes { attribute(TargetJvmVersion.TARGET_JVM_VERSION_ATTRIBUTE, 8) } dependencies { components { withModule<QuasarRule>("co.paralleluniverse:quasar-core") } implementation("co.paralleluniverse:quasar-core:0.7.9") } Making variants encoded in versions explicit
Another solution to publish multiple alternatives for the same library is the usage of a a versioning pattern as done by the popular Guava library. Here, each new version is published twice by appending the classifier to the version instead of the jar artifact. In the case of Guava 28 for example, we can find a 28.0-jre (Java 8) and 28.0-android (Java 6) version on Maven central. The advantage of using this pattern when working only with pom metadata is that both variants are discoverable through the version. The disadvantage is that there is no information what the different version suffixes mean semantically. So in the case of conflict, Gradle would just pick the highest version when comparing the version strings.
Turning this into proper variants is a bit more tricky, as Gradle first selects a version of a module and then selects the best fitting variant. So the concept that variants are encoded as versions is not supported directly. However, since both variants are always published together we can assume that the files are physically located in the same repository. And since they are published with Maven repository conventions, we know the location of each file if we know module name and version. We can write the following rule:
Example 126. Rule to add JDK 6 and JDK 8 variants to Guava metadata
build.gradle
@CacheableRule abstract class GuavaRule implements ComponentMetadataRule { void execute(ComponentMetadataContext context) { def variantVersion = context.details.id.version def version = variantVersion.substring(0, variantVersion.indexOf("-")) ["compile", "runtime"].each { base -> [6: "android", 8: "jre"].each { targetJvmVersion, jarName -> context.details.addVariant("jdk$targetJvmVersion${base.capitalize()}", base) { attributes { attributes.attribute(TargetJvmVersion.TARGET_JVM_VERSION_ATTRIBUTE, targetJvmVersion) } withFiles { removeAllFiles() addFile("guava-$version-${jarName}.jar", "../$version-$jarName/guava-$version-${jarName}.jar") } } } } } } build.gradle.kts
@CacheableRule abstract class GuavaRule: ComponentMetadataRule { override fun execute(context: ComponentMetadataContext) { val variantVersion = context.details.id.version val version = variantVersion.substring(0, variantVersion.indexOf("-")) listOf("compile", "runtime").forEach { base -> mapOf(6 to "android", 8 to "jre").forEach { (targetJvmVersion, jarName) -> context.details.addVariant("jdk$targetJvmVersion${base.capitalize()}", base) { attributes { attributes.attribute(TargetJvmVersion.TARGET_JVM_VERSION_ATTRIBUTE, targetJvmVersion) } withFiles { removeAllFiles() addFile("guava-$version-$jarName.jar", "../$version-$jarName/guava-$version-$jarName.jar") } } } } } } Similar to the previous example, we add runtime and compile variants for both Java versions. In the withFiles block however, we now also specify a relative path for the corresponding jar file which allows Gradle to find the file no matter if it has selected a -jre or -android version. The path is always relative to the location of the metadata (in this case pom) file of the selection module version. So with this rules, both Guava 28 "versions" carry both the jdk6 and jdk8 variants. So it does not matter to which one Gradle resolves. The variant, and with it the correct jar file, is determined based on the requested TARGET_JVM_VERSION_ATTRIBUTE value.
Example 127. Applying and utilising rule for Guava metadata
build.gradle
configurations.compileClasspath.attributes { attribute(TargetJvmVersion.TARGET_JVM_VERSION_ATTRIBUTE, 6) } dependencies { components { withModule("com.google.guava:guava", GuavaRule) } // '23.3-android' and '23.3-jre' are now the same as both offer both variants implementation("com.google.guava:guava:23.3+") } build.gradle.kts
configurations["compileClasspath"].attributes { attribute(TargetJvmVersion.TARGET_JVM_VERSION_ATTRIBUTE, 6) } dependencies { components { withModule<GuavaRule>("com.google.guava:guava") } // '23.3-android' and '23.3-jre' are now the same as both offer both variants implementation("com.google.guava:guava:23.3+") } Adding variants for native jars
Jars with classifiers are also used to separate parts of a library for which multiple alternatives exists, for example native code, from the main artifact. This is for example done by the Lightweight Java Game Library (LWGJ), which publishes several platform specific jars to Maven central from which always one is needed, in addition to the main jar, at runtime. It is not possible to convey this information in pom metadata as there is no concept of putting multiple artifacts in relation through the metadata. In Gradle Module Metadata, each variant can have arbitrary many files and we can leverage that by writing the following rule:
Example 128. Rule to add native runtime variants to LWGJ metadata
build.gradle
@CacheableRule abstract class LwjglRule implements ComponentMetadataRule { //val os: String, val arch: String, val classifier: String) private def nativeVariants = [ [os: OperatingSystemFamily.LINUX, arch: "arm32", classifier: "natives-linux-arm32"], [os: OperatingSystemFamily.LINUX, arch: "arm64", classifier: "natives-linux-arm64"], [os: OperatingSystemFamily.WINDOWS, arch: "x86", classifier: "natives-windows-x86"], [os: OperatingSystemFamily.WINDOWS, arch: "x86-64", classifier: "natives-windows"], [os: OperatingSystemFamily.MACOS, arch: "x86-64", classifier: "natives-macos"] ] @Inject abstract ObjectFactory getObjects() void execute(ComponentMetadataContext context) { context.details.withVariant("runtime") { attributes { attributes.attribute(OperatingSystemFamily.OPERATING_SYSTEM_ATTRIBUTE, objects.named(OperatingSystemFamily, "none")) attributes.attribute(MachineArchitecture.ARCHITECTURE_ATTRIBUTE, objects.named(MachineArchitecture, "none")) } } nativeVariants.each { variantDefinition -> context.details.addVariant("${variantDefinition.classifier}-runtime", "runtime") { attributes { attributes.attribute(OperatingSystemFamily.OPERATING_SYSTEM_ATTRIBUTE, objects.named(OperatingSystemFamily, variantDefinition.os)) attributes.attribute(MachineArchitecture.ARCHITECTURE_ATTRIBUTE, objects.named(MachineArchitecture, variantDefinition.arch)) } withFiles { addFile("${context.details.id.name}-${context.details.id.version}-${variantDefinition.classifier}.jar") } } } } } build.gradle.kts
@CacheableRule abstract class LwjglRule: ComponentMetadataRule { data class NativeVariant(val os: String, val arch: String, val classifier: String) private val nativeVariants = listOf( NativeVariant(OperatingSystemFamily.LINUX, "arm32", "natives-linux-arm32"), NativeVariant(OperatingSystemFamily.LINUX, "arm64", "natives-linux-arm64"), NativeVariant(OperatingSystemFamily.WINDOWS, "x86", "natives-windows-x86"), NativeVariant(OperatingSystemFamily.WINDOWS, "x86-64", "natives-windows"), NativeVariant(OperatingSystemFamily.MACOS, "x86-64", "natives-macos") ) @get:Inject abstract val objects: ObjectFactory override fun execute(context: ComponentMetadataContext) { context.details.withVariant("runtime") { attributes { attributes.attribute(OperatingSystemFamily.OPERATING_SYSTEM_ATTRIBUTE, objects.named("none")) attributes.attribute(MachineArchitecture.ARCHITECTURE_ATTRIBUTE, objects.named("none")) } } nativeVariants.forEach { variantDefinition -> context.details.addVariant("${variantDefinition.classifier}-runtime", "runtime") { attributes { attributes.attribute(OperatingSystemFamily.OPERATING_SYSTEM_ATTRIBUTE, objects.named(variantDefinition.os)) attributes.attribute(MachineArchitecture.ARCHITECTURE_ATTRIBUTE, objects.named(variantDefinition.arch)) } withFiles { addFile("${context.details.id.name}-${context.details.id.version}-${variantDefinition.classifier}.jar") } } } } } This rule is quite similar to the Quasar library example above. Only this time we have five different runtime variants we add and nothing we need to change for the compile variant. The runtime variants are all based on the existing runtime variant and we do not change any existing information. All Java ecosystem attributes, the dependencies and the main jar file stay part of each of the runtime variants. We only set the additional attributes OPERATING_SYSTEM_ATTRIBUTE and ARCHITECTURE_ATTRIBUTE which are defined as part of Gradle's native support. And we add the corresponding native jar file so that each runtime variant now carries two files: the main jar and the native jar.
In the build script, we can now request a specific variant and Gradle will fail with a selection error if more information is needed to make a decision.
Example 129. Applying and utilising rule for LWGJ metadata
build.gradle
configurations["runtimeClasspath"].attributes { attribute(OperatingSystemFamily.OPERATING_SYSTEM_ATTRIBUTE, objects.named(OperatingSystemFamily, "windows")) } dependencies { components { withModule("org.lwjgl:lwjgl", LwjglRule) } implementation("org.lwjgl:lwjgl:3.2.3") } build.gradle.kts
configurations["runtimeClasspath"].attributes { attribute(OperatingSystemFamily.OPERATING_SYSTEM_ATTRIBUTE, objects.named("windows")) } dependencies { components { withModule<LwjglRule>("org.lwjgl:lwjgl") } implementation("org.lwjgl:lwjgl:3.2.3") } Gradle fails to select a variant because a machine architecture needs to be chosen
> Could not resolve all files for configuration ':runtimeClasspath'. > Could not resolve org.lwjgl:lwjgl:3.2.3. Required by: project : > Cannot choose between the following variants of org.lwjgl:lwjgl:3.2.3: - natives-windows-runtime - natives-windows-x86-runtime
Making different flavors of a library available through capabilities
Because it is difficult to model optional feature variants as separate jars with pom metadata, libraries sometimes compose different jars with a different feature set. That is, instead of composing your flavor of the library from different feature variants, you select one of the pre-composed variants (offering everything in one jar). One such library is the well-known dependency injection framework Guice, published on Maven central, which offers a complete flavor (the main jar) and a reduced variant without aspect-oriented programming support (guice-4.2.2-no_aop.jar). That second variant with a classifier is not mentioned in the pom metadata. With the following rule, we create compile and runtime variants based on that file and make it selectable through a capability named com.google.inject:guice-no_aop.
Example 130. Rule to add no_aop feature variant to Guice metadata
build.gradle
@CacheableRule abstract class GuiceRule implements ComponentMetadataRule { void execute(ComponentMetadataContext context) { ["compile", "runtime"].each { base -> context.details.addVariant("noAop${base.capitalize()}", base) { withCapabilities { addCapability("com.google.inject", "guice-no_aop", context.details.id.version) } withFiles { removeAllFiles() addFile("guice-${context.details.id.version}-no_aop.jar") } withDependencies { removeAll { it.group == "aopalliance" } } } } } } build.gradle.kts
@CacheableRule abstract class GuiceRule: ComponentMetadataRule { override fun execute(context: ComponentMetadataContext) { listOf("compile", "runtime").forEach { base -> context.details.addVariant("noAop${base.capitalize()}", base) { withCapabilities { addCapability("com.google.inject", "guice-no_aop", context.details.id.version) } withFiles { removeAllFiles() addFile("guice-${context.details.id.version}-no_aop.jar") } withDependencies { removeAll { it.group == "aopalliance" } } } } } } The new variants also have the dependency on the standardized aop interfaces library aopalliance:aopalliance removed, as this is clearly not needed by these variants. Again, this is information that cannot be expressed in pom metadata. We can now select a guice-no_aop variant and will get the correct jar file and the correct dependencies.
Example 131. Applying and utilising rule for Guice metadata
build.gradle
dependencies { components { withModule("com.google.inject:guice", GuiceRule) } implementation("com.google.inject:guice:4.2.2") { capabilities { requireCapability("com.google.inject:guice-no_aop") } } } build.gradle.kts
dependencies { components { withModule<GuiceRule>("com.google.inject:guice") } implementation("com.google.inject:guice:4.2.2") { capabilities { requireCapability("com.google.inject:guice-no_aop") } } } Adding missing capabilities to detect conflicts
Another usage of capabilities is to express that two different modules, for example log4j and log4j-over-slf4j, provide alternative implementations of the same thing. By declaring that both provide the same capability, Gradle only accepts one of them in a dependency graph. This example, and how it can be tackled with a component metadata rule, is described in detail in the feature modelling section.
Making Ivy modules variant-aware
Modules with Ivy metadata, do not have variants by default. However, Ivy configurations can be mapped to variants as the addVariant(name, baseVariantOrConfiguration) accepts any Ivy configuration that was published as base. This can be used, for example, to define runtime and compile variants. An example of a corresponding rule can be found here. Ivy details of Ivy configurations (e.g. dependencies and files) can also be modified using the withVariant(configurationName) API. However, modifying attributes or capabilities on Ivy configurations has no effect.
For very Ivy specific use cases, the component metadata rules API also offers access to other details only found in Ivy metadata. These are available through the IvyModuleDescriptor interface and can be accessed using getDescriptor(IvyModuleDescriptor) on the ComponentMetadataContext.
Example 132. Ivy component metadata rule
build.gradle
@CacheableRule abstract class IvyComponentRule implements ComponentMetadataRule { void execute(ComponentMetadataContext context) { def descriptor = context.getDescriptor(IvyModuleDescriptor) if (descriptor != null && descriptor.branch == "testing") { context.details.status = "rc" } } } build.gradle.kts
@CacheableRule abstract class IvyComponentRule : ComponentMetadataRule { override fun execute(context: ComponentMetadataContext) { val descriptor = context.getDescriptor(IvyModuleDescriptor::class) if (descriptor != null && descriptor.branch == "testing") { context.details.status = "rc" } } } Filter using Maven metadata
For Maven specific use cases, the component metadata rules API also offers access to other details only found in POM metadata. These are available through the PomModuleDescriptor interface and can be accessed using getDescriptor(PomModuleDescriptor) on the ComponentMetadataContext.
Example 133. Access pom packaging type in component metadata rule
build.gradle
@CacheableRule abstract class MavenComponentRule implements ComponentMetadataRule { void execute(ComponentMetadataContext context) { def descriptor = context.getDescriptor(PomModuleDescriptor) if (descriptor != null && descriptor.packaging == "war") { // ... } } } build.gradle.kts
@CacheableRule abstract class MavenComponentRule : ComponentMetadataRule { override fun execute(context: ComponentMetadataContext) { val descriptor = context.getDescriptor(PomModuleDescriptor::class) if (descriptor != null && descriptor.packaging == "war") { // ... } } } Modifying metadata on the component level for alignment
While all the examples above made modifications to variants of a component, there is also a limited set of modifications that can be done to the metadata of the component itself. This information can influence the version selection process for a module during dependency resolution, which is performed before one or multiple variants of a component are selected.
The first API available on the component is belongsTo() to create virtual platforms for aligning versions of multiple modules without Gradle Module Metadata. It is explained in detail in the section on aligning versions of modules not published with Gradle.
Modifying metadata on the component level for version selection based on status
Gradle and Gradle Module Metadata also allow attributes to be set on the whole component instead of a single variant. Each of these attributes carries special semantics as they influence version selection which is done before variant selection. While variant selection can handle any custom attribute, version selection only considers attributes for which specific semantics are implemented. At the moment, the only attribute with meaning here is org.gradle.status. It is therefore recommended to only modify this attribute, if any, on the component level. A dedicated API setStatus(value) is available for this. To modify another attribute for all variants of a component withAllVariants { attributes {} } should be utilised instead.
A module's status is taken into consideration when a latest version selector is resolved. Specifically, latest.someStatus will resolve to the highest module version that has status someStatus or a more mature status. For example, latest.integration will select the highest module version regardless of its status (because integration is the least mature status as explained below), whereas latest.release will select the highest module version with status release.
The interpretation of the status can be influenced by changing a module's status scheme through the setStatusScheme(valueList) API. This concept models the different levels of maturity that a module transitions through over time with different publications. The default status scheme, ordered from least to most mature status, is integration, milestone, release. The org.gradle.status attribute must be set, to one of the values in the components status scheme. Thus each component always has a status which is determined from the metadata as follows:
-
Gradle Module Metadata: the value that was published for the
org.gradle.statusattribute on the component -
Ivy metadata:
statusdefined in the ivy.xml, defaults tointegrationif missing -
Pom metadata:
integrationfor modules with a SNAPSHOT version,releasefor all others
The following example demonstrates latest selectors based on a custom status scheme declared in a component metadata rule that applies to all modules:
Example 134. Custom status scheme
build.gradle
@CacheableRule abstract class CustomStatusRule implements ComponentMetadataRule { void execute(ComponentMetadataContext context) { context.details.statusScheme = ["nightly", "milestone", "rc", "release"] if (context.details.status == "integration") { context.details.status = "nightly" } } } dependencies { components { all(CustomStatusRule) } implementation("org.apache.commons:commons-lang3:latest.rc") } build.gradle.kts
@CacheableRule abstract class CustomStatusRule : ComponentMetadataRule { override fun execute(context: ComponentMetadataContext) { context.details.statusScheme = listOf("nightly", "milestone", "rc", "release") if (context.details.status == "integration") { context.details.status = "nightly" } } } dependencies { components { all<CustomStatusRule>() } implementation("org.apache.commons:commons-lang3:latest.rc") } Compared to the default scheme, the rule inserts a new status rc and replaces integration with nightly. Existing modules with the state integration are mapped to nightly.
Customizing resolution of a dependency directly
| This section covers mechanisms Gradle offers to directly influence the behavior of the dependency resolution engine. In contrast to the other concepts covered in this chapter, like dependency constraints or component metadata rules, which are all inputs to resolution, the following mechanisms allow you to write rules which are directly injected into the resolution engine. Because of this, they can be seen as brute force solutions, that may hide future problems (e.g. if new dependencies are added). Therefore, the general advice is to only use the following mechanisms if other means are not sufficient. If you are authoring a library, you should always prefer dependency constraints as they are published for your consumers. |
Using dependency resolve rules
A dependency resolve rule is executed for each resolved dependency, and offers a powerful api for manipulating a requested dependency prior to that dependency being resolved. The feature currently offers the ability to change the group, name and/or version of a requested dependency, allowing a dependency to be substituted with a completely different module during resolution.
Dependency resolve rules provide a very powerful way to control the dependency resolution process, and can be used to implement all sorts of advanced patterns in dependency management. Some of these patterns are outlined below. For more information and code samples see the ResolutionStrategy class in the API documentation.
Implementing a custom versioning scheme
In some corporate environments, the list of module versions that can be declared in Gradle builds is maintained and audited externally. Dependency resolve rules provide a neat implementation of this pattern:
-
In the build script, the developer declares dependencies with the module group and name, but uses a placeholder version, for example:
default. -
The
defaultversion is resolved to a specific version via a dependency resolve rule, which looks up the version in a corporate catalog of approved modules.
This rule implementation can be neatly encapsulated in a corporate plugin, and shared across all builds within the organisation.
Example 135. Using a custom versioning scheme
build.gradle
configurations.all { resolutionStrategy.eachDependency { DependencyResolveDetails details -> if (details.requested.version == 'default') { def version = findDefaultVersionInCatalog(details.requested.group, details.requested.name) details.useVersion version.version details.because version.because } } } def findDefaultVersionInCatalog(String group, String name) { //some custom logic that resolves the default version into a specific version [version: "1.0", because: 'tested by QA'] } build.gradle.kts
configurations.all { resolutionStrategy.eachDependency { if (requested.version == "default") { val version = findDefaultVersionInCatalog(requested.group, requested.name) useVersion(version.version) because(version.because) } } } data class DefaultVersion(val version: String, val because: String) fun findDefaultVersionInCatalog(group: String, name: String): DefaultVersion { //some custom logic that resolves the default version into a specific version return DefaultVersion(version = "1.0", because = "tested by QA") } Denying a particular version with a replacement
Dependency resolve rules provide a mechanism for denying a particular version of a dependency and providing a replacement version. This can be useful if a certain dependency version is broken and should not be used, where a dependency resolve rule causes this version to be replaced with a known good version. One example of a broken module is one that declares a dependency on a library that cannot be found in any of the public repositories, but there are many other reasons why a particular module version is unwanted and a different version is preferred.
In example below, imagine that version 1.2.1 contains important fixes and should always be used in preference to 1.2. The rule provided will enforce just this: any time version 1.2 is encountered it will be replaced with 1.2.1. Note that this is different from a forced version as described above, in that any other versions of this module would not be affected. This means that the 'newest' conflict resolution strategy would still select version 1.3 if this version was also pulled transitively.
Example 136. Example: Blacklisting a version with a replacement
build.gradle
configurations.all { resolutionStrategy.eachDependency { DependencyResolveDetails details -> if (details.requested.group == 'org.software' && details.requested.name == 'some-library' && details.requested.version == '1.2') { details.useVersion '1.2.1' details.because 'fixes critical bug in 1.2' } } } build.gradle.kts
configurations.all { resolutionStrategy.eachDependency { if (requested.group == "org.software" && requested.name == "some-library" && requested.version == "1.2") { useVersion("1.2.1") because("fixes critical bug in 1.2") } } } | There's a difference with using the reject directive of rich version constraints: rich versions will cause the build to fail if a rejected version is found in the graph, or select a non rejected version when using dynamic dependencies. Here, we manipulate the requested versions in order to select a different version when we find a rejected one. In other words, this is a solution to rejected versions, while rich version constraints allow declaring the intent (you should not use this version). |
Using module replacement rules
It is preferable to express module conflicts in terms of capabilities conflicts. However, if there's no such rule declared or that you are working on versions of Gradle which do not support capabilities, Gradle provides tooling to work around those issues.
Module replacement rules allow a build to declare that a legacy library has been replaced by a new one. A good example when a new library replaced a legacy one is the google-collections -> guava migration. The team that created google-collections decided to change the module name from com.google.collections:google-collections into com.google.guava:guava. This is a legal scenario in the industry: teams need to be able to change the names of products they maintain, including the module coordinates. Renaming of the module coordinates has impact on conflict resolution.
To explain the impact on conflict resolution, let's consider the google-collections -> guava scenario. It may happen that both libraries are pulled into the same dependency graph. For example, our project depends on guava but some of our dependencies pull in a legacy version of google-collections. This can cause runtime errors, for example during test or application execution. Gradle does not automatically resolve the google-collections -> guava conflict because it is not considered as a version conflict. It's because the module coordinates for both libraries are completely different and conflict resolution is activated when group and module coordinates are the same but there are different versions available in the dependency graph (for more info, refer to the section on conflict resolution). Traditional remedies to this problem are:
-
Declare exclusion rule to avoid pulling in
google-collectionsto graph. It is probably the most popular approach. -
Avoid dependencies that pull in legacy libraries.
-
Upgrade the dependency version if the new version no longer pulls in a legacy library.
-
Downgrade to
google-collections. It's not recommended, just mentioned for completeness.
Traditional approaches work but they are not general enough. For example, an organisation wants to resolve the google-collections -> guava conflict resolution problem in all projects. It is possible to declare that certain module was replaced by other. This enables organisations to include the information about module replacement in the corporate plugin suite and resolve the problem holistically for all Gradle-powered projects in the enterprise.
Example 137. Declaring a module replacement
build.gradle
dependencies { modules { module("com.google.collections:google-collections") { replacedBy("com.google.guava:guava", "google-collections is now part of Guava") } } } build.gradle.kts
dependencies { modules { module("com.google.collections:google-collections") { replacedBy("com.google.guava:guava", "google-collections is now part of Guava") } } } What happens when we declare that google-collections is replaced by guava? Gradle can use this information for conflict resolution. Gradle will consider every version of guava newer/better than any version of google-collections. Also, Gradle will ensure that only guava jar is present in the classpath / resolved file list. Note that if only google-collections appears in the dependency graph (e.g. no guava) Gradle will not eagerly replace it with guava. Module replacement is an information that Gradle uses for resolving conflicts. If there is no conflict (e.g. only google-collections or only guava in the graph) the replacement information is not used.
Currently it is not possible to declare that a given module is replaced by a set of modules. However, it is possible to declare that multiple modules are replaced by a single module.
Using dependency substitution rules
Dependency substitution rules work similarly to dependency resolve rules. In fact, many capabilities of dependency resolve rules can be implemented with dependency substitution rules. They allow project and module dependencies to be transparently substituted with specified replacements. Unlike dependency resolve rules, dependency substitution rules allow project and module dependencies to be substituted interchangeably.
Adding a dependency substitution rule to a configuration changes the timing of when that configuration is resolved. Instead of being resolved on first use, the configuration is instead resolved when the task graph is being constructed. This can have unexpected consequences if the configuration is being further modified during task execution, or if the configuration relies on modules that are published during execution of another task.
To explain:
-
A
Configurationcan be declared as an input to any Task, and that configuration can include project dependencies when it is resolved. -
If a project dependency is an input to a Task (via a configuration), then tasks to build the project artifacts must be added to the task dependencies.
-
In order to determine the project dependencies that are inputs to a task, Gradle needs to resolve the
Configurationinputs. -
Because the Gradle task graph is fixed once task execution has commenced, Gradle needs to perform this resolution prior to executing any tasks.
In the absence of dependency substitution rules, Gradle knows that an external module dependency will never transitively reference a project dependency. This makes it easy to determine the full set of project dependencies for a configuration through simple graph traversal. With this functionality, Gradle can no longer make this assumption, and must perform a full resolve in order to determine the project dependencies.
Substituting an external module dependency with a project dependency
One use case for dependency substitution is to use a locally developed version of a module in place of one that is downloaded from an external repository. This could be useful for testing a local, patched version of a dependency.
The module to be replaced can be declared with or without a version specified.
Example 138. Substituting a module with a project
build.gradle
configurations.all { resolutionStrategy.dependencySubstitution { substitute module("org.utils:api") using project(":api") because "we work with the unreleased development version" substitute module("org.utils:util:2.5") using project(":util") } } build.gradle.kts
configurations.all { resolutionStrategy.dependencySubstitution { substitute(module("org.utils:api")) .using(project(":api")).because("we work with the unreleased development version") substitute(module("org.utils:util:2.5")).using(project(":util")) } } Note that a project that is substituted must be included in the multi-project build (via settings.gradle). Dependency substitution rules take care of replacing the module dependency with the project dependency and wiring up any task dependencies, but do not implicitly include the project in the build.
Substituting a project dependency with a module replacement
Another way to use substitution rules is to replace a project dependency with a module in a multi-project build. This can be useful to speed up development with a large multi-project build, by allowing a subset of the project dependencies to be downloaded from a repository rather than being built.
The module to be used as a replacement must be declared with a version specified.
Example 139. Substituting a project with a module
build.gradle
configurations.all { resolutionStrategy.dependencySubstitution { substitute project(":api") using module("org.utils:api:1.3") because "we use a stable version of org.utils:api" } } build.gradle.kts
configurations.all { resolutionStrategy.dependencySubstitution { substitute(project(":api")) .using(module("org.utils:api:1.3")).because("we use a stable version of org.utils:api") } } When a project dependency has been replaced with a module dependency, that project is still included in the overall multi-project build. However, tasks to build the replaced dependency will not be executed in order to resolve the depending Configuration.
Conditionally substituting a dependency
A common use case for dependency substitution is to allow more flexible assembly of sub-projects within a multi-project build. This can be useful for developing a local, patched version of an external dependency or for building a subset of the modules within a large multi-project build.
The following example uses a dependency substitution rule to replace any module dependency with the group org.example, but only if a local project matching the dependency name can be located.
Example 140. Conditionally substituting a dependency
build.gradle
configurations.all { resolutionStrategy.dependencySubstitution.all { DependencySubstitution dependency -> if (dependency.requested instanceof ModuleComponentSelector && dependency.requested.group == "org.example") { def targetProject = findProject(":${dependency.requested.module}") if (targetProject != null) { dependency.useTarget targetProject } } } } build.gradle.kts
configurations.all { resolutionStrategy.dependencySubstitution.all { requested.let { if (it is ModuleComponentSelector && it.group == "org.example") { val targetProject = findProject(":${it.module}") if (targetProject != null) { useTarget(targetProject) } } } } } Note that a project that is substituted must be included in the multi-project build (via settings.gradle). Dependency substitution rules take care of replacing the module dependency with the project dependency, but do not implicitly include the project in the build.
Substituting a dependency with another variant
Gradle's dependency management engine is variant-aware meaning that for a single component, the engine may select different artifacts and transitive dependencies.
What to select is determined by the attributes of the consumer configuration and the attributes of the variants found on the producer side. It is, however, possible that some specific dependencies override attributes from the configuration itself. This is typically the case when using the Java Platform plugin: this plugin builds a special kind of component which is called a "platform" and can be addressed by setting the component category attribute to platform, in opposition to typical dependencies which are targetting libraries.
Therefore, you may face situations where you want to substitute a platform dependency with a regular dependency, or the other way around.
Substituting a dependency with attributes
Let's imagine that you want to substitute a platform dependency with a regular dependency. This means that the library you are consuming declared something like this:
Example 141. An incorrect dependency on a platform
lib/build.gradle
dependencies { // This is a platform dependency but you want the library implementation platform('com.google.guava:guava:28.2-jre') } lib/build.gradle.kts
dependencies { // This is a platform dependency but you want the library implementation(platform("com.google.guava:guava:28.2-jre")) } The platform keyword is actually a short-hand notation for a dependency with attributes. If we want to substitute this dependency with a regular dependency, then we need to select precisely the dependencies which have the platform attribute.
This can be done by using a substitution rule:
Example 142. Substitute a platform dependency with a regular dependency
consumer/build.gradle
configurations.all { resolutionStrategy.dependencySubstitution { substitute(platform(module('com.google.guava:guava:28.2-jre'))). using module('com.google.guava:guava:28.2-jre') } } consumer/build.gradle.kts
configurations.all { resolutionStrategy.dependencySubstitution { substitute(platform(module("com.google.guava:guava:28.2-jre"))) .using(module("com.google.guava:guava:28.2-jre")) } } The same rule without the platform keyword would try to substitute regular dependencies with a regular dependency, which is not what you want, so it's important to understand that the substitution rules apply on a dependency specification: it matches the requested dependency (substitute XXX) with a substitute (using YYY).
You can have attributes on both the requested dependency or the substitute and the substitution is not limited to platform: you can actually specify the whole set of dependency attributes using the variant notation. The following rule is strictly equivalent to the rule above:
Example 143. Substitute a platform dependency with a regular dependency using the variant notation
consumer/build.gradle
configurations.all { resolutionStrategy.dependencySubstitution { substitute variant(module('com.google.guava:guava:28.2-jre')) { attributes { attribute(Category.CATEGORY_ATTRIBUTE, objects.named(Category, Category.REGULAR_PLATFORM)) } } using module('com.google.guava:guava:28.2-jre') } } consumer/build.gradle.kts
configurations.all { resolutionStrategy.dependencySubstitution { substitute(variant(module("com.google.guava:guava:28.2-jre")) { attributes { attribute(Category.CATEGORY_ATTRIBUTE, objects.named(Category.REGULAR_PLATFORM)) } }).using(module("com.google.guava:guava:28.2-jre")) } } Please refer to the Substitution DSL API docs for a complete reference of the variant substitution API.
| In composite builds, the rule that you have to match the exact requested dependency attributes is not applied: when using composites, Gradle will automatically match the requested attributes. In other words, it is implicit that if you include another build, you are substituting all variants of the substituted module with an equivalent variant in the included build. |
Substituting a dependency with a dependency with capabilities
Similarly to attributes substitution, Gradle lets you substitute a dependency with or without capabilities with another dependency with or without capabilities.
For example, let's imagine that you need to substitute a regular dependency with its test fixtures instead. You can achieve this by using the following dependency substitution rule:
Example 144. Substitute a dependency with its test fixtures
build.gradle
configurations.testCompileClasspath { resolutionStrategy.dependencySubstitution { substitute(module('com.acme:lib:1.0')) .using variant(module('com.acme:lib:1.0')) { capabilities { requireCapability('com.acme:lib-test-fixtures') } } } } build.gradle.kts
configurations.testCompileClasspath { resolutionStrategy.dependencySubstitution { substitute(module("com.acme:lib:1.0")).using(variant(module("com.acme:lib:1.0")) { capabilities { requireCapability("com.acme:lib-test-fixtures") } }) } } Capabilities which are declared in a substitution rule on the requested dependency constitute part of the dependency match specification, and therefore dependencies which do not require the capabilities will not be matched.
Please refer to the Substitution DSL API docs for a complete reference of the variant substitution API.
| In composite builds, the rule that you have to match the exact requested dependency capabilities is not applied: when using composites, Gradle will automatically match the requested capabilities. In other words, it is implicit that if you include another build, you are substituting all variants of the substituted module with an equivalent variant in the included build. |
Substituting a dependency with a classifier or artifact
While external modules are in general addressed via their group/artifact/version coordinates, it is common that such modules are published with additional artifacts that you may want to use in place of the main artifact. This is typically the case for classified artifacts, but you may also need to select an artifact with a different file type or extension. Gradle discourages use of classifiers in dependencies and prefers to model such artifacts as additional variants of a module. There are lots of advantages of using variants instead of classified artifacts, including, but not only, a different set of dependencies for those artifacts.
However, in order to help bridging the two models, Gradle provides means to change or remove a classifier in a substitution rule.
Example 145. Dependencies which will lead to a resolution error
consumer/build.gradle
dependencies { implementation 'com.google.guava:guava:28.2-jre' implementation 'co.paralleluniverse:quasar-core:0.8.0' implementation project(':lib') } consumer/build.gradle.kts
dependencies { implementation("com.google.guava:guava:28.2-jre") implementation("co.paralleluniverse:quasar-core:0.8.0") implementation(project(":lib")) } In the example above, the first level dependency on quasar makes us think that Gradle would resolve quasar-core-0.8.0.jar but it's not the case: the build would fail with this message:
Execution failed for task ':resolve'. > Could not resolve all files for configuration ':runtimeClasspath'. > Could not find quasar-core-0.8.0-jdk8.jar (co.paralleluniverse:quasar-core:0.8.0). Searched in the following locations: https://repo1.maven.org/maven2/co/paralleluniverse/quasar-core/0.8.0/quasar-core-0.8.0-jdk8.jar That's because there's a dependency on another project, lib, which itself depends on a different version of quasar-core:
Example 146. A "classified" dependency
lib/build.gradle
dependencies { implementation "co.paralleluniverse:quasar-core:0.7.12_r3:jdk8" } lib/build.gradle.kts
dependencies { implementation("co.paralleluniverse:quasar-core:0.7.12_r3:jdk8") } What happens is that Gradle would perform conflict resolution between quasar-core 0.8.0 and quasar-core 0.7.12_r3. Because 0.8.0 is higher, we select this version, but the dependency in lib has a classifier, jdk8 and this classifier doesn't exist anymore in release 0.8.0.
To fix this problem, you can ask Gradle to resolve both dependencies without classifier:
Example 147. A resolution rule to disable selection of a classifier
consumer/build.gradle
configurations.all { resolutionStrategy.dependencySubstitution { substitute module('co.paralleluniverse:quasar-core') using module('co.paralleluniverse:quasar-core:0.8.0') withoutClassifier() } } consumer/build.gradle.kts
configurations.all { resolutionStrategy.dependencySubstitution { substitute(module("co.paralleluniverse:quasar-core")) .using(module("co.paralleluniverse:quasar-core:0.8.0")) .withoutClassifier() } } This rule effectively replaces any dependency on quasar-core found in the graph with a dependency without classifier.
Alternatively, it's possible to select a dependency with a specific classifier or, for more specific use cases, substitute with a very specific artifact (type, extension and classifier).
For more information, please refer to the following API documentation:
-
artifact selection via the Substitution DSL
-
artifact selection via the DependencySubstitution API
-
artifact selection via the ResolutionStrategy API
Disabling transitive resolution
By default Gradle resolves all transitive dependencies specified by the dependency metadata. Sometimes this behavior may not be desirable e.g. if the metadata is incorrect or defines a large graph of transitive dependencies. You can tell Gradle to disable transitive dependency management for a dependency by setting ModuleDependency.setTransitive(boolean) to false. As a result only the main artifact will be resolved for the declared dependency.
Example 148. Disabling transitive dependency resolution for a declared dependency
build.gradle
dependencies { implementation('com.google.guava:guava:23.0') { transitive = false } } build.gradle.kts
dependencies { implementation("com.google.guava:guava:23.0") { isTransitive = false } } | Disabling transitive dependency resolution will likely require you to declare the necessary runtime dependencies in your build script which otherwise would have been resolved automatically. Not doing so might lead to runtime classpath issues. |
A project can decide to disable transitive dependency resolution completely. You either don't want to rely on the metadata published to the consumed repositories or you want to gain full control over the dependencies in your graph. For more information, see Configuration.setTransitive(boolean).
Example 149. Disabling transitive dependency resolution on the configuration-level
build.gradle
configurations.all { transitive = false } dependencies { implementation 'com.google.guava:guava:23.0' } build.gradle.kts
configurations.all { isTransitive = false } dependencies { implementation("com.google.guava:guava:23.0") } Changing configuration dependencies prior to resolution
At times, a plugin may want to modify the dependencies of a configuration before it is resolved. The withDependencies method permits dependencies to be added, removed or modified programmatically.
Example 150. Modifying dependencies on a configuration
build.gradle
configurations { implementation { withDependencies { DependencySet dependencies -> ExternalModuleDependency dep = dependencies.find { it.name == 'to-modify' } as ExternalModuleDependency dep.version { strictly "1.2" } } } } build.gradle.kts
configurations { create("implementation") { withDependencies { val dep = this.find { it.name == "to-modify" } as ExternalModuleDependency dep.version { strictly("1.2") } } } } Setting default configuration dependencies
A configuration can be configured with default dependencies to be used if no dependencies are explicitly set for the configuration. A primary use case of this functionality is for developing plugins that make use of versioned tools that the user might override. By specifying default dependencies, the plugin can use a default version of the tool only if the user has not specified a particular version to use.
Example 151. Specifying default dependencies on a configuration
build.gradle
configurations { pluginTool { defaultDependencies { dependencies -> dependencies.add(project.dependencies.create("org.gradle:my-util:1.0")) } } } build.gradle.kts
configurations { create("pluginTool") { defaultDependencies { add(project.dependencies.create("org.gradle:my-util:1.0")) } } } Excluding a dependency from a configuration completely
Similar to excluding a dependency in a dependency declaration, you can exclude a transitive dependency for a particular configuration completely by using Configuration.exclude(java.util.Map). This will automatically exclude the transitive dependency for all dependencies declared on the configuration.
Example 152. Excluding transitive dependency for a particular configuration
build.gradle
configurations { implementation { exclude group: 'commons-collections', module: 'commons-collections' } } dependencies { implementation 'commons-beanutils:commons-beanutils:1.9.4' implementation 'com.opencsv:opencsv:4.6' } build.gradle.kts
configurations { "implementation" { exclude(group = "commons-collections", module = "commons-collections") } } dependencies { implementation("commons-beanutils:commons-beanutils:1.9.4") implementation("com.opencsv:opencsv:4.6") } Matching dependencies to repositories
Gradle exposes an API to declare what a repository may or may not contain. This feature offers a fine grained control on which repository serve which artifacts, which can be one way of controlling the source of dependencies.
Head over to the section on repository content filtering to know more about this feature.
Enabling Ivy dynamic resolve mode
Gradle's Ivy repository implementations support the equivalent to Ivy's dynamic resolve mode. Normally, Gradle will use the rev attribute for each dependency definition included in an ivy.xml file. In dynamic resolve mode, Gradle will instead prefer the revConstraint attribute over the rev attribute for a given dependency definition. If the revConstraint attribute is not present, the rev attribute is used instead.
To enable dynamic resolve mode, you need to set the appropriate option on the repository definition. A couple of examples are shown below. Note that dynamic resolve mode is only available for Gradle's Ivy repositories. It is not available for Maven repositories, or custom Ivy DependencyResolver implementations.
Example 153. Enabling dynamic resolve mode
build.gradle
// Can enable dynamic resolve mode when you define the repository repositories { ivy { url "http://repo.mycompany.com/repo" resolve.dynamicMode = true } } // Can use a rule instead to enable (or disable) dynamic resolve mode for all repositories repositories.withType(IvyArtifactRepository) { resolve.dynamicMode = true } build.gradle.kts
// Can enable dynamic resolve mode when you define the repository repositories { ivy { url = uri("http://repo.mycompany.com/repo") resolve.isDynamicMode = true } } // Can use a rule instead to enable (or disable) dynamic resolve mode for all repositories repositories.withType<IvyArtifactRepository> { resolve.isDynamicMode = true } Producing and Consuming Variants of Libraries
Declaring Capabilities of a Library
Capabilities as first-level concept
Components provide a number of features which are often orthogonal to the software architecture used to provide those features. For example, a library may include several features in a single artifact. However, such a library would be published at single GAV (group, artifact and version) coordinates. This means that, at single coordinates, potentially co-exist different "features" of a component.
With Gradle it becomes interesting to explicitly declare what features a component provides. For this, Gradle provides the concept of capability.
A feature is often built by combining different capabilities.
In an ideal world, components shouldn't declare dependencies on explicit GAVs, but rather express their requirements in terms of capabilities:
-
"give me a component which provides logging"
-
"give me a scripting engine"
-
"give me a scripting engine that supports Groovy"
By modeling capabilities, the dependency management engine can be smarter and tell you whenever you have incompatible capabilities in a dependency graph, or ask you to choose whenever different modules in a graph provide the same capability.
Declaring capabilities for external modules
It's worth noting that Gradle supports declaring capabilities for components you build, but also for external components in case they didn't.
For example, if your build file contains the following dependencies:
Example 154. A build file with an implicit conflict of logging frameworks
build.gradle
dependencies { // This dependency will bring log4:log4j transitively implementation 'org.apache.zookeeper:zookeeper:3.4.9' // We use log4j over slf4j implementation 'org.slf4j:log4j-over-slf4j:1.7.10' } build.gradle.kts
dependencies { // This dependency will bring log4:log4j transitively implementation("org.apache.zookeeper:zookeeper:3.4.9") // We use log4j over slf4j implementation("org.slf4j:log4j-over-slf4j:1.7.10") } As is, it's pretty hard to figure out that you will end up with two logging frameworks on the classpath. In fact, zookeeper will bring in log4j, where what we want to use is log4j-over-slf4j. We can preemptively detect the conflict by adding a rule which will declare that both logging frameworks provide the same capability:
Example 155. A build file with an implicit conflict of logging frameworks
build.gradle
dependencies { // Activate the "LoggingCapability" rule components.all(LoggingCapability) } @CompileStatic class LoggingCapability implements ComponentMetadataRule { final static Set<String> LOGGING_MODULES = ["log4j", "log4j-over-slf4j"] as Set<String> void execute(ComponentMetadataContext context) { context.details.with { if (LOGGING_MODULES.contains(id.name)) { allVariants { it.withCapabilities { // Declare that both log4j and log4j-over-slf4j provide the same capability it.addCapability("log4j", "log4j", id.version) } } } } } } build.gradle.kts
dependencies { // Activate the "LoggingCapability" rule components.all(LoggingCapability::class.java) } class LoggingCapability : ComponentMetadataRule { val loggingModules = setOf("log4j", "log4j-over-slf4j") override fun execute(context: ComponentMetadataContext) = context.details.run { if (loggingModules.contains(id.name)) { allVariants { withCapabilities { // Declare that both log4j and log4j-over-slf4j provide the same capability addCapability("log4j", "log4j", id.version) } } } } } By adding this rule, we will make sure that Gradle will detect conflicts and properly fail:
> Could not resolve all files for configuration ':compileClasspath'. > Could not resolve org.slf4j:log4j-over-slf4j:1.7.10. Required by: project : > Module 'org.slf4j:log4j-over-slf4j' has been rejected: Cannot select module with conflict on capability 'log4j:log4j:1.7.10' also provided by [log4j:log4j:1.2.16(compile)] > Could not resolve log4j:log4j:1.2.16. Required by: project : > org.apache.zookeeper:zookeeper:3.4.9 > Module 'log4j:log4j' has been rejected: Cannot select module with conflict on capability 'log4j:log4j:1.2.16' also provided by [org.slf4j:log4j-over-slf4j:1.7.10(compile)]
See the capabilities section of the documentation to figure out how to fix capability conflicts.
Declaring additional capabilities for a local component
All components have an implicit capability corresponding to the same GAV coordinates as the component. However, it is also possible to declare additional explicit capabilities for a component. This is convenient whenever a library published at different GAV coordinates is an alternate implementation of the same API:
Example 156. Declaring capabilities of a component
build.gradle
configurations { apiElements { outgoing { capability("com.acme:my-library:1.0") capability("com.other:module:1.1") } } runtimeElements { outgoing { capability("com.acme:my-library:1.0") capability("com.other:module:1.1") } } } build.gradle.kts
configurations { apiElements { outgoing { capability("com.acme:my-library:1.0") capability("com.other:module:1.1") } } runtimeElements { outgoing { capability("com.acme:my-library:1.0") capability("com.other:module:1.1") } } } Capabilities must be attached to outgoing configurations, which are consumable configurations of a component.
This example shows that we declare two capabilities:
-
com.acme:my-library:1.0, which corresponds to the implicit capability of the library -
com.other:module:1.1, which corresponds to another capability of this library
It's worth noting we need to do 1. because as soon as you start declaring explicit capabilities, then all capabilities need to be declared, including the implicit one.
The second capability can be specific to this library, or it can correspond to a capability provided by an external component. In that case, if com.other:module appears in the same dependency graph, the build will fail and consumers will have to choose what module to use.
Capabilities are published to Gradle Module Metadata. However, they have no equivalent in POM or Ivy metadata files. As a consequence, when publishing such a component, Gradle will warn you that this feature is only for Gradle consumers:
Maven publication 'maven' contains dependencies that cannot be represented in a published pom file. - Declares capability com.acme:my-library:1.0 - Declares capability com.other:module:1.1
Modeling feature variants and optional dependencies
Gradle supports the concept of feature variants: when building a library, it's often the case that some features should only be available when some dependencies are present, or when special artifacts are used.
Feature variants let consumers choose what features of a library they need: the dependency management engine will select the right artifacts and dependencies.
This allows for a number of different scenarios (list is non-exhaustive):
-
a (better) substitute for Maven optional dependencies
-
a main library is built with support for different mutually-exclusive implementations of runtime features; the user must choose one, and only one, implementation of each such feature
-
a main library is built with support for optional runtime features, each of which requires a different set of dependencies
-
a main library comes with secondary variants like test fixtures
-
a main library comes with a main artifact, and enabling an additional feature requires additional artifacts
Selection of feature variants and capabilities
Declaring a dependency on a component is usually done by providing a set of coordinates (group, artifact, version also known as GAV coordinates). This allows the engine to determine the component we're looking for, but such a component may provide different variants. A variant is typically chosen based on the usage. For example, we might choose a different variant for compiling against a component (in which case we need the API of the component) or when executing code (in which case we need the runtime of the component). All variants of a component provide a number of capabilities, which are denoted similarly using GAV coordinates.
| A capability is denoted by GAV coordinates, but you must think of it as feature description:
And in general, having two components that provide the same thing in the graph is a problem (they conflict). |
This is an important concept because:
-
by default a variant provides a capability corresponding to the GAV coordinates of its component
-
it is not allowed to have different components or different variants of a component in a dependency graph if they provide the same capability
-
it is allowed to select two variants of the same component, as long as they provide different capabilities
A typical component will only provide variants with the default capability. A Java library, for example, exposes two variants (API and runtime) which provide the same capability. As a consequence, it is an error to have both the API and runtime of a single component in a dependency graph.
However, imagine that you need the runtime and the test fixtures of a component. Then it is allowed as long as the runtime and test fixtures variant of the library declare different capabilities.
If we do so, a consumer would then have to declare two dependencies:
-
one on the "main" variant, the library
-
one on the "test fixtures" variant, by requiring its capability
| While the engine supports feature variants independently of the ecosystem, this feature is currently only available using the Java plugins. |
Declaring feature variants
Feature variants can be declared by applying the java or java-library plugins. The following code illustrates how to declare a feature named mongodbSupport:
Example 157. Declaring a feature variant
build.gradle
group = 'org.gradle.demo' version = '1.0' java { registerFeature('mongodbSupport') { usingSourceSet(sourceSets.main) } } build.gradle.kts
group = "org.gradle.demo" version = "1.0" java { registerFeature("mongodbSupport") { usingSourceSet(sourceSets["main"]) } } Gradle will automatically setup a number of things for you, in a very similar way to how the Java Library Plugin sets up configurations:
-
the configuration
mongodbSupportApi, used to declare API dependencies for this feature -
the configuration
mongodbSupportImplementation, used to declare implementation dependencies for this feature -
the configuration
mongodbSupportApiElements, used by consumers to fetch the artifacts and API dependencies of this feature -
the configuration
mongodbSupportRuntimeElements, used by consumers to fetch the artifacts and runtime dependencies of this feature
Most users will only need to care about the first two configurations, to declare the specific dependencies of this feature:
Example 158. Declaring dependencies of a feature
build.gradle
dependencies { mongodbSupportImplementation 'org.mongodb:mongodb-driver-sync:3.9.1' } build.gradle.kts
dependencies { "mongodbSupportImplementation"("org.mongodb:mongodb-driver-sync:3.9.1") } | By convention, Gradle maps the feature name to a capability whose group and version are the same as the group and version of the main component, respectively, but whose name is the main component name followed by a For example, if the group is If you choose the capability name yourself or add more capabilities to a variant, it is recommended to follow the same convention. |
Feature variant source set
In the previous example, we're declaring a feature variant which uses the main source set. This is a typical use case in the Java ecosystem, where it's, for whatever reason, not possible to split the sources of a project into different subprojects or different source sets. Gradle will therefore declare the configurations as described, but will also setup the compile classpath and runtime classpath of the main source set so that it extends from the feature configuration. Said differently, this allows you to declare the dependencies specific to a feature in their own "bucket", but everything is still compiled as a single source set. There will also be a single artifact (the component Jar) including support for all features.
However, it is often preferred to have a separate source set for a feature. Gradle will then perform a similar mapping, but will not make the compile and runtime classpath of the main component extend from the dependencies of the registered features. It will also, by convention, create a Jar task to bundle the classes built from this feature source set, using a classifier corresponding to the kebab-case name of the feature:
Example 159. Declaring a feature variant using a separate source set
build.gradle
sourceSets { mongodbSupport { java { srcDir 'src/mongodb/java' } } } java { registerFeature('mongodbSupport') { usingSourceSet(sourceSets.mongodbSupport) } } build.gradle.kts
sourceSets { create("mongodbSupport") { java { srcDir("src/mongodb/java") } } } java { registerFeature("mongodbSupport") { usingSourceSet(sourceSets["mongodbSupport"]) } } Publishing feature variants
| Depending on the metadata file format, publishing feature variants may be lossy:
|
Publishing feature variants is supported using the maven-publish and ivy-publish plugins only. The Java Plugin (or Java Library Plugin) will take care of registering the additional variants for you, so there's no additional configuration required, only the regular publications:
Example 160. Publishing a component with feature variants
build.gradle
plugins { id 'java-library' id 'maven-publish' } // ... publishing { publications { myLibrary(MavenPublication) { from components.java } } } build.gradle.kts
plugins { `java-library` `maven-publish` } // ... publishing { publications { create("myLibrary", MavenPublication::class.java) { from(components["java"]) } } } Adding javadoc and sources JARs
Similar to the main Javadoc and sources JARs, you can configure the added feature variant so that it produces JARs for the Javadoc and sources. This however only makes sense when using a source set other than the main one.
Example 161. Producing javadoc and sources JARs for feature variants
build.gradle
java { registerFeature('mongodbSupport') { usingSourceSet(sourceSets.mongodbSupport) withJavadocJar() withSourcesJar() } } build.gradle.kts
java { registerFeature("mongodbSupport") { usingSourceSet(sourceSets["mongodbSupport"]) withJavadocJar() withSourcesJar() } } Dependencies on feature variants
| As mentioned earlier, feature variants can be lossy when published. As a consequence, a consumer can depend on a feature variant only in these cases:
|
A consumer can specify that it needs a specific feature of a producer by declaring required capabilities. For example, if a producer declares a "MySQL support" feature like this:
Example 162. A library declaring a feature to support MySQL
build.gradle
group = 'org.gradle.demo' java { registerFeature('mysqlSupport') { usingSourceSet(sourceSets.main) } } dependencies { mysqlSupportImplementation 'mysql:mysql-connector-java:8.0.14' } build.gradle.kts
group = "org.gradle.demo" java { registerFeature("mysqlSupport") { usingSourceSet(sourceSets["main"]) } } dependencies { "mysqlSupportImplementation"("mysql:mysql-connector-java:8.0.14") } Then the consumer can declare a dependency on the MySQL support feature by doing this:
Example 163. Consuming specific features in a multi-project build
build.gradle
dependencies { // This project requires the main producer component implementation(project(":producer")) // But we also want to use its MySQL support runtimeOnly(project(":producer")) { capabilities { requireCapability("org.gradle.demo:producer-mysql-support") } } } build.gradle.kts
dependencies { // This project requires the main producer component implementation(project(":producer")) // But we also want to use its MySQL support runtimeOnly(project(":producer")) { capabilities { requireCapability("org.gradle.demo:producer-mysql-support") } } } This will automatically bring the mysql-connector-java dependency on the runtime classpath. If there were more than one dependency, all of them would be brought, meaning that a feature can be used to group dependencies which contribute to a feature together.
Similarly, if an external library with feature variants was published with Gradle Module Metadata, it is possible to depend on a feature provided by that library:
Example 164. Consuming specific features from an external repository
build.gradle
dependencies { // This project requires the main producer component implementation('org.gradle.demo:producer:1.0') // But we also want to use its MongoDB support runtimeOnly('org.gradle.demo:producer:1.0') { capabilities { requireCapability("org.gradle.demo:producer-mongodb-support") } } } build.gradle.kts
dependencies { // This project requires the main producer component implementation("org.gradle.demo:producer:1.0") // But we also want to use its MongoDB support runtimeOnly("org.gradle.demo:producer:1.0") { capabilities { requireCapability("org.gradle.demo:producer-mongodb-support") } } } Handling mutually exclusive variants
The main advantage of using capabilities as a way to handle features is that you can precisely handle compatibility of variants. The rule is simple:
It's not allowed to have two variants of components that provide the same capability in a single dependency graph.
We can leverage that to ask Gradle to fail whenever the user mis-configures dependencies. Imagine, for example, that your library supports MySQL, Postgres and MongoDB, but that it's only allowed to choose one of those at the same time. Not allowed should directly translate to "provide the same capability", so there must be a capability provided by all three features:
Example 165. A producer of multiple features that are mutually exclusive
build.gradle
java { registerFeature('mysqlSupport') { usingSourceSet(sourceSets.main) capability('org.gradle.demo', 'producer-db-support', '1.0') capability('org.gradle.demo', 'producer-mysql-support', '1.0') } registerFeature('postgresSupport') { usingSourceSet(sourceSets.main) capability('org.gradle.demo', 'producer-db-support', '1.0') capability('org.gradle.demo', 'producer-postgres-support', '1.0') } registerFeature('mongoSupport') { usingSourceSet(sourceSets.main) capability('org.gradle.demo', 'producer-db-support', '1.0') capability('org.gradle.demo', 'producer-mongo-support', '1.0') } } dependencies { mysqlSupportImplementation 'mysql:mysql-connector-java:8.0.14' postgresSupportImplementation 'org.postgresql:postgresql:42.2.5' mongoSupportImplementation 'org.mongodb:mongodb-driver-sync:3.9.1' } build.gradle.kts
java { registerFeature("mysqlSupport") { usingSourceSet(sourceSets["main"]) capability("org.gradle.demo", "producer-db-support", "1.0") capability("org.gradle.demo", "producer-mysql-support", "1.0") } registerFeature("postgresSupport") { usingSourceSet(sourceSets["main"]) capability("org.gradle.demo", "producer-db-support", "1.0") capability("org.gradle.demo", "producer-postgres-support", "1.0") } registerFeature("mongoSupport") { usingSourceSet(sourceSets["main"]) capability("org.gradle.demo", "producer-db-support", "1.0") capability("org.gradle.demo", "producer-mongo-support", "1.0") } } dependencies { "mysqlSupportImplementation"("mysql:mysql-connector-java:8.0.14") "postgresSupportImplementation"("org.postgresql:postgresql:42.2.5") "mongoSupportImplementation"("org.mongodb:mongodb-driver-sync:3.9.1") } Here, the producer declares 3 variants, one for each database runtime support:
-
mysql-supportprovides both thedb-supportandmysql-supportcapabilities -
postgres-supportprovides both thedb-supportandpostgres-supportcapabilities -
mongo-supportprovides both thedb-supportandmongo-supportcapabilities
Then if the consumer tries to get both the postgres-support and mysql-support like this (this also works transitively):
Example 166. A consumer trying to use 2 incompatible variants at the same time
build.gradle
dependencies { implementation(project(":producer")) // Let's try to ask for both MySQL and Postgres support runtimeOnly(project(":producer")) { capabilities { requireCapability("org.gradle.demo:producer-mysql-support") } } runtimeOnly(project(":producer")) { capabilities { requireCapability("org.gradle.demo:producer-postgres-support") } } } build.gradle.kts
dependencies { // This project requires the main producer component implementation(project(":producer")) // Let's try to ask for both MySQL and Postgres support runtimeOnly(project(":producer")) { capabilities { requireCapability("org.gradle.demo:producer-mysql-support") } } runtimeOnly(project(":producer")) { capabilities { requireCapability("org.gradle.demo:producer-postgres-support") } } } Dependency resolution would fail with the following error:
Cannot choose between org.gradle.demo:producer:1.0 variant mysqlSupportRuntimeElements and org.gradle.demo:producer:1.0 variant postgresSupportRuntimeElements because they provide the same capability: org.gradle.demo:producer-db-support:1.0
Understanding variant selection
Gradle's dependency management engine is known as variant aware. In a traditional dependency management engine like Apache Maven™, dependencies are bound to components published at GAV coordinates. This means that the set of transitive dependencies for a component is solely determined by the GAV coordinates of this component. It doesn't matter what artifact is actually resolved, the set of dependencies is always the same. In addition, selecting a different artifact for a component (for example, using the jdk7 artifact) is cumbersome as it requires the use of classifiers. One issue with this model is that it cannot guarantee global graph consistency because there are no common semantics associated with classifiers. What this means is that there's nothing which prevents from having both the jdk7 and jdk8 versions of a single module on classpath, because the engine has no idea what semantics are associated with the classifier name.
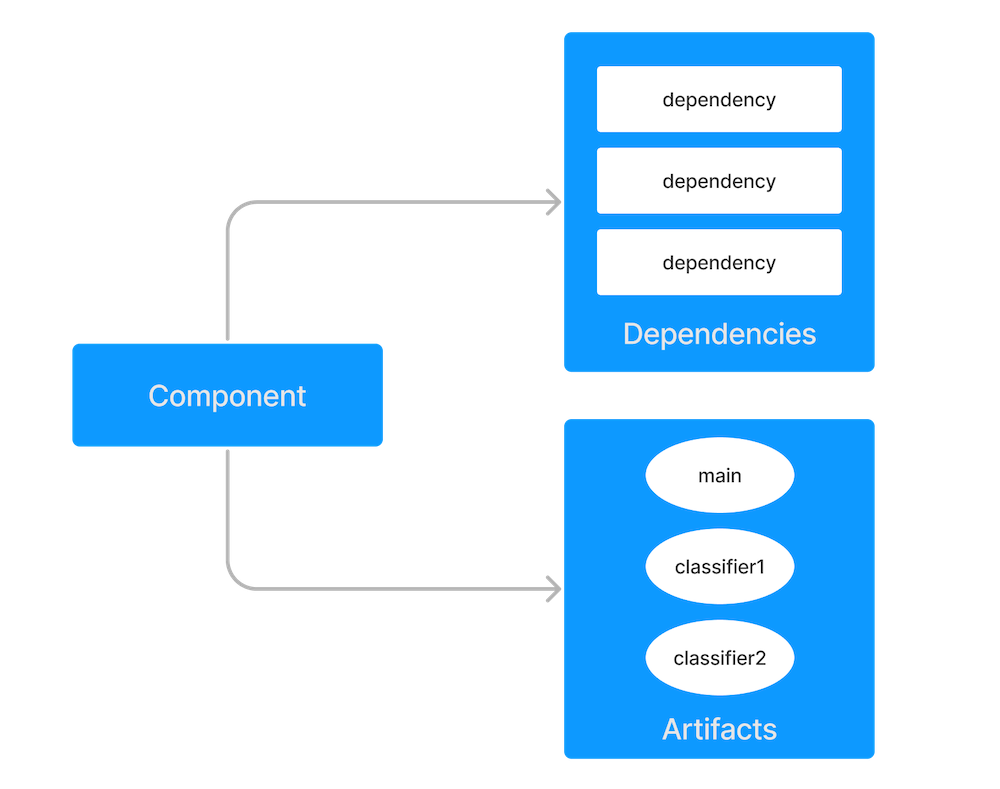
Figure 11. The Maven component model
Gradle, in addition to the concept of a module published at GAV coordinates, introduces the concept of variants of this module. Variants correspond to the different "views" of a component that is published at the same GAV coordinates. In the Gradle model, artifacts are attached to variants, not modules. This means, in practice, that different artifacts can have a different set of dependencies:
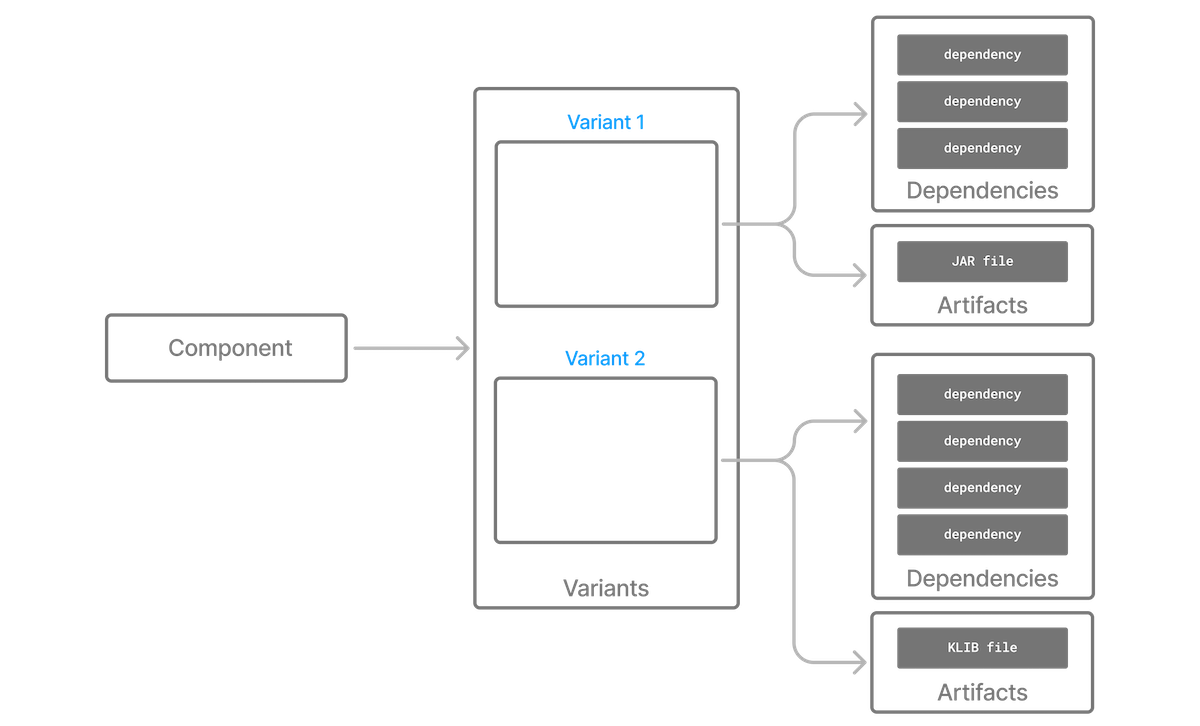
Figure 12. The Gradle component model
This intermediate level, which associates artifacts and dependencies to variants instead of directly to the component, allows Gradle to model properly what each artifact is used for.
However, this raises the question about how variants are selected: how does Gradle know which variant to choose when there's more than one? In practice, variants are selected thanks to the use of attributes, which provide semantics to the variants and help the engine in achieving a consistent resolution result.
For historical reasons, Gradle differentiates between two kind of components:
-
local components, built from sources, for which variants are mapped to outgoing configurations
-
external components, published on repositories, in which case either the module was published with Gradle Module Metadata and variants are natively supported, or the module is using Ivy/Maven metadata and variants are derived from metadata.
In both cases, Gradle performs variant aware selection.
Configuration and variant attributes
Local components expose variants as outgoing configurations, which are consumable configurations. When dependency resolution happens, the engine will select one variant of an outgoing component by selecting one of its consumable configurations.
| There are 2 noticeable exception to this rule:
In this case, variant aware resolution is bypassed. |
Attributes are used on both resolvable configurations (also known as a consumer) and consumable configurations (on the producer). Adding attributes to other kinds of configurations simply has no effect, as attributes are not inherited between configurations.
The role of the dependency resolution engine is to find a suitable variant of a producer given the constraints expressed by a consumer.
This is where attributes come into play: their role is to perform the selection of the right variant of a component.
| Variants vs configurations For external components, the terminology is to use the word variants, not configurations. Configurations are a super-set of variants. This means that an external component provides variants, which also have attributes. However, sometimes the term configuration may leak into the DSL for historical reasons, or because you use Ivy which also has this concept of configuration. |
Visualizing variant information
Gradle offers a report task called outgoingVariants that displays the variants of a project, with their capabilities, attributes and artifacts. It is conceptually similar to the dependencyInsight reporting task.
By default, outgoingVariants prints information about all variants. It offers the optional parameter --variant <variantName> to select a single variant to display. It also accepts the --all flag to include information about legacy and deprecated configurations.
Here is the output of the outgoingVariants task on a freshly generated java-library project:
> Task :outgoingVariants -------------------------------------------------- Variant apiElements -------------------------------------------------- Description = API elements for main. Capabilities - [default capability] Attributes - org.gradle.category = library - org.gradle.dependency.bundling = external - org.gradle.jvm.version = 8 - org.gradle.libraryelements = jar - org.gradle.usage = java-api Artifacts - build/libs/variant-report.jar (artifactType = jar) Secondary variants (*) - Variant : classes - Attributes - org.gradle.category = library - org.gradle.dependency.bundling = external - org.gradle.jvm.version = 8 - org.gradle.libraryelements = classes - org.gradle.usage = java-api - Artifacts - build/classes/java/main (artifactType = java-classes-directory) -------------------------------------------------- Variant runtimeElements -------------------------------------------------- Description = Elements of runtime for main. Capabilities - [default capability] Attributes - org.gradle.category = library - org.gradle.dependency.bundling = external - org.gradle.jvm.version = 8 - org.gradle.libraryelements = jar - org.gradle.usage = java-runtime Artifacts - build/libs/variant-report.jar (artifactType = jar) Secondary variants (*) - Variant : classes - Attributes - org.gradle.category = library - org.gradle.dependency.bundling = external - org.gradle.jvm.version = 8 - org.gradle.libraryelements = classes - org.gradle.usage = java-runtime - Artifacts - build/classes/java/main (artifactType = java-classes-directory) - Variant : resources - Attributes - org.gradle.category = library - org.gradle.dependency.bundling = external - org.gradle.jvm.version = 8 - org.gradle.libraryelements = resources - org.gradle.usage = java-runtime - Artifacts - build/resources/main (artifactType = java-resources-directory) (*) Secondary variants are variants created via the Configuration#getOutgoing(): ConfigurationPublications API which also participate in selection, in addition to the configuration itself.
From this you can see the two main variants that are exposed by a java library, apiElements and runtimeElements. Notice that the main difference is on the org.gradle.usage attribute, with values java-api and java-runtime. As they indicate, this is where the difference is made between what needs to be on the compile classpath of consumers, versus what's needed on the runtime classpath.
It also shows secondary variants, which are exclusive to Gradle projects and not published. For example, the secondary variant classes from apiElements is what allows Gradle to skip the JAR creation when compiling against a java-library project.
Variant aware matching
Let's take the example of a lib library which exposes 2 variants: its API (via a variant named exposedApi) and its runtime (via a variant named exposedRuntime).
| About producer variants The variant name is there mostly for debugging purposes and to get a nicer display in error messages. The name, in particular, doesn't participate in the id of a variant: only its attributes do. That is to say that to search for a particular variant, one must rely on its attributes, not its name. There are no restrictions on the number of variants a component can expose. Traditionally, a component would expose an API and an implementation, but we may, for example, want to expose the test fixtures of a component too. It is also possible to expose different APIs for different consumers (think about different environments, like Linux vs Windows). |
A consumer needs to explain what variant it needs and this is done by setting attributes on the consumer.
Attributes consist of a name and a value pair. For example, Gradle comes with a standard attribute named org.gradle.usage specifically to deal with the concept of selecting the right variant of a component based on the usage of the consumer (compile, runtime …). It is however possible to define an arbitrary number of attributes. As a producer, we can express that a consumable configuration represents the API of a component by attaching the (org.gradle.usage,JAVA_API) attribute to the variant. As a consumer, we can express that we need the API of the dependencies of a resolvable configuration by attaching the (org.gradle.usage,JAVA_API) attribute to it. Doing this, Gradle has a way to automatically select the appropriate variant by looking at the configuration attributes:
-
the consumer wants
org.gradle.usage=JAVA_API -
the producer,
libexposes 2 different variants. One withorg.gradle.usage=JAVA_API, the other withorg.gradle.usage=JAVA_RUNTIME. -
Gradle chooses the
org.gradle.usage=JAVA_APIvariant of the producer because it matches the consumer attributes
In other words: attributes are used to perform the selection based on the values of the attributes.
A more elaborate example involves more than one attribute. Typically, a Java Library project in Gradle will involve 4 different attributes, found both on the producer and consumer sides:
-
org.gradle.usage, explaining if the variant is the API of a component, or its implementation -
org.gradle.dependency.bundling, which declares how the dependencies of the component are bundled (for example, if the artifact is a fat jar, then the bundling isEMBEDDED) -
org.gradle.libraryelements, which is used to explain what parts of the library the variant contains (classes, resources or everything) -
org.gradle.jvm.version, which is used to explain what minimal version of Java this variant is targeted at
Now imagine that our library comes in two different flavors:
-
one for JDK 8
-
one for JDK 9+
This is typically achieved, in Maven, by producing 2 different artifacts, a "main" artifact and a "classified" one. However, in Maven a consumer cannot express the fact it needs the most appropriate version of the library based on the runtime.
With Gradle, this is elegantly solved by having the producer declare 2 variants:
-
one with
org.gradle.jvm.version=8, for consumers at least running on JDK 8 -
one with
org.gradle.jvm.version=9, for consumers starting from JDK 9
Note that the artifacts for both variants will be different, but their dependencies may be different too. Typically, the JDK 8 variant may need a "backport" library of JDK 9+ to work, that only consumers running on JDK 8 should get.
On the consumer side, the resolvable configuration will set all four attributes above, and, depending on the runtime, will set its org.gradle.jvm.version to 8 or more.
| A note about compatibility of variants What if the consumer sets Then resolution would fail with an error message explaining that there's no matching variant of the producer. This is because Gradle recognizes that the consumer wants a Java 7 compatible library, but the minimal version of Java available on the producer is 8. If, on the other hand, the consumer needs 11, then Gradle knows both the 8 and 9 variant would work, but it will select 9 because it's the highest compatible version. |
Variant selection errors
In the process of identifying the right variant of a component, two situations will result in a resolution error:
-
More than one variant from the producer match the consumer attributes, there is variant ambiguity
-
No variant from the producer match the consumer attributes
Dealing with ambiguous variant selection errors
An ambiguous variant selection looks somewhat like the following:
> Could not resolve all files for configuration ':compileClasspath'. > Could not resolve project :lib. Required by: project :ui > Cannot choose between the following variants of project :lib: - feature1ApiElements - feature2ApiElements All of them match the consumer attributes: - Variant 'feature1ApiElements' capability org.test:test-capability:1.0: - Unmatched attribute: - Found org.gradle.category 'library' but wasn't required. - Compatible attributes: - Provides org.gradle.dependency.bundling 'external' - Provides org.gradle.jvm.version '11' - Required org.gradle.libraryelements 'classes' and found value 'jar'. - Provides org.gradle.usage 'java-api' - Variant 'feature2ApiElements' capability org.test:test-capability:1.0: - Unmatched attribute: - Found org.gradle.category 'library' but wasn't required. - Compatible attributes: - Provides org.gradle.dependency.bundling 'external' - Provides org.gradle.jvm.version '11' - Required org.gradle.libraryelements 'classes' and found value 'jar'. - Provides org.gradle.usage 'java-api'
As can be seen, all compatible candidate variants are displayed, with their attributes. These are then grouped into two sections:
-
Unmatched attributes are presented first, as they might be the missing piece in selecting the proper variant.
-
Compatible attributes are presented second as they indicate what the consumer wanted and how these variants do match that request.
There cannot be any mismatched attributes as the variant would not be a candidate then. Similarly, the set of displayed variants also excludes the ones that have been disambiguated.
In the example above, the fix does not lie in attribute matching but in capability matching, which are shown next to the variant name. Because these two variants effectively provide the same attributes and capabilities, they cannot be disambiguated. So in this case, the fix is most likely to provide different capabilities on the producer side (project :lib) and express a capability choice on the consumer side (project :ui).
Dealing with no matching variant errors
A no matching variant error looks somewhat like the following:
> No variants of project :lib match the consumer attributes: - Configuration ':lib:compile': - Incompatible attribute: - Required artifactType 'dll' and found incompatible value 'jar'. - Other compatible attribute: - Provides usage 'api' - Configuration ':lib:compile' variant debug: - Incompatible attribute: - Required artifactType 'dll' and found incompatible value 'jar'. - Other compatible attributes: - Found buildType 'debug' but wasn't required. - Provides usage 'api' - Configuration ':lib:compile' variant release: - Incompatible attribute: - Required artifactType 'dll' and found incompatible value 'jar'. - Other compatible attributes: - Found buildType 'release' but wasn't required. - Provides usage 'api'
As can be seen, all candidate variants are displayed, with their attributes. These are then grouped into two sections:
-
Incompatible attributes are presented first, as they usually are the key in understanding why a variant could not be selected.
-
Other attributes are presented second, this includes required and compatible ones as well as all extra producer attributes that are not requested by the consumer.
Similarly with the ambiguous variant error, the goal is then to understand which variant is to be selected and see which attribute or capability can be tweaked on the consumer for this to happen.
Mapping from Maven/Ivy to variants
Neither Maven nor Ivy have the concept of variants, which are only natively supported by Gradle Module Metadata. However, it doesn't prevent Gradle from working with them thanks to different strategies.
| Relationship with Gradle Module Metadata Gradle Module Metadata is a metadata format for modules published on Maven, Ivy or other kind of repositories. It is similar to |
Mapping of POM files to variants
Modules published on a Maven repository are converted into variant-aware modules. A particularity of Maven modules is that there is no way to know what kind of component is published. In particular, there's no way to make the difference between a BOM representing a platform, and a BOM used as a super-POM. Sometimes, it is even possible for a POM file to act both as a platform and a library.
As a consequence, Maven modules are derived into 6 distinct variants, which allows Gradle users to explain precisely what they depend on:
-
2 "library" variants (attribute
org.gradle.category=library)-
the
compilevariant maps the<scope>compile</scope>dependencies. This variant is equivalent to theapiElementsvariant of the Java Library plugin. All dependencies of this scope are considered API dependencies. -
the
runtimevariant maps both the<scope>compile</scope>and<scope>runtime</scope>dependencies. This variant is equivalent to theruntimeElementsvariant of the Java Library plugin. All dependencies of those scopes are considered runtime dependencies.-
in both cases, the
<dependencyManagement>dependencies are not converted to constraints
-
-
-
4 "platform" variants derived from the
<dependencyManagement>block (attributeorg.gradle.category=platform):-
the
platform-compilevariant maps the<scope>compile</scope>dependency management dependencies as dependency constraints. -
the
platform-runtimevariant maps both the<scope>compile</scope>and<scope>runtime</scope>dependency management dependencies as dependency constraints. -
the
enforced-platform-compileis similar toplatform-compilebut all the constraints are forced -
the
enforced-platform-runtimeis similar toplatform-runtimebut all the constraints are forced
-
You can understand more about the use of platform and enforced platforms variants by looking at the importing BOMs section of the manual. By default, whenever you declare a dependency on a Maven module, Gradle is going to look for the library variants. However, using the platform or enforcedPlatform keyword, Gradle is now looking for one of the "platform" variants, which allows you to import the constraints from the POM files, instead of the dependencies.
Mapping of Ivy files to variants
Contrary to Maven, there is no derivation strategy implemented for Ivy files by default. The reason fo this is that, contrary to pom, Ivy is a flexible format that allows you to publish arbitrary many and customized configurations. So there is no notion of compile/runtime scope or compile/runtime variants in Ivy in general. Only if you use the ivy-publish plugin to publish ivy files with Gradle, you get a structure that follows a similar pattern as pom files. But since there is not guarantee that all ivy metadata files consumed by a build follow this pattern, Gradle cannot enforce a derivation strategy based on it.
However, if you want to implement a derivation strategy for compile and runtime variants for Ivy, you can do so with component metadata rule. The component metadata rules API allows you to access ivy configurations and create variants based on them. If you know that all the ivy modules your are consuming have been published with Gradle without further customizations of the ivy.xml file, you can add the following rule to your build:
Example 167. Deriving compile and runtime variants for Ivy metadata
build.gradle
abstract class IvyVariantDerivationRule implements ComponentMetadataRule { @Inject abstract ObjectFactory getObjects() void execute(ComponentMetadataContext context) { // This filters out any non Ivy module if(context.getDescriptor(IvyModuleDescriptor) == null) { return } context.details.addVariant("runtimeElements", "default") { attributes { attribute(LibraryElements.LIBRARY_ELEMENTS_ATTRIBUTE, getObjects().named(LibraryElements, LibraryElements.JAR)) attribute(Category.CATEGORY_ATTRIBUTE, getObjects().named(Category, Category.LIBRARY)) attribute(Usage.USAGE_ATTRIBUTE, getObjects().named(Usage, Usage.JAVA_RUNTIME)) } } context.details.addVariant("apiElements", "compile") { attributes { attribute(LibraryElements.LIBRARY_ELEMENTS_ATTRIBUTE, getObjects().named(LibraryElements, LibraryElements.JAR)) attribute(Category.CATEGORY_ATTRIBUTE, getObjects().named(Category, Category.LIBRARY)) attribute(Usage.USAGE_ATTRIBUTE, getObjects().named(Usage, Usage.JAVA_API)) } } } } dependencies { components { all(IvyVariantDerivationRule) } } build.gradle.kts
abstract class IvyVariantDerivationRule : ComponentMetadataRule { @Inject abstract fun getObjects(): ObjectFactory override fun execute(context: ComponentMetadataContext) { // This filters out any non Ivy module if(context.getDescriptor(IvyModuleDescriptor::class) == null) { return } context.details.addVariant("runtimeElements", "default") { attributes { attribute(LibraryElements.LIBRARY_ELEMENTS_ATTRIBUTE, getObjects().named(LibraryElements.JAR)) attribute(Category.CATEGORY_ATTRIBUTE, getObjects().named(Category.LIBRARY)) attribute(Usage.USAGE_ATTRIBUTE, getObjects().named(Usage.JAVA_RUNTIME)) } } context.details.addVariant("apiElements", "compile") { attributes { attribute(LibraryElements.LIBRARY_ELEMENTS_ATTRIBUTE, getObjects().named(LibraryElements.JAR)) attribute(Category.CATEGORY_ATTRIBUTE, getObjects().named(Category.LIBRARY)) attribute(Usage.USAGE_ATTRIBUTE, getObjects().named(Usage.JAVA_API)) } } } } dependencies { components { all<IvyVariantDerivationRule>() } } The rule creates an apiElements variant based on the compile configuration and a runtimeElements variant based on the default configuration of each ivy module. For each variant, it sets the corresponding Java ecosystem attributes. Dependencies and artifacts of the variants are taken from the underlying configurations. If not all consumed ivy modules follow this pattern, the rule can be adjusted or only applied to a selected set of modules.
For all ivy modules without variants, Gradle falls back to legacy configuration selection (i.e. Gradle does not perform variant aware resolution for these modules). This means either the default configuration or the configuration explicitly defined in the dependency to the corresponding module is selected. (Note that explicit configuration selection is only possible from build scripts or ivy metadata, and should be avoided in favor of variant selection.)
Working with Variant Attributes
As explained in the section on variant aware matching, attributes give semantics to variants and are used to perform the selection between them.
As a user of Gradle, attributes are often hidden as implementation details. But it might be useful to understand the standard attributes defined by Gradle and its core plugins.
As a plugin author, these attributes, and the way they are defined, can serve as a basis for building your own set of attributes in your eco system plugin.
Standard attributes defined by Gradle
Gradle defines a list of standard attributes used by Gradle's core plugins.
Ecosystem-independent standard attributes
| Attribute name | Description | Values | compatibility and disambiguation rules |
|---|---|---|---|
| | Indicates main purpose of variant | | Following ecosystem semantics (e.g. |
| | Indicates the category of this software component | | Following ecosystem semantics (e.g. |
| | Indicates the contents of a | | Following ecosystem semantics(e.g. in the JVM world, |
| | Indicates the contents of a | | No default, no compatibility |
| | Indicates how dependencies of a variant are accessed. | | Following ecosystem semantics (e.g. in the JVM world, |
| Attribute name | Description | Values | compatibility and disambiguation rules |
|---|---|---|---|
| | Component level attribute, derived | Based on a status scheme, with a default one existing based on the source repository. | Based on the scheme in use |
JVM ecosystem specific attributes
In addition to the ecosystem independent attributes defined above, the JVM ecosystem adds the following attribute:
| Attribute name | Description | Values | compatibility and disambiguation rules |
|---|---|---|---|
| | Indicates the JVM version compatibility. | Integer using the version after the | Defaults to the JVM version used by Gradle, lower is compatible with higher, prefers highest compatible. |
| | Indicates that a variant is optimized for a certain JVM environment. | Common values are | The attribute is used to prefer one variant over another if multiple are available, but in general all values are compatible. The default is |
The JVM ecosystem also contains a number of compatibility and disambiguation rules over the different attributes. The reader willing to know more can take a look at the code for org.gradle.api.internal.artifacts.JavaEcosystemSupport.
Gradle plugin ecosystem specific attributes
For Gradle plugin development, the following attribute is supported since Gradle 7.0. A Gradle plugin variant can specify compatibility with a Gradle API version through this attribute.
| Attribute name | Description | Values | compatibility and disambiguation rules |
|---|---|---|---|
| | Indicates the Gradle API version compatibility. | Valid Gradle version strings. | Defaults to the currently running Gradle, lower is compatible with higher, prefers highest compatible. |
Declaring custom attributes
If you are extending Gradle, e.g. by writing a plugin for another ecosystem, declaring custom attributes could be an option if you want to support variant-aware dependency management features in your plugin. However, you should be cautious if you also attempt to publish libraries. Semantics of new attributes are usually defined through a plugin, which can carry compatibility and disambiguation rules. Consequently, builds that consume libraries published for a certain ecosystem, also need to apply the corresponding plugin to interpret attributes correctly. If your plugin is intended for a larger audience, i.e. if it is openly available and libraries are published to public repositories, defining new attributes effectively extends the semantics of Gradle Module Metadata and comes with responsibilities. E.g., support for attributes that are already published should not be removed again, or should be handled in some kind of compatibility layer in future versions of the plugin.
Creating attributes in a build script or plugin
Attributes are typed. An attribute can be created via the Attribute<T>.of method:
Example 168. Define attributes
build.gradle
// An attribute of type `String` def myAttribute = Attribute.of("my.attribute.name", String) // An attribute of type `Usage` def myUsage = Attribute.of("my.usage.attribute", Usage) build.gradle.kts
// An attribute of type `String` val myAttribute = Attribute.of("my.attribute.name", String::class.java) // An attribute of type `Usage` val myUsage = Attribute.of("my.usage.attribute", Usage::class.java) Currently, only attribute types of String, or anything extending Named is supported. Attributes must be declared in the attribute schema found on the dependencies handler:
Example 169. Registering attributes on the attributes schema
build.gradle
dependencies.attributesSchema { // registers this attribute to the attributes schema attribute(myAttribute) attribute(myUsage) } build.gradle.kts
dependencies.attributesSchema { // registers this attribute to the attributes schema attribute(myAttribute) attribute(myUsage) } Then configurations can be configured to set values for attributes:
Example 170. Setting attributes on configurations
build.gradle
configurations { myConfiguration { attributes { attribute(myAttribute, 'my-value') } } } build.gradle.kts
configurations { create("myConfiguration") { attributes { attribute(myAttribute, "my-value") } } } For attributes which type extends Named, the value of the attribute must be created via the object factory:
Example 171. Named attributes
build.gradle
configurations { myConfiguration { attributes { attribute(myUsage, project.objects.named(Usage, 'my-value')) } } } build.gradle.kts
configurations { "myConfiguration" { attributes { attribute(myUsage, project.objects.named(Usage::class.java, "my-value")) } } } Attribute compatibility rules
Attributes let the engine select compatible variants. However, there are cases where a provider may not have exactly what the consumer wants, but still something that it can use. For example, if the consumer is asking for the API of a library, there's a possibility that the producer doesn't have such a variant, but only a runtime variant. This is typical of libraries published on external repositories. In this case, we know that even if we don't have an exact match (API), we can still compile against the runtime variant (it contains more than what we need to compile but it's still ok to use). To deal with this, Gradle provides attribute compatibility rules. The role of a compatibility rule is to explain what variants are compatible with what the consumer asked for.
Attribute disambiguation rules
Because multiple values for an attribute can be compatible with the requested attribute, Gradle needs to choose between the candidates. This is done by implementing an attribute disambiguation rule.
Sharing outputs between projects
A common pattern, in multi-project builds, is that one project consumes the artifacts of another project. In general, the simplest consumption form in the Java ecosystem is that when A depends on B, then A would depend on the jar produced by project B. As previously described in this chapter, this is modeled by A depending on a variant of B, where the variant is selected based on the needs of A. For compilation, we need the API dependencies of B, provided by the apiElements variant. For runtime, we need the runtime dependencies of B, provided by the runtimeElements variant.
However, what if you need a different artifact than the main one? Gradle provides, for example, built-in support for depending on the test fixtures of another project, but sometimes the artifact you need to depend on simply isn't exposed as a variant.
In order to be safe to share between projects and allow maximum performance (parallelism), such artifacts must be exposed via outgoing configurations.
| Don't reference other project tasks directly A frequent anti-pattern to declare cross-project dependencies is: This publication model is unsafe and can lead to non-reproducible and hard to parallelize builds. This section explains how to properly create cross-project boundaries by defining "exchanges" between projects by using variants. |
There are two, complementary, options to share artifacts between projects. The simplified version is only suitable if what you need to share is a simple artifact that doesn't depend on the consumer. The simple solution is also limited to cases where this artifact is not published to a repository. This also implies that the consumer does not publish a dependency to this artifact. In cases where the consumer resolves to different artifacts in different contexts (e.g., different target platforms) or that publication is required, you need to use the advanced version.
Simple sharing of artifacts between projects
First, a producer needs to declare a configuration which is going to be exposed to consumers. As explained in the configurations chapter, this corresponds to a consumable configuration.
Let's imagine that the consumer requires instrumented classes from the producer, but that this artifact is not the main one. The producer can expose its instrumented classes by creating a configuration that will "carry" this artifact:
Example 172. Declaring an outgoing variant
producer/build.gradle
configurations { instrumentedJars { canBeConsumed = true canBeResolved = false // If you want this configuration to share the same dependencies, otherwise omit this line extendsFrom implementation, runtimeOnly } } producer/build.gradle.kts
val instrumentedJars by configurations.creating { isCanBeConsumed = true isCanBeResolved = false // If you want this configuration to share the same dependencies, otherwise omit this line extendsFrom(configurations["implementation"], configurations["runtimeOnly"]) } This configuration is consumable, which means it's an "exchange" meant for consumers. We're now going to add artifacts to this configuration, that consumers would get when they consume it:
Example 173. Attaching an artifact to an outgoing configuration
producer/build.gradle
artifacts { instrumentedJars(instrumentedJar) } producer/build.gradle.kts
artifacts { add("instrumentedJars", instrumentedJar) } Here the "artifact" we're attaching is a task that actually generates a Jar. Doing so, Gradle can automatically track dependencies of this task and build them as needed. This is possible because the Jar task extends AbstractArchiveTask. If it's not the case, you will need to explicitly declare how the artifact is generated.
Example 174. Explicitly declaring the task dependency of an artifact
producer/build.gradle
artifacts { instrumentedJars(someTask.outputFile) { builtBy(someTask) } } producer/build.gradle.kts
artifacts { add("instrumentedJars", someTask.outputFile) { builtBy(someTask) } } Now the consumer needs to depend on this configuration in order to get the right artifact:
Example 175. An explicit configuration dependency
consumer/build.gradle
dependencies { instrumentedClasspath(project(path: ":producer", configuration: 'instrumentedJars')) } consumer/build.gradle.kts
dependencies { instrumentedClasspath(project(mapOf( "path" to ":producer", "configuration" to "instrumentedJars"))) } | Declaring a dependency on an explicit target configuration is not recommended if you plan to publish the component which has this dependency: this would likely lead to broken metadata. If you need to publish the component on a remote repository, follow the instructions of the variant-aware cross publication documentation. |
In this case, we're adding the dependency to the instrumentedClasspath configuration, which is a consumer specific configuration. In Gradle terminology, this is called a resolvable configuration, which is defined this way:
Example 176. Declaring a resolvable configuration on the consumer
consumer/build.gradle
configurations { instrumentedClasspath { canBeConsumed = false canBeResolved = true } } consumer/build.gradle.kts
val instrumentedClasspath by configurations.creating { isCanBeConsumed = false isCanBeResolved = true } Variant-aware sharing of artifacts between projects
In the simple sharing solution, we defined a configuration on the producer side which serves as an exchange of artifacts between the producer and the consumer. However, the consumer has to explicitly tell which configuration it depends on, which is something we want to avoid in variant aware resolution. In fact, we also have explained that it is possible for a consumer to express requirements using attributes and that the producer should provide the appropriate outgoing variants using attributes too. This allows for smarter selection, because using a single dependency declaration, without any explicit target configuration, the consumer may resolve different things. The typical example is that using a single dependency declaration project(":myLib"), we would either choose the arm64 or i386 version of myLib depending on the architecture.
To do this, we will add attributes to both the consumer and the producer.
| It is important to understand that once configurations have attributes, they participate in variant aware resolution, which means that they are candidates considered whenever any notation like In practice, it means that the attribute set used on the configuration you create are likely to be dependent on the ecosystem in use (Java, C++, …) because the relevant plugins for those ecosystems often use different attributes. |
Let's enhance our previous example which happens to be a Java Library project. Java libraries expose a couple of variants to their consumers, apiElements and runtimeElements. Now, we're adding a 3rd one, instrumentedJars.
Therefore, we need to understand what our new variant is used for in order to set the proper attributes on it. Let's look at the attributes we find on the runtimeElements configuration:
gradle outgoingVariants --variant runtimeElements
Attributes - org.gradle.category = library - org.gradle.dependency.bundling = external - org.gradle.jvm.version = 11 - org.gradle.libraryelements = jar - org.gradle.usage = java-runtime
What it tells us is that the Java Library plugin produces variants with 5 attributes:
-
org.gradle.categorytells us that this variant represents a library -
org.gradle.dependency.bundlingtells us that the dependencies of this variant are found as jars (they are not, for example, repackaged inside the jar) -
org.gradle.jvm.versiontells us that the minimum Java version this library supports is Java 11 -
org.gradle.libraryelementstells us this variant contains all elements found in a jar (classes and resources) -
org.gradle.usagesays that this variant is a Java runtime, therefore suitable for a Java compiler but also at runtime
As a consequence, if we want our instrumented classes to be used in place of this variant when executing tests, we need to attach similar attributes to our variant. In fact, the attribute we care about is org.gradle.libraryelements which explains what the variant contains, so we can setup the variant this way:
Example 177. Declaring the variant attributes
producer/build.gradle
configurations { instrumentedJars { canBeConsumed = true canBeResolved = false attributes { attribute(Category.CATEGORY_ATTRIBUTE, objects.named(Category, Category.LIBRARY)) attribute(Usage.USAGE_ATTRIBUTE, objects.named(Usage, Usage.JAVA_RUNTIME)) attribute(Bundling.BUNDLING_ATTRIBUTE, objects.named(Bundling, Bundling.EXTERNAL)) attribute(TargetJvmVersion.TARGET_JVM_VERSION_ATTRIBUTE, JavaVersion.current().majorVersion.toInteger()) attribute(LibraryElements.LIBRARY_ELEMENTS_ATTRIBUTE, objects.named(LibraryElements, 'instrumented-jar')) } } } producer/build.gradle.kts
val instrumentedJars by configurations.creating { isCanBeConsumed = true isCanBeResolved = false attributes { attribute(Category.CATEGORY_ATTRIBUTE, namedAttribute(Category.LIBRARY)) attribute(Usage.USAGE_ATTRIBUTE, namedAttribute(Usage.JAVA_RUNTIME)) attribute(Bundling.BUNDLING_ATTRIBUTE, namedAttribute(Bundling.EXTERNAL)) attribute(TargetJvmVersion.TARGET_JVM_VERSION_ATTRIBUTE, JavaVersion.current().majorVersion.toInt()) attribute(LibraryElements.LIBRARY_ELEMENTS_ATTRIBUTE, namedAttribute("instrumented-jar")) } } inline fun <reified T: Named> Project.namedAttribute(value: String) = objects.named(T::class.java, value) | Choosing the right attributes to set is the hardest thing in this process, because they carry the semantics of the variant. Therefore, before adding new attributes, you should always ask yourself if there isn't an attribute which carries the semantics you need. If there isn't, then you may add a new attribute. When adding new attributes, you must also be careful because it's possible that it creates ambiguity during selection. Often adding an attribute means adding it to all existing variants. |
What we have done here is that we have added a new variant, which can be used at runtime, but contains instrumented classes instead of the normal classes. However, it now means that for runtime, the consumer has to choose between two variants:
-
runtimeElements, the regular variant offered by thejava-libraryplugin -
instrumentedJars, the variant we have created
In particular, say we want the instrumented classes on the test runtime classpath. We can now, on the consumer, declare our dependency as a regular project dependency:
Example 178. Declaring the project dependency
consumer/build.gradle
dependencies { testImplementation 'junit:junit:4.13' testImplementation project(':producer') } consumer/build.gradle.kts
dependencies { testImplementation("junit:junit:4.13") testImplementation(project(":producer")) } If we stop here, Gradle will still select the runtimeElements variant in place of our instrumentedJars variant. This is because the testRuntimeClasspath configuration asks for a configuration which libraryelements attribute is jar, and our new instrumented-jars value is not compatible.
So we need to change the requested attributes so that we now look for instrumented jars:
Example 179. Changing the consumer attributes
consumer/build.gradle
configurations { testRuntimeClasspath { attributes { attribute(LibraryElements.LIBRARY_ELEMENTS_ATTRIBUTE, objects.named(LibraryElements, 'instrumented-jar')) } } } consumer/build.gradle.kts
configurations { testRuntimeClasspath { attributes { attribute(LibraryElements.LIBRARY_ELEMENTS_ATTRIBUTE, objects.named(LibraryElements::class.java, "instrumented-jar")) } } } Now, we're telling that whenever we're going to resolve the test runtime classpath, what we are looking for is instrumented classes. There is a problem though: in our dependencies list, we have JUnit, which, obviously, is not instrumented. So if we stop here, Gradle is going to fail, explaining that there's no variant of JUnit which provide instrumented classes. This is because we didn't explain that it's fine to use the regular jar, if no instrumented version is available. To do this, we need to write a compatibility rule:
Example 180. A compatibility rule
consumer/build.gradle
abstract class InstrumentedJarsRule implements AttributeCompatibilityRule<LibraryElements> { @Override void execute(CompatibilityCheckDetails<LibraryElements> details) { if (details.consumerValue.name == 'instrumented-jar' && details.producerValue.name == 'jar') { details.compatible() } } } consumer/build.gradle.kts
abstract class InstrumentedJarsRule: AttributeCompatibilityRule<LibraryElements> { override fun execute(details: CompatibilityCheckDetails<LibraryElements>) = details.run { if (consumerValue?.name == "instrumented-jar" && producerValue?.name == "jar") { compatible() } } } which we need to declare on the attributes schema:
Example 181. Making use of the compatibility rule
consumer/build.gradle
dependencies { attributesSchema { attribute(LibraryElements.LIBRARY_ELEMENTS_ATTRIBUTE) { compatibilityRules.add(InstrumentedJarsRule) } } } consumer/build.gradle.kts
dependencies { attributesSchema { attribute(LibraryElements.LIBRARY_ELEMENTS_ATTRIBUTE) { compatibilityRules.add(InstrumentedJarsRule::class.java) } } } And that's it! Now we have:
-
added a variant which provides instrumented jars
-
explained that this variant is a substitute for the runtime
-
explained that the consumer needs this variant only for test runtime
Gradle therefore offers a powerful mechanism to select the right variants based on preferences and compatibility. More details can be found in the variant aware plugins section of the documentation.
| By adding a value to an existing attribute like we have done, or by defining new attributes, we are extending the model. This means that all consumers have to know about this extended model. For local consumers, this is usually not a problem because all projects understand and share the same schema, but if you had to publish this new variant to an external repository, it means that external consumers would have to add the same rules to their builds for them to pass. This is in general not a problem for ecosystem plugins (e.g: the Kotlin plugin) where consumption is in any case not possible without applying the plugin, but it is a problem if you add custom values or attributes. So, avoid publishing custom variants if they are for internal use only. |
Targeting different platforms
It is common for a library to target different platforms. In the Java ecosystem, we often see different artifacts for the same library, distinguished by a different classifier. A typical example is Guava, which is published as this:
-
guava-jrefor JDK 8 and above -
guava-androidfor JDK 7
The problem with this approach is that there's no semantics associated with the classifier. The dependency resolution engine, in particular, cannot determine automatically which version to use based on the consumer requirements. For example, it would be better to express that you have a dependency on Guava, and let the engine choose between jre and android based on what is compatible.
Gradle provides an improved model for this, which doesn't have the weakness of classifiers: attributes.
In particular, in the Java ecosystem, Gradle provides a built-in attribute that library authors can use to express compatibility with the Java ecosystem: org.gradle.jvm.version. This attribute expresses the minimal version that a consumer must have in order to work properly.
When you apply the java or java-library plugins, Gradle will automatically associate this attribute to the outgoing variants. This means that all libraries published with Gradle automatically tell which target platform they use.
By default, the org.gradle.jvm.version is set to the value of the release property (or as fallback to the targetCompatibility value) of the main compilation task of the source set.
While this attribute is automatically set, Gradle will not, by default, let you build a project for different JVMs. If you need to do this, then you will need to create additional variants following the instructions on variant-aware matching.
| Future versions of Gradle will provide ways to automatically build for different Java platforms. |
Transforming dependency artifacts on resolution
As described in different kinds of configurations, there may be different variants for the same dependency. For example, an external Maven dependency has a variant which should be used when compiling against the dependency (java-api), and a variant for running an application which uses the dependency (java-runtime). A project dependency has even more variants, for example the classes of the project which are used for compilation are available as classes directories (org.gradle.usage=java-api, org.gradle.libraryelements=classes) or as JARs (org.gradle.usage=java-api, org.gradle.libraryelements=jar).
The variants of a dependency may differ in its transitive dependencies or in the artifact itself. For example, the java-api and java-runtime variants of a Maven dependency only differ in the transitive dependencies and both use the same artifact — the JAR file. For a project dependency, the java-api,classes and the java-api,jars variants have the same transitive dependencies and different artifacts — the classes directories and the JAR files respectively.
Gradle identifies a variant of a dependency uniquely by its set of attributes. The java-api variant of a dependency is the variant identified by the org.gradle.usage attribute with value java-api.
When Gradle resolves a configuration, the attributes on the resolved configuration determine the requested attributes. For all dependencies in the configuration, the variant with the requested attributes is selected when resolving the configuration. For example, when the configuration requests org.gradle.usage=java-api, org.gradle.libraryelements=classes on a project dependency, then the classes directory is selected as the artifact.
When the dependency does not have a variant with the requested attributes, resolving the configuration fails. Sometimes it is possible to transform the artifact of the dependency into the requested variant without changing the transitive dependencies. For example, unzipping a JAR transforms the artifact of the java-api,jars variant into the java-api,classes variant. Such a transformation is called Artifact Transform. Gradle allows registering artifact transforms, and when the dependency does not have the requested variant, then Gradle will try to find a chain of artifact transforms for creating the variant.
Artifact transform selection and execution
As described above, when Gradle resolves a configuration and a dependency in the configuration does not have a variant with the requested attributes, Gradle tries to find a chain of artifact transforms to create the variant. The process of finding a matching chain of artifact transforms is called artifact transform selection. Each registered transform converts from a set of attributes to a set of attributes. For example, the unzip transform can convert from org.gradle.usage=java-api, org.gradle.libraryelements=jars to org.gradle.usage=java-api, org.gradle.libraryelements=classes.
In order to find a chain, Gradle starts with the requested attributes and then considers all transforms which modify some of the requested attributes as possible paths leading there. Going backwards, Gradle tries to obtain a path to some existing variant using transforms.
For example, consider a minified attribute with two values: true and false. The minified attribute represents a variant of a dependency with unnecessary class files removed. There is an artifact transform registered, which can transform minified from false to true. When minified=true is requested for a dependency, and there are only variants with minified=false, then Gradle selects the registered minify transform. The minify transform is able to transform the artifact of the dependency with minified=false to the artifact with minified=true.
Of all the found transform chains, Gradle tries to select the best one:
-
If there is only one transform chain, it is selected.
-
If there are two transform chains, and one is a suffix of the other one, it is selected.
-
If there is a shortest transform chain, then it is selected.
-
In all other cases, the selection fails and an error is reported.
| Gradle does not try to select artifact transforms when there is already a variant of the dependency matching the requested attributes. |
| The |
After selecting the required artifact transforms, Gradle resolves the variants of the dependencies which are necessary for the initial transform in the chain. As soon as Gradle finishes resolving the artifacts for the variant, either by downloading an external dependency or executing a task producing the artifact, Gradle starts transforming the artifacts of the variant with the selected chain of artifact transforms. Gradle executes the transform chains in parallel when possible.
Picking up the minify example above, consider a configuration with two dependencies, the external guava dependency and a project dependency on the producer project. The configuration has the attributes org.gradle.usage=java-runtime,org.gradle.libraryelements=jar,minified=true. The external guava dependency has two variants:
-
org.gradle.usage=java-runtime,org.gradle.libraryelements=jar,minified=falseand -
org.gradle.usage=java-api,org.gradle.libraryelements=jar,minified=false.
Using the minify transform, Gradle can convert the variant org.gradle.usage=java-runtime,org.gradle.libraryelements=jar,minified=false of guava to org.gradle.usage=java-runtime,org.gradle.libraryelements=jar,minified=true, which are the requested attributes. The project dependency also has variants:
-
org.gradle.usage=java-runtime,org.gradle.libraryelements=jar,minified=false, -
org.gradle.usage=java-runtime,org.gradle.libraryelements=classes,minified=false, -
org.gradle.usage=java-api,org.gradle.libraryelements=jar,minified=false, -
org.gradle.usage=java-api,org.gradle.libraryelements=classes,minified=false -
and a few more.
Again, using the minify transform, Gradle can convert the variant org.gradle.usage=java-runtime,org.gradle.libraryelements=jar,minified=false of the project producer to org.gradle.usage=java-runtime,org.gradle.libraryelements=jar,minified=true, which are the requested attributes.
When the configuration is resolved, Gradle needs to download the guava JAR and minify it. Gradle also needs to execute the producer:jar task to generate the JAR artifact of the project and then minify it. The downloading and the minification of the guava.jar happens in parallel to the execution of the producer:jar task and the minification of the resulting JAR.
Here is how to setup the minified attribute so that the above works. You need to register the new attribute in the schema, add it to all JAR artifacts and request it on all resolvable configurations.
Example 182. Artifact transform attribute setup
build.gradle
def artifactType = Attribute.of('artifactType', String) def minified = Attribute.of('minified', Boolean) dependencies { attributesSchema { attribute(minified) (1) } artifactTypes.getByName("jar") { attributes.attribute(minified, false) (2) } } configurations.all { afterEvaluate { if (canBeResolved) { attributes.attribute(minified, true) (3) } } } dependencies { registerTransform(Minify) { from.attribute(minified, false).attribute(artifactType, "jar") to.attribute(minified, true).attribute(artifactType, "jar") } } dependencies { (4) implementation('com.google.guava:guava:27.1-jre') implementation(project(':producer')) } build.gradle.kts
val artifactType = Attribute.of("artifactType", String::class.java) val minified = Attribute.of("minified", Boolean::class.javaObjectType) dependencies { attributesSchema { attribute(minified) (1) } artifactTypes.getByName("jar") { attributes.attribute(minified, false) (2) } } configurations.all { afterEvaluate { if (isCanBeResolved) { attributes.attribute(minified, true) (3) } } } dependencies { registerTransform(Minify::class) { from.attribute(minified, false).attribute(artifactType, "jar") to.attribute(minified, true).attribute(artifactType, "jar") } } dependencies { (4) implementation("com.google.guava:guava:27.1-jre") implementation(project(":producer")) } | 1 | Add the attribute to the schema |
| 2 | All JAR files are not minified |
| 3 | Request minified=true on all resolvable configurations |
| 4 | Add the dependencies which will be transformed |
You can now see what happens when we run the resolveRuntimeClasspath task which resolves the runtimeClasspath configuration. Observe that Gradle transforms the project dependency before the resolveRuntimeClasspath task starts. Gradle transforms the binary dependencies when it executes the resolveRuntimeClasspath task.
Output when resolving the runtimeClasspath configuration
> gradle resolveRuntimeClasspath > Task :producer:compileJava > Task :producer:processResources NO-SOURCE > Task :producer:classes > Task :producer:jar > Transform producer.jar (project :producer) with Minify Nothing to minify - using producer.jar unchanged > Task :resolveRuntimeClasspath Minifying guava-27.1-jre.jar Nothing to minify - using listenablefuture-9999.0-empty-to-avoid-conflict-with-guava.jar unchanged Nothing to minify - using jsr305-3.0.2.jar unchanged Nothing to minify - using checker-qual-2.5.2.jar unchanged Nothing to minify - using error_prone_annotations-2.2.0.jar unchanged Nothing to minify - using j2objc-annotations-1.1.jar unchanged Nothing to minify - using animal-sniffer-annotations-1.17.jar unchanged Nothing to minify - using failureaccess-1.0.1.jar unchanged BUILD SUCCESSFUL in 0s 3 actionable tasks: 3 executed
Implementing artifact transforms
Similar to task types, an artifact transform consists of an action and some parameters. The major difference to custom task types is that the action and the parameters are implemented as two separate classes.
The implementation of the artifact transform action is a class implementing TransformAction. You need to implement the transform() method on the action, which converts an input artifact into zero, one or multiple of output artifacts. Most artifact transforms will be one-to-one, so the transform method will transform the input artifact to exactly one output artifact.
You can only supply two types of paths to the dir or file methods:
-
An absolute path to the input artifact or in the input artifact (for an input directory).
-
A relative path.
Gradle uses the absolute path as the location of the output artifact. For example, if the input artifact is an exploded WAR, then the transform action can call TransformOutputs.file() for all jar files in the WEB-INF/lib directory. The output of the transform would then be the library JARs of the web application.
For a relative path, the dir() or file() method returns a workspace to the transform action. The implementation of the transform action needs to create the transformed artifact at the location of the provided workspace.
The output artifacts replace the input artifact in the transformed variant in the order they were registered. For example, if the configuration consists of the artifacts lib1.jar, lib2.jar, lib3.jar, and the transform action registers a minified output artifact <artifact-name>-min.jar for the input artifact, then the transformed configuration consists of the artifacts lib1-min.jar, lib2-min.jar and lib3-min.jar.
Here is the implementation of an Unzip transform which transforms a JAR file into a classes directory by unzipping it. The Unzip transform does not require any parameters. Note how the implementation uses @InputArtifact to inject the artifact to transform into the action. It requests a directory for the unzipped classes by using TransformOutputs.dir() and then unzips the JAR file into this directory.
Example 183. Artifact transform without parameters
build.gradle
abstract class Unzip implements TransformAction<TransformParameters.None> { (1) @InputArtifact (2) abstract Provider<FileSystemLocation> getInputArtifact() @Override void transform(TransformOutputs outputs) { def input = inputArtifact.get().asFile def unzipDir = outputs.dir(input.name) (3) unzipTo(input, unzipDir) (4) } private static void unzipTo(File zipFile, File unzipDir) { // implementation... } } build.gradle.kts
abstract class Unzip : TransformAction<TransformParameters.None> { (1) @get:InputArtifact (2) abstract val inputArtifact: Provider<FileSystemLocation> override fun transform(outputs: TransformOutputs) { val input = inputArtifact.get().asFile val unzipDir = outputs.dir(input.name) (3) unzipTo(input, unzipDir) (4) } private fun unzipTo(zipFile: File, unzipDir: File) { // implementation... } } | 1 | Use TransformParameters.None if the transform does not use parameters |
| 2 | Inject the input artifact |
| 3 | Request an output location for the unzipped files |
| 4 | Do the actual work of the transform |
An artifact transform may require parameters, like a String determining some filter, or some file collection which is used for supporting the transformation of the input artifact. In order to pass those parameters to the transform action, you need to define a new type with the desired parameters. The type needs to implement the marker interface TransformParameters. The parameters must be represented using managed properties and the parameters type must be a managed type. You can use an interface or abstract class declaring the getters and Gradle will generate the implementation. All getters need to have proper input annotations, see the table in the section on incremental build.
Here is the implementation of a Minify transform that makes JARs smaller by only keeping certain classes in them. The Minify transform requires the classes to keep as parameters. Observe how you can obtain the parameters by TransformAction.getParameters() in the transform() method. The implementation of the transform() method requests a location for the minified JAR by using TransformOutputs.file() and then creates the minified JAR at this location.
Example 184. Minify transform implementation
build.gradle
abstract class Minify implements TransformAction<Parameters> { (1) interface Parameters extends TransformParameters { (2) @Input Map<String, Set<String>> getKeepClassesByArtifact() void setKeepClassesByArtifact(Map<String, Set<String>> keepClasses) } @PathSensitive(PathSensitivity.NAME_ONLY) @InputArtifact abstract Provider<FileSystemLocation> getInputArtifact() @Override void transform(TransformOutputs outputs) { def fileName = inputArtifact.get().asFile.name for (entry in parameters.keepClassesByArtifact) { (3) if (fileName.startsWith(entry.key)) { def nameWithoutExtension = fileName.substring(0, fileName.length() - 4) minify(inputArtifact.get().asFile, entry.value, outputs.file("${nameWithoutExtension}-min.jar")) return } } println "Nothing to minify - using ${fileName} unchanged" outputs.file(inputArtifact) (4) } private void minify(File artifact, Set<String> keepClasses, File jarFile) { println "Minifying ${artifact.name}" // Implementation ... } } build.gradle.kts
abstract class Minify : TransformAction<Minify.Parameters> { (1) interface Parameters : TransformParameters { (2) @get:Input var keepClassesByArtifact: Map<String, Set<String>> } @get:PathSensitive(PathSensitivity.NAME_ONLY) @get:InputArtifact abstract val inputArtifact: Provider<FileSystemLocation> override fun transform(outputs: TransformOutputs) { val fileName = inputArtifact.get().asFile.name for (entry in parameters.keepClassesByArtifact) { (3) if (fileName.startsWith(entry.key)) { val nameWithoutExtension = fileName.substring(0, fileName.length - 4) minify(inputArtifact.get().asFile, entry.value, outputs.file("${nameWithoutExtension}-min.jar")) return } } println("Nothing to minify - using ${fileName} unchanged") outputs.file(inputArtifact) (4) } private fun minify(artifact: File, keepClasses: Set<String>, jarFile: File) { println("Minifying ${artifact.name}") // Implementation ... } } | 1 | Declare the parameter type |
| 2 | Interface for the transform parameters |
| 3 | Use the parameters |
| 4 | Use the unchanged input artifact when no minification is required |
Remember that the input artifact is a dependency, which may have its own dependencies. If your artifact transform needs access to those transitive dependencies, it can declare an abstract getter returning a FileCollection and annotate it with @InputArtifactDependencies. When your transform runs, Gradle will inject the transitive dependencies into that FileCollection property by implementing the getter. Note that using input artifact dependencies in a transform has performance implications, only inject them when you really need them.
Moreover, artifact transforms can make use of the build cache for their outputs. To enable the build cache for an artifact transform, add the @CacheableTransform annotation on the action class. For cacheable transforms, you must annotate its @InputArtifact property — and any property marked with @InputArtifactDependencies — with normalization annotations such as @PathSensitive.
The following example shows a more complicated transform. It moves some selected classes of a JAR to a different package, rewriting the byte code of the moved classes and all classes using the moved classes (class relocation). In order to determine the classes to relocate, it looks at the packages of the input artifact and the dependencies of the input artifact. It also does not relocate packages contained in JAR files in an external classpath.
Example 185. Artifact transform for class relocation
build.gradle
@CacheableTransform (1) abstract class ClassRelocator implements TransformAction<Parameters> { interface Parameters extends TransformParameters { (2) @CompileClasspath (3) ConfigurableFileCollection getExternalClasspath() @Input Property<String> getExcludedPackage() } @Classpath (4) @InputArtifact abstract Provider<FileSystemLocation> getPrimaryInput() @CompileClasspath @InputArtifactDependencies (5) abstract FileCollection getDependencies() @Override void transform(TransformOutputs outputs) { def primaryInputFile = primaryInput.get().asFile if (parameters.externalClasspath.contains(primaryInput)) { (6) outputs.file(primaryInput) } else { def baseName = primaryInputFile.name.substring(0, primaryInputFile.name.length - 4) relocateJar(outputs.file("$baseName-relocated.jar")) } } private relocateJar(File output) { // implementation... def relocatedPackages = (dependencies.collectMany { readPackages(it) } + readPackages(primaryInput.get().asFile)) as Set def nonRelocatedPackages = parameters.externalClasspath.collectMany { readPackages(it) } def relocations = (relocatedPackages - nonRelocatedPackages).collect { packageName -> def toPackage = "relocated.$packageName" println("$packageName -> $toPackage") new Relocation(packageName, toPackage) } new JarRelocator(primaryInput.get().asFile, output, relocations).run() } } build.gradle.kts
@CacheableTransform (1) abstract class ClassRelocator : TransformAction<ClassRelocator.Parameters> { interface Parameters : TransformParameters { (2) @get:CompileClasspath (3) val externalClasspath: ConfigurableFileCollection @get:Input val excludedPackage: Property<String> } @get:Classpath (4) @get:InputArtifact abstract val primaryInput: Provider<FileSystemLocation> @get:CompileClasspath @get:InputArtifactDependencies (5) abstract val dependencies: FileCollection override fun transform(outputs: TransformOutputs) { val primaryInputFile = primaryInput.get().asFile if (parameters.externalClasspath.contains(primaryInputFile)) { (6) outputs.file(primaryInput) } else { val baseName = primaryInputFile.name.substring(0, primaryInputFile.name.length - 4) relocateJar(outputs.file("$baseName-relocated.jar")) } } private fun relocateJar(output: File) { // implementation... val relocatedPackages = (dependencies.flatMap { it.readPackages() } + primaryInput.get().asFile.readPackages()).toSet() val nonRelocatedPackages = parameters.externalClasspath.flatMap { it.readPackages() } val relocations = (relocatedPackages - nonRelocatedPackages).map { packageName -> val toPackage = "relocated.$packageName" println("$packageName -> $toPackage") Relocation(packageName, toPackage) } JarRelocator(primaryInput.get().asFile, output, relocations).run() } } | 1 | Declare the transform cacheable |
| 2 | Interface for the transform parameters |
| 3 | Declare input type for each parameter |
| 4 | Declare a normalization for the input artifact |
| 5 | Inject the input artifact dependencies |
| 6 | Use the parameters |
Registering artifact transforms
You need to register the artifact transform actions, providing parameters if necessary, so that they can be selected when resolving dependencies.
In order to register an artifact transform, you must use registerTransform() within the dependencies {} block.
There are a few points to consider when using registerTransform():
-
The
fromandtoattributes are required. -
The transform action itself can have configuration options. You can configure them with the
parameters {}block. -
You must register the transform on the project that has the configuration that will be resolved.
-
You can supply any type implementing TransformAction to the
registerTransform()method.
For example, imagine you want to unpack some dependencies and put the unpacked directories and files on the classpath. You can do so by registering an artifact transform action of type Unzip, as shown here:
Example 186. Artifact transform registration without parameters
build.gradle
def artifactType = Attribute.of('artifactType', String) dependencies { registerTransform(Unzip) { from.attribute(artifactType, 'jar') to.attribute(artifactType, 'java-classes-directory') } } build.gradle.kts
val artifactType = Attribute.of("artifactType", String::class.java) dependencies { registerTransform(Unzip::class) { from.attribute(artifactType, "jar") to.attribute(artifactType, "java-classes-directory") } } Another example is that you want to minify JARs by only keeping some class files from them. Note the use of the parameters {} block to provide the classes to keep in the minified JARs to the Minify transform.
Example 187. Artifact transform registration with parameters
build.gradle
def artifactType = Attribute.of('artifactType', String) def minified = Attribute.of('minified', Boolean) def keepPatterns = [ "guava": [ "com.google.common.base.Optional", "com.google.common.base.AbstractIterator" ] as Set ] dependencies { registerTransform(Minify) { from.attribute(minified, false).attribute(artifactType, "jar") to.attribute(minified, true).attribute(artifactType, "jar") parameters { keepClassesByArtifact = keepPatterns } } } build.gradle.kts
val artifactType = Attribute.of("artifactType", String::class.java) val minified = Attribute.of("minified", Boolean::class.javaObjectType) val keepPatterns = mapOf( "guava" to setOf( "com.google.common.base.Optional", "com.google.common.base.AbstractIterator" ) ) dependencies { registerTransform(Minify::class) { from.attribute(minified, false).attribute(artifactType, "jar") to.attribute(minified, true).attribute(artifactType, "jar") parameters { keepClassesByArtifact = keepPatterns } } } Implementing incremental artifact transforms
Similar to incremental tasks, artifact transforms can avoid work by only processing changed files from the last execution. This is done by using the InputChanges interface. For artifact transforms, only the input artifact is an incremental input, and therefore the transform can only query for changes there. In order to use InputChanges in the transform action, inject it into the action. For more information on how to use InputChanges, see the corresponding documentation for incremental tasks.
Here is an example of an incremental transform that counts the lines of code in Java source files:
Example 188. Artifact transform for lines of code counting
build.gradle
abstract class CountLoc implements TransformAction<TransformParameters.None> { @Inject (1) abstract InputChanges getInputChanges() @PathSensitive(PathSensitivity.RELATIVE) @InputArtifact abstract Provider<FileSystemLocation> getInput() @Override void transform(TransformOutputs outputs) { def outputDir = outputs.dir("${input.get().asFile.name}.loc") println("Running transform on ${input.get().asFile.name}, incremental: ${inputChanges.incremental}") inputChanges.getFileChanges(input).forEach { change -> (2) def changedFile = change.file if (change.fileType != FileType.FILE) { return } def outputLocation = new File(outputDir, "${change.normalizedPath}.loc") switch (change.changeType) { case ADDED: case MODIFIED: println("Processing file ${changedFile.name}") outputLocation.parentFile.mkdirs() outputLocation.text = changedFile.readLines().size() case REMOVED: println("Removing leftover output file ${outputLocation.name}") outputLocation.delete() } } } } build.gradle.kts
abstract class CountLoc : TransformAction<TransformParameters.None> { @get:Inject (1) abstract val inputChanges: InputChanges @get:PathSensitive(PathSensitivity.RELATIVE) @get:InputArtifact abstract val input: Provider<FileSystemLocation> override fun transform(outputs: TransformOutputs) { val outputDir = outputs.dir("${input.get().asFile.name}.loc") println("Running transform on ${input.get().asFile.name}, incremental: ${inputChanges.isIncremental}") inputChanges.getFileChanges(input).forEach { change -> (2) val changedFile = change.file if (change.fileType != FileType.FILE) { return@forEach } val outputLocation = outputDir.resolve("${change.normalizedPath}.loc") when (change.changeType) { ChangeType.ADDED, ChangeType.MODIFIED -> { println("Processing file ${changedFile.name}") outputLocation.parentFile.mkdirs() outputLocation.writeText(changedFile.readLines().size.toString()) } ChangeType.REMOVED -> { println("Removing leftover output file ${outputLocation.name}") outputLocation.delete() } } } } } | 1 | Inject InputChanges |
| 2 | Query for changes in the input artifact |
Working in a Multi-repo Environment
Composing builds
What is a composite build?
A composite build is simply a build that includes other builds. In many ways a composite build is similar to a Gradle multi-project build, except that instead of including single projects, complete builds are included.
Composite builds allow you to:
-
combine builds that are usually developed independently, for instance when trying out a bug fix in a library that your application uses
-
decompose a large multi-project build into smaller, more isolated chunks that can be worked in independently or together as needed
A build that is included in a composite build is referred to, naturally enough, as an "included build". Included builds do not share any configuration with the composite build, or the other included builds. Each included build is configured and executed in isolation.
Included builds interact with other builds via dependency substitution. If any build in the composite has a dependency that can be satisfied by the included build, then that dependency will be replaced by a project dependency on the included build. Because of the reliance on dependency substitution, composite builds may force configurations to be resolved earlier, when composing the task execution graph. This can have a negative impact on overall build performance, because these configurations are not resolved in parallel.
By default, Gradle will attempt to determine the dependencies that can be substituted by an included build. However for more flexibility, it is possible to explicitly declare these substitutions if the default ones determined by Gradle are not correct for the composite. See Declaring substitutions.
As well as consuming outputs via project dependencies, a composite build can directly declare task dependencies on included builds. Included builds are isolated, and are not able to declare task dependencies on the composite build or on other included builds. See Depending on tasks in an included build.
Defining a composite build
The following examples demonstrate the various ways that 2 Gradle builds that are normally developed separately can be combined into a composite build. For these examples, the my-utils multi-project build produces 2 different java libraries (number-utils and string-utils), and the my-app build produces an executable using functions from those libraries.
The my-app build does not have direct dependencies on my-utils. Instead, it declares binary dependencies on the libraries produced by my-utils.
Example 189. Dependencies of my-app
my-app/app/build.gradle
plugins { id 'application' } application { mainClass = 'org.sample.myapp.Main' } dependencies { implementation 'org.sample:number-utils:1.0' implementation 'org.sample:string-utils:1.0' } my-app/app/build.gradle.kts
plugins { id("application") } application { mainClass.set("org.sample.myapp.Main") } dependencies { implementation("org.sample:number-utils:1.0") implementation("org.sample:string-utils:1.0") } Defining a composite build via --include-build
The --include-build command-line argument turns the executed build into a composite, substituting dependencies from the included build into the executed build.
Output of gradle --include-build ../my-utils run
> gradle --include-build ../my-utils run > Task :app:processResources NO-SOURCE > Task :my-utils:string-utils:compileJava > Task :my-utils:string-utils:processResources NO-SOURCE > Task :my-utils:string-utils:classes > Task :my-utils:string-utils:jar > Task :my-utils:number-utils:compileJava > Task :my-utils:number-utils:processResources NO-SOURCE > Task :my-utils:number-utils:classes > Task :my-utils:number-utils:jar > Task :app:compileJava > Task :app:classes > Task :app:run The answer is 42 BUILD SUCCESSFUL in 0s 6 actionable tasks: 6 executed
Defining a composite build via the settings file
It's possible to make the above arrangement persistent, by using Settings.includeBuild(java.lang.Object) to declare the included build in the settings.gradle (or settings.gradle.kts in Kotlin) file. The settings file can be used to add subprojects and included builds at the same time. Included builds are added by location. See the examples below for more details.
Defining a separate composite build
One downside of the above approach is that it requires you to modify an existing build, rendering it less useful as a standalone build. One way to avoid this is to define a separate composite build, whose only purpose is to combine otherwise separate builds.
Example 190. Declaring a separate composite
settings.gradle
rootProject.name = 'my-composite' includeBuild 'my-app' includeBuild 'my-utils' settings.gradle.kts
rootProject.name = "my-composite" includeBuild("my-app") includeBuild("my-utils") In this scenario, the 'main' build that is executed is the composite, and it doesn't define any useful tasks to execute itself. In order to execute the 'run' task in the 'my-app' build, the composite build must define a delegating task.
Example 191. Depending on task from included build
build.gradle
tasks.register('run') { dependsOn gradle.includedBuild('my-app').task(':app:run') } build.gradle.kts
tasks.register("run") { dependsOn(gradle.includedBuild("my-app").task(":app:run")) } More details about tasks that depend on included build tasks are below.
Including builds that define Gradle plugins
A special case of included builds are builds that define Gradle plugins. These builds should be included using the includeBuild statement inside the pluginManagement {} block of the settings file. Using this mechanism, the included build may also contribute a settings plugin that can be applied in the settings file itself.
Example 192. Including a plugin build
settings.gradle
pluginManagement { includeBuild '../url-verifier-plugin' } settings.gradle.kts
pluginManagement { includeBuild("../url-verifier-plugin") } Including plugin builds via the plugin management block is an incubating feature. You may also use the stable includeBuild mechanism outside pluginManagement to include plugin builds. However, this does not support all use cases and including plugin builds like that will be deprecated once the new mechanism is stable. |
Restrictions on included builds
Most builds can be included into a composite, including other composite builds. However there are some limitations.
Every included build:
-
must not have a
rootProject.namethe same as another included build. -
must not have a
rootProject.namethe same as a top-level project of the composite build. -
must not have a
rootProject.namethe same as the composite buildrootProject.name.
Interacting with a composite build
In general, interacting with a composite build is much the same as a regular multi-project build. Tasks can be executed, tests can be run, and builds can be imported into the IDE.
Executing tasks
Tasks from the composite build can be executed from the command-line or from your IDE. Executing a task will result in direct task dependencies being executed, as well as those tasks required to build dependency artifacts from included builds.
You call a task in an included build using a fully qualified path, which usually is :included-build-name:subproject-name:taskName. Subproject and task names can be abbreviated. This is not supported for included build names.
$ ./gradlew :included-build:subproject-a:compileJava > Task :included-build:subproject-a:compileJava $ ./gradlew :included-build:sA:cJ > Task :included-build:subproject-a:compileJava
| Included build tasks are automatically executed in order to generate required dependency artifacts, or the including build can declare a dependency on a task from an included build. |
Importing into the IDE
One of the most useful features of composite builds is IDE integration. By applying the idea or eclipse plugin to your build, it is possible to generate a single IDEA or Eclipse project that permits all builds in the composite to be developed together.
In addition to these Gradle plugins, recent versions of IntelliJ IDEA and Eclipse Buildship support direct import of a composite build.
Importing a composite build permits sources from separate Gradle builds to be easily developed together. For every included build, each sub-project is included as an IDEA Module or Eclipse Project. Source dependencies are configured, providing cross-build navigation and refactoring.
Declaring the dependencies substituted by an included build
By default, Gradle will configure each included build in order to determine the dependencies it can provide. The algorithm for doing this is very simple: Gradle will inspect the group and name for the projects in the included build, and substitute project dependencies for any external dependency matching ${project.group}:${project.name}.
By default, substitutions are not registered for the main build. To make the (sub)projects of the main build addressable by ${project.group}:${project.name}, you can tell Gradle to treat the main build like an included build by self-including it: includeBuild("."). |
There are cases when the default substitutions determined by Gradle are not sufficient, or they are not correct for a particular composite. For these cases it is possible to explicitly declare the substitutions for an included build. Take for example a single-project build 'anonymous-library', that produces a java utility library but does not declare a value for the group attribute:
Example 193. Build that does not declare group attribute
When this build is included in a composite, it will attempt to substitute for the dependency module "undefined:anonymous-library" ("undefined" being the default value for project.group, and "anonymous-library" being the root project name). Clearly this isn't going to be very useful in a composite build. To use the unpublished library unmodified in a composite build, the composing build can explicitly declare the substitutions that it provides:
Example 194. Declaring the substitutions for an included build
settings.gradle
rootProject.name = 'declared-substitution' include 'app' // tag::composite_substitution[] includeBuild('anonymous-library') { dependencySubstitution { substitute module('org.sample:number-utils') using project(':') } } // end::composite_substitution[] settings.gradle.kts
rootProject.name = "declared-substitution" include("app") // tag::composite_substitution[] includeBuild("anonymous-library") { dependencySubstitution { substitute(module("org.sample:number-utils")).using(project(":")) } } // end::composite_substitution[] With this configuration, the "my-app" composite build will substitute any dependency on org.sample:number-utils with a dependency on the root project of "anonymous-library".
Cases where included build substitutions must be declared
Many builds will function automatically as an included build, without declared substitutions. Here are some common cases where declared substitutions are required:
-
When the
archivesBaseNameproperty is used to set the name of the published artifact. -
When a configuration other than
defaultis published. -
When the
MavenPom.addFilter()is used to publish artifacts that don't match the project name. -
When the
maven-publishorivy-publishplugins are used for publishing, and the publication coordinates don't match${project.group}:${project.name}.
Cases where composite build substitutions won't work
Some builds won't function correctly when included in a composite, even when dependency substitutions are explicitly declared. This limitation is due to the fact that a project dependency that is substituted will always point to the default configuration of the target project. Any time that the artifacts and dependencies specified for the default configuration of a project don't match what is actually published to a repository, then the composite build may exhibit different behaviour.
Here are some cases where the publish module metadata may be different from the project default configuration:
-
When a configuration other than
defaultis published. -
When the
maven-publishorivy-publishplugins are used. -
When the
POMorivy.xmlfile is tweaked as part of publication.
Builds using these features function incorrectly when included in a composite build. We plan to improve this in the future.
Depending on tasks in an included build
Using these APIs, it is possible to declare a dependency on a task in a particular included build, or tasks with a certain path in all or some of the included builds.
Example 195. Depending on a single task from an included build
build.gradle
tasks.register('run') { dependsOn gradle.includedBuild('my-app').task(':app:run') } build.gradle.kts
tasks.register("run") { dependsOn(gradle.includedBuild("my-app").task(":app:run")) } Example 196. Depending on a task with path in all included builds
build.gradle
tasks.register('publishDeps') { dependsOn gradle.includedBuilds*.task(':publishIvyPublicationToIvyRepository') } build.gradle.kts
tasks.register("publishDeps") { dependsOn(gradle.includedBuilds.map { it.task(":publishMavenPublicationToMavenRepository") }) } Current limitations and future plans for composite builds
Limitations of the current implementation include:
-
No support for included builds that have publications that don't mirror the project default configuration. See Cases where composite builds won't work.
-
Software model based native builds are not supported. (Binary dependencies are not yet supported for native builds).
-
Multiple composite builds may conflict when run in parallel, if more than one includes the same build. Gradle does not share the project lock of a shared composite build to between Gradle invocation to prevent concurrent execution.
Improvements we have planned for upcoming releases include:
-
Making the implicit
buildSrcproject an included build.
Publishing Libraries
Publishing a project as module
The vast majority of software projects build something that aims to be consumed in some way. It could be a library that other software projects use or it could be an application for end users. Publishing is the process by which the thing being built is made available to consumers.
In Gradle, that process looks like this:
-
Define what to publish
-
Define where to publish it to
-
Do the publishing
Each of the these steps is dependent on the type of repository to which you want to publish artifacts. The two most common types are Maven-compatible and Ivy-compatible repositories, or Maven and Ivy repositories for short.
As of Gradle 6.0, the Gradle Module Metadata will always be published alongside the Ivy XML or Maven POM metadata file.
Gradle makes it easy to publish to these types of repository by providing some prepackaged infrastructure in the form of the Maven Publish Plugin and the Ivy Publish Plugin. These plugins allow you to configure what to publish and perform the publishing with a minimum of effort.
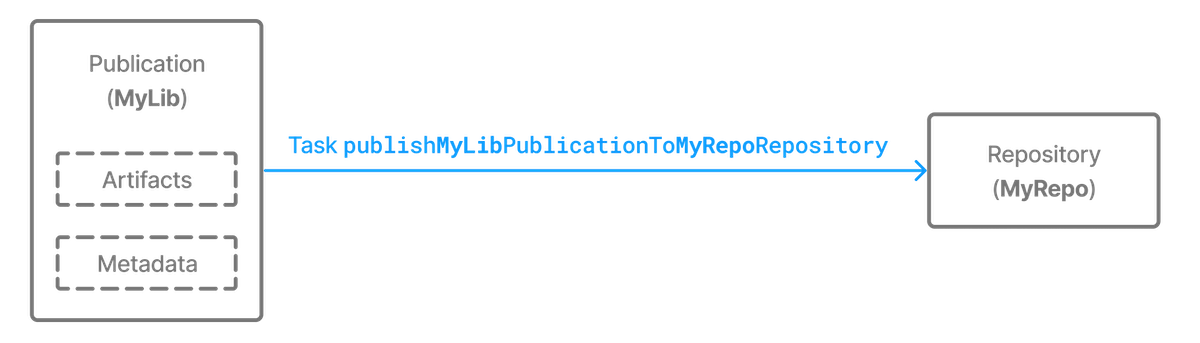
Figure 13. The publishing process
Let's take a look at those steps in more detail:
- What to publish
-
Gradle needs to know what files and information to publish so that consumers can use your project. This is typically a combination of artifacts and metadata that Gradle calls a publication. Exactly what a publication contains depends on the type of repository it's being published to.
For example, a publication destined for a Maven repository includes:
-
One or more artifacts — typically built by the project,
-
The Gradle Module Metadata file which will describe the variants of the published component,
-
The Maven POM file will identify the primary artifact and its dependencies. The primary artifact is typically the project's production JAR and secondary artifacts might consist of "-sources" and "-javadoc" JARs.
In addition, Gradle will publish checksums for all of the above, and signatures when configured to do so. From Gradle 6.0 onwards, this includes
SHA256andSHA512checksums. -
- Where to publish
-
Gradle needs to know where to publish artifacts so that consumers can get hold of them. This is done via repositories, which store and make available all sorts of artifact. Gradle also needs to interact with the repository, which is why you must provide the type of the repository and its location.
- How to publish
-
Gradle automatically generates publishing tasks for all possible combinations of publication and repository, allowing you to publish any artifact to any repository. If you're publishing to a Maven repository, the tasks are of type PublishToMavenRepository, while for Ivy repositories the tasks are of type PublishToIvyRepository.
What follows is a practical example that demonstrates the entire publishing process.
Setting up basic publishing
The first step in publishing, irrespective of your project type, is to apply the appropriate publishing plugin. As mentioned in the introduction, Gradle supports both Maven and Ivy repositories via the following plugins:
-
Maven Publish Plugin
-
Ivy Publish Plugin
These provide the specific publication and repository classes needed to configure publishing for the corresponding repository type. Since Maven repositories are the most commonly used ones, they will be the basis for this example and for the other samples in the chapter. Don't worry, we will explain how to adjust individual samples for Ivy repositories.
Let's assume we're working with a simple Java library project, so only the following plugins are applied:
Example 197. Applying the necessary plugins
build.gradle
plugins { id 'java-library' id 'maven-publish' } build.gradle.kts
plugins { `java-library` `maven-publish` } Once the appropriate plugin has been applied, you can configure the publications and repositories. For this example, we want to publish the project's production JAR file — the one produced by the jar task — to a custom, Maven repository. We do that with the following publishing {} block, which is backed by PublishingExtension:
Example 198. Configuring a Java library for publishing
build.gradle
group = 'org.example' version = '1.0' publishing { publications { myLibrary(MavenPublication) { from components.java } } repositories { maven { name = 'myRepo' url = layout.buildDirectory.dir("repo") } } } build.gradle.kts
group = "org.example" version = "1.0" publishing { publications { create<MavenPublication>("myLibrary") { from(components["java"]) } } repositories { maven { name = "myRepo" url = uri(layout.buildDirectory.dir("repo")) } } } This defines a publication called "myLibrary" that can be published to a Maven repository by virtue of its type: MavenPublication. This publication consists of just the production JAR artifact and its metadata, which combined are represented by the java component of the project.
Components are the standard way of defining a publication. They are provided by plugins, usually of the language or platform variety. For example, the Java Plugin defines the components.java SoftwareComponent, while the War Plugin defines components.web. |
The example also defines a file-based Maven repository with the name "myRepo". Such a file-based repository is convenient for a sample, but real-world builds typically work with HTTPS-based repository servers, such as Maven Central or an internal company server.
| You may define one, and only one, repository without a name. This translates to an implicit name of "Maven" for Maven repositories and "Ivy" for Ivy repositories. All other repository definitions must be given an explicit name. |
In combination with the project's group and version, the publication and repository definitions provide everything that Gradle needs to publish the project's production JAR. Gradle will then create a dedicated publishMyLibraryPublicationToMyRepoRepository task that does just that. Its name is based on the template publishPubNamePublicationToRepoNameRepository. See the appropriate publishing plugin's documentation for more details on the nature of this task and any other tasks that may be available to you.
You can either execute the individual publishing tasks directly, or you can execute publish, which will run all the available publishing tasks. In this example, publish will just run publishMyLibraryPublicationToMavenRepository.
| Basic publishing to an Ivy repository is very similar: you simply use the Ivy Publish Plugin, replace There are differences between the two types of repository, particularly around the extra metadata that each support — for example, Maven repositories require a POM file while Ivy ones have their own metadata format — so see the plugin chapters for comprehensive information on how to configure both publications and repositories for whichever repository type you're working with. |
That's everything for the basic use case. However, many projects need more control over what gets published, so we look at several common scenarios in the following sections.
Suppressing validation errors
Gradle performs validation of generated module metadata. In some cases, validation can fail, indicating that you most likely have an error to fix, but you may have done something intentionally. If this is the case, Gradle will indicate the name of the validation error you can disable on the GenerateModuleMetadata tasks:
Example 199. Disabling some validation errors
build.gradle
tasks.withType(GenerateModuleMetadata).configureEach { // The value 'enforced-platform' is provided in the validation // error message you got suppressedValidationErrors.add('enforced-platform') } build.gradle.kts
tasks.withType<GenerateModuleMetadata> { // The value 'enforced-platform' is provided in the validation // error message you got suppressedValidationErrors.add("enforced-platform") } Understanding Gradle Module Metadata
Gradle Module Metadata is a format used to serialize the Gradle component model. It is similar to Apache Maven™'s POM file or Apache Ivy™ ivy.xml files. The goal of metadata files is to provide to consumers a reasonable model of what is published on a repository.
Gradle Module Metadata is a unique format aimed at improving dependency resolution by making it multi-platform and variant-aware.
In particular, Gradle Module Metadata supports:
-
rich version constraints
-
dependency constraints
-
component capabilities
-
variant-aware resolution
Publication of Gradle Module Metadata will enable better dependency management for your consumers:
-
early discovery of problems by detecting incompatible modules
-
consistent selection of platform-specific dependencies
-
native dependency version alignment
-
automatically getting dependencies for specific features of your library
The specification for Gradle Module Metadata can be found here.
Mapping with other formats
Gradle Module Metadata is automatically published on Maven or Ivy repositories. However, it doesn't replace the pom.xml or ivy.xml files: it is published alongside those files. This is done to maximize compatibility with third-party build tools.
Gradle does its best to map Gradle-specific concepts to Maven or Ivy. When a build file uses features that can only be represented in Gradle Module Metadata, Gradle will warn you at publication time. The table below summarizes how some Gradle specific features are mapped to Maven and Ivy:
| Gradle | Maven | Ivy | Description |
|---|---|---|---|
| dependency constraints | | Not published | Gradle dependency constraints are transitive, while Maven's dependency management block isn't |
| rich version constraints | Publishes the requires version | Published the requires version | |
| component capabilities | Not published | Not published | Component capabilities are unique to Gradle |
| Feature variants | Variant artifacts are uploaded, dependencies are published as optional dependencies | Variant artifacts are uploaded, dependencies are not published | Feature variants are a good replacement for optional dependencies |
| Custom component types | Artifacts are uploaded, dependencies are those described by the mapping | Artifacts are uploaded, dependencies are ignored | Custom component types are probably not consumable from Maven or Ivy in any case. They usually exist in the context of a custom ecosystem. |
Disabling metadata compatibility publication warnings
If you want to suppress warnings, you can use the following APIs to do so:
-
For Maven, see the
suppress*methods in MavenPublication -
For Ivy, see the
suppress*methods in IvyPublication
Example 200. Disabling publication warnings
build.gradle
publications { maven(MavenPublication) { from components.java suppressPomMetadataWarningsFor('runtimeElements') } } build.gradle.kts
publications { register<MavenPublication>("maven") { from(components["java"]) suppressPomMetadataWarningsFor("runtimeElements") } } Interactions with other build tools
Because Gradle Module Metadata is not widely spread and because it aims at maximizing compatibility with other tools, Gradle does a couple of things:
-
Gradle Module Metadata is systematically published alongside the normal descriptor for a given repository (Maven or Ivy)
-
the
pom.xmlorivy.xmlfile will contain a marker comment which tells Gradle that Gradle Module Metadata exists for this module
The goal of the marker is not for other tools to parse module metadata: it's for Gradle users only. It explains to Gradle that a better module metadata file exists and that it should use it instead. It doesn't mean that consumption from Maven or Ivy would be broken either, only that it works in degraded mode.
| This must be seen as a performance optimization: instead of having to do 2 network requests, one to get Gradle Module Metadata, then one to get the POM/Ivy file in case of a miss, Gradle will first look at the file which is most likely to be present, then only perform a 2nd request if the module was actually published with Gradle Module Metadata. |
If you know that the modules you depend on are always published with Gradle Module Metadata, you can optimize the network calls by configuring the metadata sources for a repository:
Example 201. Resolving Gradle Module Metadata only
build.gradle
repositories { maven { url "http://repo.mycompany.com/repo" metadataSources { gradleMetadata() } } } build.gradle.kts
repositories { maven { setUrl("http://repo.mycompany.com/repo") metadataSources { gradleMetadata() } } } Gradle Module Metadata validation
Gradle Module Metadata is validated before being published.
The following rules are enforced:
-
Variant names must be unique,
-
Each variant must have at least one attribute,
-
Two variants cannot have the exact same attributes and capabilities,
-
If there are dependencies, at least one, across all variants, must carry version information.
These rules ensure the quality of the metadata produced, and help confirm that consumption will not be problematic.
Gradle Module Metadata reproducibility
The task generating the module metadata files is currently never marked UP-TO-DATE by Gradle due to the way it is implemented. However, if neither build inputs nor build scripts changed, the task result is effectively up-to-date: it always produces the same output.
If users desire to have a unique module file per build invocation, it is possible to link an identifier in the produced metadata to the build that created it. Users can choose to enable this unique identifier in their publication:
Example 202. Configuring the build identifier of a publication
build.gradle
publishing { publications { myLibrary(MavenPublication) { from components.java withBuildIdentifier() } } } build.gradle.kts
publishing { publications { create<MavenPublication>("myLibrary") { from(components["java"]) withBuildIdentifier() } } } With the changes above, the generated Gradle Module Metadata file will always be different, forcing downstream tasks to consider it out-of-date.
Disabling Gradle Module Metadata publication
There are situations where you might want to disable publication of Gradle Module Metadata:
-
the repository you are uploading to rejects the metadata file (unknown format)
-
you are using Maven or Ivy specific concepts which are not properly mapped to Gradle Module Metadata
In this case, disabling the publication of Gradle Module Metadata is done simply by disabling the task which generates the metadata file:
Example 203. Disabling publication of Gradle Module Metadata
build.gradle
tasks.withType(GenerateModuleMetadata) { enabled = false } build.gradle.kts
tasks.withType<GenerateModuleMetadata> { enabled = false } Signing artifacts
The Signing Plugin can be used to sign all artifacts and metadata files that make up a publication, including Maven POM files and Ivy module descriptors. In order to use it:
-
Apply the Signing Plugin
-
Configure the signatory credentials — follow the link to see how
-
Specify the publications you want signed
Here's an example that configures the plugin to sign the mavenJava publication:
Example 204. Signing a publication
build.gradle
signing { sign publishing.publications.mavenJava } build.gradle.kts
signing { sign(publishing.publications["mavenJava"]) } This will create a Sign task for each publication you specify and wire all publishPubNamePublicationToRepoNameRepository tasks to depend on it. Thus, publishing any publication will automatically create and publish the signatures for its artifacts and metadata, as you can see from this output:
Example: Sign and publish a project
Output of gradle publish
> gradle publish > Task :compileJava > Task :processResources > Task :classes > Task :jar > Task :javadoc > Task :javadocJar > Task :sourcesJar > Task :generateMetadataFileForMavenJavaPublication > Task :generatePomFileForMavenJavaPublication > Task :signMavenJavaPublication > Task :publishMavenJavaPublicationToMavenRepository > Task :publish BUILD SUCCESSFUL in 0s 10 actionable tasks: 10 executed
Customizing publishing
Modifying and adding variants to existing components for publishing
Gradle's publication model is based on the notion of components, which are defined by plugins. For example, the Java Library plugin defines a java component which corresponds to a library, but the Java Platform plugin defines another kind of component, named javaPlatform, which is effectively a different kind of software component (a platform).
Sometimes we want to add more variants to or modify existing variants of an existing component. For example, if you added a variant of a Java library for a different platform, you may just want to declare this additional variant on the java component itself. In general, declaring additional variants is often the best solution to publish additional artifacts.
To perform such additions or modifications, the AdhocComponentWithVariants interface declares two methods called addVariantsFromConfiguration and withVariantsFromConfiguration which accept two parameters:
-
the outgoing configuration that is used as a variant source
-
a customization action which allows you to filter which variants are going to be published
To utilise these methods, you must make sure that the SoftwareComponent you work with is itself an AdhocComponentWithVariants, which is the case for the components created by the Java plugins (Java, Java Library, Java Platform). Adding a variant is then very simple:
Example 205. Adding a variant to an existing software component
InstrumentedJarsPlugin.groovy
AdhocComponentWithVariants javaComponent = (AdhocComponentWithVariants) project.components.findByName("java") javaComponent.addVariantsFromConfiguration(outgoing) { // dependencies for this variant are considered runtime dependencies it.mapToMavenScope("runtime") // and also optional dependencies, because we don't want them to leak it.mapToOptional() } InstrumentedJarsPlugin.kt
val javaComponent = components.findByName("java") as AdhocComponentWithVariants javaComponent.addVariantsFromConfiguration(outgoing) { // dependencies for this variant are considered runtime dependencies mapToMavenScope("runtime") // and also optional dependencies, because we don't want them to leak mapToOptional() } In other cases, you might want to modify a variant that was added by one of the Java plugins already. For example, if you activate publishing of Javadoc and sources, these become additional variants of the java component. If you only want to publish one of them, e.g. only Javadoc but no sources, you can modify the sources variant to not being published:
Example 206. Publish a java library with Javadoc but without sources
build.gradle
java { withJavadocJar() withSourcesJar() } components.java.withVariantsFromConfiguration(configurations.sourcesElements) { skip() } publishing { publications { mavenJava(MavenPublication) { from components.java } } } build.gradle.kts
java { withJavadocJar() withSourcesJar() } val javaComponent = components["java"] as AdhocComponentWithVariants javaComponent.withVariantsFromConfiguration(configurations["sourcesElements"]) { skip() } publishing { publications { create<MavenPublication>("mavenJava") { from(components["java"]) } } } Creating and publishing custom components
In the previous example, we have demonstrated how to extend or modify an existing component, like the components provided by the Java plugins. But Gradle also allows you to build a custom component (not a Java Library, not a Java Platform, not something supported natively by Gradle).
To create a custom component, you first need to create an empty adhoc component. At the moment, this is only possible via a plugin because you need to get a handle on the SoftwareComponentFactory :
Example 207. Injecting the software component factory
InstrumentedJarsPlugin.groovy
private final SoftwareComponentFactory softwareComponentFactory @Inject InstrumentedJarsPlugin(SoftwareComponentFactory softwareComponentFactory) { this.softwareComponentFactory = softwareComponentFactory } InstrumentedJarsPlugin.kt
class InstrumentedJarsPlugin @Inject constructor( private val softwareComponentFactory: SoftwareComponentFactory) : Plugin<Project> { Declaring what a custom component publishes is still done via the AdhocComponentWithVariants API. For a custom component, the first step is to create custom outgoing variants, following the instructions in this chapter. At this stage, what you should have is variants which can be used in cross-project dependencies, but that we are now going to publish to external repositories.
Example 208. Creating a custom, adhoc component
InstrumentedJarsPlugin.groovy
// create an adhoc component def adhocComponent = softwareComponentFactory.adhoc("myAdhocComponent") // add it to the list of components that this project declares project.components.add(adhocComponent) // and register a variant for publication adhocComponent.addVariantsFromConfiguration(outgoing) { it.mapToMavenScope("runtime") } InstrumentedJarsPlugin.kt
// create an adhoc component val adhocComponent = softwareComponentFactory.adhoc("myAdhocComponent") // add it to the list of components that this project declares components.add(adhocComponent) // and register a variant for publication adhocComponent.addVariantsFromConfiguration(outgoing) { mapToMavenScope("runtime") } First we use the factory to create a new adhoc component. Then we add a variant through the addVariantsFromConfiguration method, which is described in more detail in the previous section.
In simple cases, there's a one-to-one mapping between a Configuration and a variant, in which case you can publish all variants issued from a single Configuration because they are effectively the same thing. However, there are cases where a Configuration is associated with additional configuration publications that we also call secondary variants. Such configurations make sense in the cross-project publications use case, but not when publishing externally. This is for example the case when between projects you share a directory of files, but there's no way you can publish a directory directly on a Maven repository (only packaged things like jars or zips). Look at the ConfigurationVariantDetails class for details about how to skip publication of a particular variant. If addVariantsFromConfiguration has already been called for a configuration, further modification of the resulting variants can be performed using withVariantsFromConfiguration.
When publishing an adhoc component like this:
-
Gradle Module Metadata will exactly represent the published variants. In particular, all outgoing variants will inherit dependencies, artifacts and attributes of the published configuration.
-
Maven and Ivy metadata files will be generated, but you need to declare how the dependencies are mapped to Maven scopes via the ConfigurationVariantDetails class.
In practice, it means that components created this way can be consumed by Gradle the same way as if they were "local components".
Adding custom artifacts to a publication
| Instead of thinking in terms of artifacts, you should embrace the variant aware model of Gradle. It is expected that a single module may need multiple artifacts. However this rarely stops there, if the additional artifacts represent an optional feature, they might also have different dependencies and more. Gradle, via Gradle Module Metadata, supports the publication of additional variants which make those artifacts known to the dependency resolution engine. Please refer to the variant-aware sharing section of the documentation to see how to declare such variants and check out how to publish custom components. If you attach extra artifacts to a publication directly, they are published "out of context". That means, they are not referenced in the metadata at all and can then only be addressed directly through a classifier on a dependency. In contrast to Gradle Module Metadata, Maven pom metadata will not contain information on additional artifacts regardless of whether they are added through a variant or directly, as variants cannot be represented in the pom format. |
The following section describes how you publish artifacts directly if you are sure that metadata, for example Gradle or POM metadata, is irrelevant for your use case. For example, if your project doesn't need to be consumed by other projects and the only thing required as result of the publishing are the artifacts themselves.
In general, there are two options:
-
Create a publication only with artifacts
-
Add artifacts to a publication based on a component with metadata (not recommended, instead adjust a component or use a adhoc component publication which will both also produce metadata fitting your artifacts)
To create a publication based on artifacts, start by defining a custom artifact and attaching it to a Gradle configuration of your choice. The following sample defines an RPM artifact that is produced by an rpm task (not shown) and attaches that artifact to the archives configuration:
Example 209. Defining a custom artifact for a configuration
build.gradle
def rpmFile = layout.buildDirectory.file('rpms/my-package.rpm') def rpmArtifact = artifacts.add('archives', rpmFile.get().asFile) { type 'rpm' builtBy 'rpm' } build.gradle.kts
val rpmFile = layout.buildDirectory.file("rpms/my-package.rpm") val rpmArtifact = artifacts.add("archives", rpmFile.get().asFile) { type = "rpm" builtBy("rpm") } The artifacts.add() method — from ArtifactHandler — returns an artifact object of type PublishArtifact that can then be used in defining a publication, as shown in the following sample:
Example 210. Attaching a custom PublishArtifact to a publication
build.gradle
publishing { publications { maven(MavenPublication) { artifact rpmArtifact } } } build.gradle.kts
publishing { publications { create<MavenPublication>("maven") { artifact(rpmArtifact) } } } -
The
artifact()method accepts publish artifacts as argument — likerpmArtifactin the sample — as well as any type of argument accepted by Project.file(java.lang.Object), such as aFileinstance, a string file path or a archive task. -
Publishing plugins support different artifact configuration properties, so always check the plugin documentation for more details. The
classifierandextensionproperties are supported by both the Maven Publish Plugin and the Ivy Publish Plugin. -
Custom artifacts need to be distinct within a publication, typically via a unique combination of
classifierandextension. See the documentation for the plugin you're using for the precise requirements. -
If you use
artifact()with an archive task, Gradle automatically populates the artifact's metadata with theclassifierandextensionproperties from that task.
Now you can publish the RPM.
If you really want to add an artifact to a publication based on a component, instead of adjusting the component itself, you can combine the from components.someComponent and artifact someArtifact notations.
Restricting publications to specific repositories
When you have defined multiple publications or repositories, you often want to control which publications are published to which repositories. For instance, consider the following sample that defines two publications — one that consists of just a binary and another that contains the binary and associated sources — and two repositories — one for internal use and one for external consumers:
Example 211. Adding multiple publications and repositories
build.gradle
publishing { publications { binary(MavenPublication) { from components.java } binaryAndSources(MavenPublication) { from components.java artifact sourcesJar } } repositories { // change URLs to point to your repos, e.g. http://my.org/repo maven { name = 'external' url = layout.buildDirectory.dir('repos/external') } maven { name = 'internal' url = layout.buildDirectory.dir('repos/internal') } } } build.gradle.kts
publishing { publications { create<MavenPublication>("binary") { from(components["java"]) } create<MavenPublication>("binaryAndSources") { from(components["java"]) artifact(tasks["sourcesJar"]) } } repositories { // change URLs to point to your repos, e.g. http://my.org/repo maven { name = "external" url = uri(layout.buildDirectory.dir("repos/external")) } maven { name = "internal" url = uri(layout.buildDirectory.dir("repos/internal")) } } } The publishing plugins will create tasks that allow you to publish either of the publications to either repository. They also attach those tasks to the publish aggregate task. But let's say you want to restrict the binary-only publication to the external repository and the binary-with-sources publication to the internal one. To do that, you need to make the publishing conditional.
Gradle allows you to skip any task you want based on a condition via the Task.onlyIf(org.gradle.api.specs.Spec) method. The following sample demonstrates how to implement the constraints we just mentioned:
Example 212. Configuring which artifacts should be published to which repositories
build.gradle
tasks.withType(PublishToMavenRepository) { onlyIf { (repository == publishing.repositories.external && publication == publishing.publications.binary) || (repository == publishing.repositories.internal && publication == publishing.publications.binaryAndSources) } } tasks.withType(PublishToMavenLocal) { onlyIf { publication == publishing.publications.binaryAndSources } } build.gradle.kts
tasks.withType<PublishToMavenRepository>().configureEach { onlyIf { (repository == publishing.repositories["external"] && publication == publishing.publications["binary"]) || (repository == publishing.repositories["internal"] && publication == publishing.publications["binaryAndSources"]) } } tasks.withType<PublishToMavenLocal>().configureEach { onlyIf { publication == publishing.publications["binaryAndSources"] } } Output of gradle publish
> gradle publish > Task :compileJava > Task :processResources > Task :classes > Task :jar > Task :generateMetadataFileForBinaryAndSourcesPublication > Task :generatePomFileForBinaryAndSourcesPublication > Task :sourcesJar > Task :publishBinaryAndSourcesPublicationToExternalRepository SKIPPED > Task :publishBinaryAndSourcesPublicationToInternalRepository > Task :generateMetadataFileForBinaryPublication > Task :generatePomFileForBinaryPublication > Task :publishBinaryPublicationToExternalRepository > Task :publishBinaryPublicationToInternalRepository SKIPPED > Task :publish BUILD SUCCESSFUL in 0s 10 actionable tasks: 10 executed
You may also want to define your own aggregate tasks to help with your workflow. For example, imagine that you have several publications that should be published to the external repository. It could be very useful to publish all of them in one go without publishing the internal ones.
The following sample demonstrates how you can do this by defining an aggregate task —publishToExternalRepository — that depends on all the relevant publish tasks:
Example 213. Defining your own shorthand tasks for publishing
build.gradle
tasks.register('publishToExternalRepository') { group = 'publishing' description = 'Publishes all Maven publications to the external Maven repository.' dependsOn tasks.withType(PublishToMavenRepository).matching { it.repository == publishing.repositories.external } } build.gradle.kts
tasks.register("publishToExternalRepository") { group = "publishing" description = "Publishes all Maven publications to the external Maven repository." dependsOn(tasks.withType<PublishToMavenRepository>().matching { it.repository == publishing.repositories["external"] }) } Configuring publishing tasks
The publishing plugins create their non-aggregate tasks after the project has been evaluated, which means you cannot directly reference them from your build script. If you would like to configure any of these tasks, you should use deferred task configuration. This can be done in a number of ways via the project's tasks collection.
For example, imagine you want to change where the generatePomFileForPubNamePublication tasks write their POM files. You can do this by using the TaskCollection.withType(java.lang.Class) method, as demonstrated by this sample:
Example 214. Configuring a dynamically named task created by the publishing plugins
build.gradle
tasks.withType(GenerateMavenPom).all { def matcher = name =~ /generatePomFileFor(\w+)Publication/ def publicationName = matcher[0][1] destination = layout.buildDirectory.file("poms/${publicationName}-pom.xml").get().asFile } build.gradle.kts
tasks.withType<GenerateMavenPom>().configureEach { val matcher = Regex("""generatePomFileFor(\w+)Publication""").matchEntire(name) val publicationName = matcher?.let { it.groupValues[1] } destination = layout.buildDirectory.file("poms/${publicationName}-pom.xml").get().asFile } The above sample uses a regular expression to extract the name of the publication from the name of the task. This is so that there is no conflict between the file paths of all the POM files that might be generated. If you only have one publication, then you don't have to worry about such conflicts since there will only be one POM file.
Dependency Management Terminology
Dependency management comes with a wealth of terminology. Here you can find the most commonly-used terms including references to the user guide to learn about their practical application.
Artifact
A file or directory produced by a build, such as a JAR, a ZIP distribution, or a native executable.
Artifacts are typically designed to be used or consumed by users or other projects, or deployed to hosting systems. In such cases, the artifact is a single file. Directories are common in the case of inter-project dependencies to avoid the cost of producing the publishable artifact.
Capability
A capability identifies a feature offered by one or multiple components. A capability is identified by coordinates similar to the coordinates used for module versions. By default, each module version offers a capability that matches its coordinates, for example com.google:guava:18.0. Capabilities can be used to express that a component provides multiple feature variants or that two different components implement the same feature (and thus cannot be used together). For more details, see the section on capabilities.
Component
Any single version of a module.
For external libraries, the term component refers to one published version of the library.
In a build, components are defined by plugins (e.g. the Java Library plugin) and provide a simple way to define a publication for publishing. They comprise artifacts as well as the appropriate metadata that describes a component's variants in detail. For example, the java component in its default setup consists of a JAR — produced by the jar task — and the dependency information of the Java api and runtime variants. It may also define additional variants, for example sources and Javadoc, with the corresponding artifacts.
Configuration
A configuration is a named set of dependencies grouped together for a specific goal. Configurations provide access to the underlying, resolved modules and their artifacts. For more information, see the sections on dependency configurations as well as resolvable and consumable configurations.
| The word "configuration" is an overloaded term and has a different meaning outside of the context of dependency management. |
Dependency
A dependency is a pointer to another piece of software required to build, test or run a module. For more information, see the section on declaring dependencies.
Dependency constraint
A dependency constraint defines requirements that need to be met by a module to make it a valid resolution result for the dependency. For example, a dependency constraint can narrow down the set of supported module versions. Dependency constraints can be used to express such requirements for transitive dependencies. For more information, see the sections on upgrading and downgrading transitive dependencies.
Feature Variant
A feature variant is a variant representing a feature of a component that can be individually selected or not. A feature variant is identified by one or more capabilities. For more information, see the sections on modeling feature variants and optional dependencies.
Module
A piece of software that evolves over time e.g. Google Guava. Every module has a name. Each release of a module is optimally represented by a module version. For convenient consumption, modules can be hosted in a repository.
Module metadata
Releases of a module provide metadata. Metadata is the data that describes the module in more detail e.g. information about the location of artifacts or required transitive dependencies. Gradle offers its own metadata format called Gradle Module Metadata (.module file) but also supports Maven (.pom) and Ivy (ivy.xml) metadata. See the section on understanding Gradle Module Metadata for more information on the supported metadata formats.
Component metadata rule
A component metadata rule is a rule that modifies a component's metadata after it was fetched from a repository, e.g. to add missing information or to correct wrong information. In contrast to resolution rules, component metadata rules are applied before resolution starts. Component metadata rules are defined as part of the build logic and can be shared through plugins. For more information, see the section on fixing metadata with component metadata rules.
Module version
A module version represents a distinct set of changes of a released module. For example 18.0 represents the version of the module with the coordinates com.google:guava:18.0. In practice there's no limitation to the scheme of the module version. Timestamps, numbers, special suffixes like -GA are all allowed identifiers. The most widely-used versioning strategy is semantic versioning.
Platform
A platform is a set of modules aimed to be used together. There are different categories of platforms, corresponding to different use cases:
-
module set: often a set of modules published together as a whole. Using one module of the set often means we want to use the same version for all modules of the set. For example, if using
groovy1.2, also usegroovy-json1.2. -
runtime environment: a set of libraries known to work well together. e.g., the Spring Platform, recommending versions for both Spring and components that work well with Spring.
-
deployment environment: Java runtime, application server, …
In addition Gradle defines virtual platforms.
| Maven's BOM (bill-of-material) is a popular kind of platform that Gradle supports. |
Publication
A description of the files and metadata that should be published to a repository as a single entity for use by consumers.
A publication has a name and consists of one or more artifacts plus information about those artifacts (the metadata).
Repository
A repository hosts a set of modules, each of which may provide one or many releases (components) indicated by a module version. The repository can be based on a binary repository product (e.g. Artifactory or Nexus) or a directory structure in the filesystem. For more information, see Declaring Repositories.
Resolution rule
A resolution rule influences the behavior of how a dependency is resolved directly. Resolution rules are defined as part of the build logic. For more information, see the section on customizing resolution of a dependency directly.
Transitive dependency
A variant of a component can have dependencies on other modules to work properly, so-called transitive dependencies. Releases of a module hosted on a repository can provide metadata to declare those transitive dependencies. By default, Gradle resolves transitive dependencies automatically. The version selection for transitive dependencies can be influenced by declaring dependency constraints.
Variant (of a component)
Each component consists of one or more variants. A variant consists of a set of artifacts and defines a set of dependencies. It is identified by a set of attributes and capabilities.
Gradle's dependency resolution is variant-aware and selects one or more variants of each component after a component (i.e. one version of a module) has been selected. It may also fail if the variant selection result is ambiguous, meaning that Gradle does not have enough information to select one of multiple mutual exclusive variants. In that case, more information can be provided through variant attributes. Examples of variants each Java components typically offers are api and runtime variants. Others examples are JDK8 and JDK11 variants. For more information, see the section on variant selection.
Variant Attribute
Attributes are used to identify and select variants. A variant has one or more attributes defined, for example org.gradle.usage=java-api, org.gradle.jvm.version=11. When dependencies are resolved, a set of attributes are requested and Gradle finds the best fitting variant(s) for each component in the dependency graph. Compatibility and disambiguation rules can be implemented for an attribute to express compatibility between values (e.g. Java 8 is compatible with Java 11, but Java 11 should be preferred if the requested version is 11 or higher). Such rules are typically provided by plugins. For more information, see the sections on variant selection and declaring attributes.
Posted by: thersathersastickrathe0269311.blogspot.com
Source: https://docs.gradle.org/current/userguide/dependency_management.html

Post a Comment for "Filecollection Org Pdf Signing Naturally Download"